Drive Shaft and Axle
Repair Procedures
In this manual: Drive Shaft and Axle
12steps
~72min
3/5difficulty
Done 0 of 12
DEPOSIT
- After making alignment marks on the companion flange yoke and the final drive gear, remove the propeller shaft mounting bolts (A).
Tightening torque: 49.0 ~ 69 N·m

- Loosen the center bearing support mounting bolts.
Tightening torque: 49.0 ~ 64 N·m

- After making reference marks on the companion flange yoke and the differential, remove the propeller shaft mounting bolts.
Tightening torque: 49.0 ~ 69 N·m
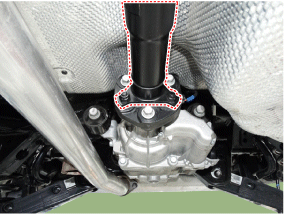
- To install, perform the removal procedure in reverse order.
Inspection
Flexible Coupling Joint- Check the flexible couplings for cracks or damage, front and rear.
- Check the centering sleeve of the flexible coupling. If the sleeve is damaged, replace the propeller shaft assembly.

- Install a dial indicator so that its plunger contacts the center of the front or rear propeller shaft.
- Check the runout by slowly turning the propeller shaft. Repeat the same procedure for the other propeller shaft.
Front propeller shaft runout: 0.3 mm (0.012 in.)

- Place the transmission in Neutral or N.
- Raise the vehicle and make sure it is securely supported.
- Check the CV joint boot (A). If the CV joint boot is damaged, replace the drive shaft.

- Check for excessive play in the CV joint. If so, the drive shaft must be replaced.
Test yourself
A quick Hyundai Tucson quiz: every answer comes with an explanation and a link to the manual page.
Was this page helpful?