Heating, Ventilation, and Air Conditioning
Defog Actuator Repair Procedures
In this manual: Heating, Ventilation, and Air Conditioning
19steps
~114min
4/5difficulty
Done 0 of 19
Inspection
- Ignition "OFF".
- Disconnect the auto defog control actuator connector.
- Make sure the auto defog actuator operates in the defrost mode ON when 12 V is applied to terminal 3 and terminal 7 is grounded.
- Make sure the auto defog control actuator operates in the defog OFF mode when the polarity is reversed.

1. -
2. -
3. DEF (open)
4. Sensor F\REF (+5V)5. Feedback signal
6. Sensor ground
7. DEF (close) - Check the voltage between terminals 5 and 6.
Door Position Voltage (5-6) Fault Detection Defog (OFF) 0.3 ± 0.15 V Low voltage: 0.1 V or less Defog (ON) 4.7 ± 0.15 V High voltage: 4.9 V or more
It transmits the current position of the actuator to the control unit. - If the measured voltage does not meet the specification, replace with a known good auto defog actuator and check that it operates correctly.
- If the problem is resolved, replace the auto defog actuator.
Replacement
- Remove the side cover (A).

- Remove the console side cover [RH] (A).

- Remove the lower airbag cover (A) and disconnect the connector (B).

- Disconnect the damper (B) from the glove box (A), then remove the glove box lift (C).

- Disconnect the pin (A), then remove the glove box (B).

- Remove the glove box housing (A) by loosening the mounting screws.

- Disconnect the trunk lock switch connector (A) and the glove box lamp connector (B).

- Disconnect the glove box switch connector (A).

- Remove the shower duct (A).

- Disconnect the auto defog actuator connector (A).
- Loosen the mounting screws and remove the console temperature control actuator (B).
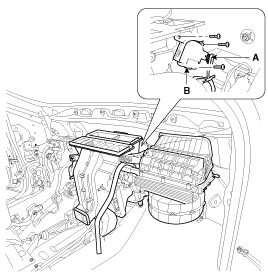
- Installation is the reverse of removal.
Test yourself
A quick Kia Cadenza VG Owner's Manual quiz: every answer comes with an explanation and a link to the manual page.
Was this page helpful?