Heating, Ventilation, and Air Conditioning
Heater Repair Procedures
In this manual: Heating, Ventilation, and Air Conditioning
23steps
~138min
5/5difficulty
Done 0 of 23
Replacement
- Disconnect the negative (-) battery terminal.
- Charge the refrigerant using the refrigerant recovery/recycling/charging station.
- When the engine has cooled, drain the engine coolant from the radiator.
- Remove the expansion valve cover (A).

- Remove the bolts (A) and the expansion valve (B) from the evaporator core. Plug or cap the lines immediately after disconnecting them to prevent moisture and dust from entering.
Tightening torque: 7.8 ~ 11.7 N·m

- Disconnect the inlet (C) and outlet (D) heater hoses from the heater unit.

- Remove the floor console assembly. (Refer to Group BD - "Console")
- Remove the steering wheel. (Refer to Group CC - "Steering Column")
- Loosen the hood cross member mounting bolts (A).
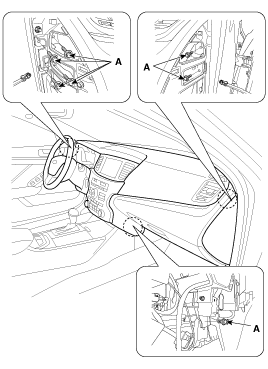
- Disconnect the right main wiring harness connectors (A).

- Disconnect the lift junction box connectors (A).

- Disconnect the left main connectors (A).

- Loosen the heater and blower unit mounting bolts (A), then remove the heater and blower unit.

- Remove the ambient sensor hose (A).

- Disconnect the heater and blower unit (A) from the airbag.
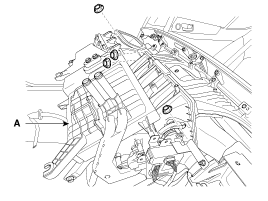
- Remove the blower unit from the heater unit (A) after removing the 3 screws.

- Loosen the mounting screw and remove the heater core cover (A).

- Remove the heater core (A) from the heater unit.

- Loosen the lower heater cover mounting screws and remove the lower heater cover (A).
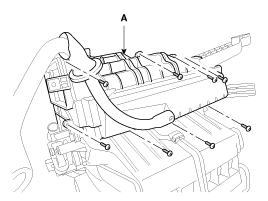
- Remove the evaporator core (A).
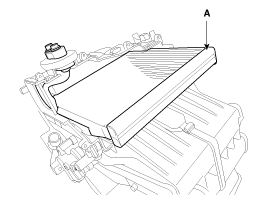
- Be careful not to bend the inlet and outlet pipes when removing the heater core, and pull out the heater core.
- Installation is the reverse of removal.
- Installation is the reverse of removal. Note the following points:
- If installing a new evaporator, add refrigerant oil (ND-OIL8).
- Replace the O-rings with new ones at each fitting and apply a thin coat of refrigerant oil before installation. Be sure to use the correct O-rings for R-134a to prevent leakage.
- Immediately after use, close the container with its cap to prevent moisture absorption.
- Do not spill refrigerant oil on the vehicle; it may damage the paint. If refrigerant oil gets on the paint, wash it off immediately.
- Apply sealant to the bushings.
- Check that there is no air leakage.
- Charge the system and check that it operates properly.
- Do not reverse the inlet and outlet heater hoses, and securely install the hose clamps.
- Fill the cooling system with engine coolant.
Test yourself
A quick Kia Cadenza VG Owner's Manual quiz: every answer comes with an explanation and a link to the manual page.
Was this page helpful?