Tire Replacement
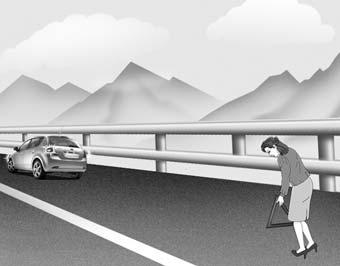
1. Park on a level surface and firmly apply the parking brake.
2. Shift the gear selector lever to P (Park).
3. Turn on the hazard warning flashers.
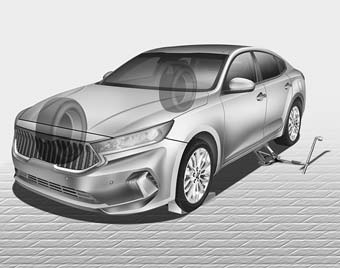
4. Remove the wheel nut wrench, jack and spare tire from the vehicle.
5. Chock the front and rear wheel diagonally opposite the jacking position.
WARNING - Jack Position
To reduce the possibility of injury, be sure to use only the jack provided with the vehicle in the correct jacking position; never use any other part of the vehicle to support the jack.
CAUTION - Tire Change
- To prevent the vehicle from moving during a tire change, always fully apply the parking brake and always chock the wheel diagonally opposite the wheel being changed.
- We recommend that the vehicle wheels be chocked and that no one remain in the vehicle while it is being jacked.
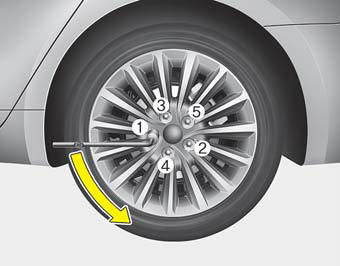
6. Loosen the wheel nuts counterclockwise one turn each, but do not remove the nuts until the tire has been raised off the ground.
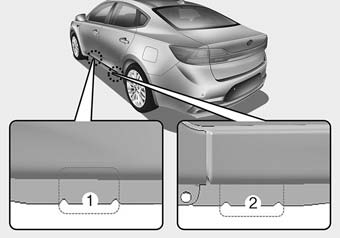
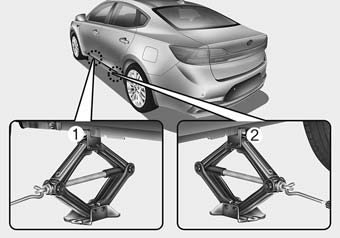
7. Place the jack at the front (1) or rear (2) jacking position closest to the tire being changed. Place the jack at the specified locations under the frame. The jacking positions are plates welded to the frame with two protrusions and a raised point to align with the jack.
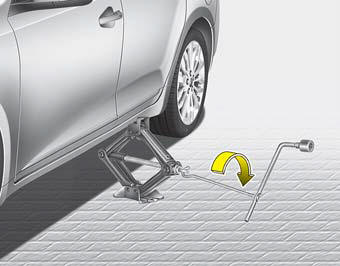
8. Insert the wheel nut wrench into the jack and turn it clockwise, raising the vehicle until the tire clears the ground. This distance is approximately 1 in (30 mm).
Before removing the wheel nuts, make sure the vehicle is stable and there is no chance of movement or slipping.
9. Loosen the wheel nuts and remove them by hand. Remove the wheel from the studs and place it flat so it cannot roll away. To install the spare wheel, lift it onto the hub, align the holes with the studs and slide the wheel onto them. If this is difficult, raise the wheel slightly and align the upper hole in the wheel with the upper stud. Rock the wheel back and forth until it slides over the other studs.
Wheels may have sharp edges. Handle them carefully to avoid possible serious injury. Before installing the wheel, make sure there is nothing on the hub or wheel (such as dirt, resin, gravel, etc.) that would prevent the wheel from seating flat against the hub.
CAUTION - Wheel Installation
Make sure the wheel makes good contact with the hub when installed. If the contact mounting surface between the wheel and hub is not correct, the wheel nuts may loosen and the wheel may come off. Loss of a wheel may result in loss of vehicle control.
10. To install the wheel, hold it by the studs, place the wheel nuts on the studs and tighten them snug by hand. Rock the tire to make sure it is fully seated, then tighten the nuts by hand as far as possible again.
11. Insert the wrench into the jack and lower the vehicle to the ground by turning the wheel nut wrench counterclockwise.
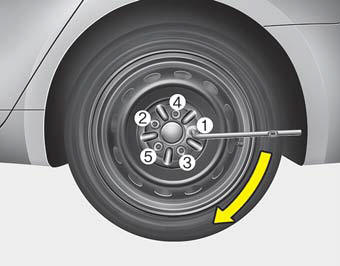
Position the wrench as shown in the illustration and tighten the wheel nuts. Make sure the socket is fully engaged over the nut. Do not stand on the wrench handle or use an extension pipe over the wrench handle. Tighten each nut in the numerical sequence shown in the illustration, working around the wheel, until all are tight. Check each nut again for tightness. After replacing the wheel, have the wheel nuts tightened to the correct torque at an authorized Kia dealer as soon as possible.
Wheel nut tightening torque: 79~94 lbf·ft (11~13 kgf·m)
If you have a tire pressure gauge, remove the valve cap and check the air pressure. If the pressure is lower than recommended, drive slowly to the nearest service station and inflate to the correct pressure. If it is too high, release air until it is correct. Always reinstall the valve cap after checking or adjusting tire pressure. If the cap is not reinstalled, dirt and debris may enter the valve and air may leak from the tire. If you lose the valve cap, purchase a new one and install it as soon as possible.
After changing the wheel, always secure the flat tire in its place and return the jack and tools to their proper storage locations.
WARNING - Reusing Wheel Nuts
Make sure that when rotating the wheel, the removed nuts are reinstalled, or if replaced, that the nuts have metric threads and the same seat configuration is used. Your vehicle has metric threads on the wheel studs and nuts. Installing a non-metric thread nut on a metric stud will not properly secure the wheel to the hub and will damage the stud, so it must be replaced.
Note that most aftermarket nuts do not have metric threads. Be extremely careful when checking the thread type before installing aftermarket nuts or wheels. If in doubt, consult an authorized Kia dealer.
WARNING - Wheel Studs
If the studs are damaged, they may lose their ability to hold the wheel. This may result in loss of the wheel and a collision, which could cause serious injury.
To prevent the jack, wheel nut wrench, and spare tire from rattling while driving, store them properly.
Check the tire pressure as soon as possible after installing the spare tire. Adjust it to the specified pressure if necessary. Refer to "Tires and Wheels" in Section 7.
Test yourself
A quick Kia Cadenza VG Owner's Manual quiz: every answer comes with an explanation and a link to the manual page.