Body (Interior and Exterior)
Crash Pad Repair Procedures
Done 0 of 81
Replacement
Cluster Replacement
- Using a flat-tip screwdriver, wrap protective tape around the tip and apply protective tape around the relevant parts to prevent damage.
- Wear gloves to protect your hands.
|
Using a screwdriver or remover, remove the center fascia lower panel (A).

Remove the car hose (A).
Disconnect the connectors of the heater and air conditioning control unit (B) from the center fascia lower panel.

Using a screwdriver or removal tool, remove the [RH] trim panel (A).
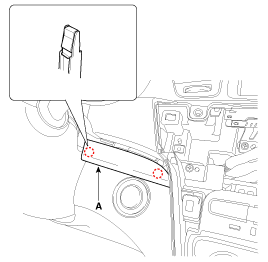
Using a screwdriver or removal tool, remove the center airbag trim (A).

Using a screwdriver or remover, remove the crash pad side cover (A). [LH]

Loosen the mounting screw and remove the [LH] trim panel (A).

Loosen the mounting screw and remove the instrument cluster front panel (A).

Loosen the mounting screws and remove the cluster unit (A).

Disconnect the connector (A).

Installation is the reverse of removal.
- Make sure the connector is properly connected.
- Replace any damaged clips.
|
Center Fascia Panel Replacement
[Center Fascia Lower Panel]
- Using a flat-tip screwdriver, wrap protective tape around the tip and apply protective tape around the relevant parts to prevent damage.
- Wear gloves to protect your hands.
|
Using a screwdriver or remover, remove the center fascia lower panel (A).
Remove the car hose (A).
Disconnect the connectors of the heater and air conditioning control unit (B) from the center fascia lower panel.
Installation is the reverse of removal.
- Make sure the connector is properly connected.
- Replace any damaged clips.
|
[Center Fascia, Upper Panel]
- Using a flat-tip screwdriver, wrap protective tape around the tip and apply protective tape around the relevant parts to prevent damage.
- Wear gloves to protect your hands.
|
Remove the cluster fascia.
Loosen the mounting screws and remove the center fascia upper panel (A).

Installation is the reverse of removal.
- Replace any damaged clips.
|
Crash Pad Lower Panel Replacement
- Using a flat-tip screwdriver, wrap protective tape around the tip and apply protective tape around the relevant parts to prevent damage.
- Wear gloves to protect your hands.
|
Using a screwdriver or remover, remove the crash pad side cover (A). [LH]
Loosen the mounting screws, then remove the crash pad lower panel (A).

Disconnect the connectors (A).

Installation is the reverse of removal.
- Make sure the connector is properly connected.
- Replace any damaged clips.
|
AVN Head Unit Replacement
- Using a flat-tip screwdriver, wrap protective tape around the tip and apply protective tape around the relevant parts to prevent damage.
- Wear gloves to protect your hands.
|
Remove the center fascia lower panel.
Loosen the mounting screws and remove the AVN head unit (A).

Disconnect the connectors (A) from the AVN head unit.

Installation is the reverse of removal.
- Make sure the connector is properly connected.
- Replace any damaged clips.
|
Heater and Air Conditioning Control Unit Replacement
- Using a flat-tip screwdriver, wrap protective tape around the tip and apply protective tape around the relevant parts to prevent damage.
- Wear gloves to protect your hands.
|
Remove the center fascia lower panel.
Loosen the mounting screws and remove the heater and air conditioning control unit (A) from the center fascia lower panel.

Installation is the reverse of removal.
- Make sure the connector is properly connected.
- Replace any damaged clips.
|
LCD Monitor Replacement
- Using a flat-tip screwdriver, wrap protective tape around the tip and apply protective tape around the relevant parts to prevent damage.
- Wear gloves to protect your hands.
|
Remove the center fascia upper panel.
Loosen the mounting screws and remove the LCD monitor (A).

Disconnect the connectors (A) from the LCD monitor.

Installation is the reverse of removal.
- Make sure the connector is properly connected.
- Replace any damaged clips.
|
Glove Box Housing Replacement
- Using a flat-tip screwdriver, wrap protective tape around the tip and apply protective tape around the relevant parts to prevent damage.
- Wear gloves to protect your hands.
|
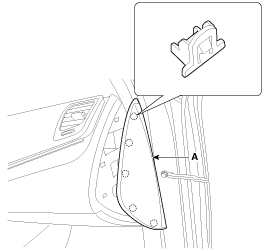
Using a screwdriver or removal tool, remove the side cover of the airbag (A). [RH]
Disconnect the plug (B) from the glove box (A).

Disconnect the air duct (A) from the glove box (B).

Disconnect the pins (A) and remove the glove box (B).

Loosen the mounting screws and remove the lower cover protector [RH] (A).

Disconnect the under lamp connector (A).

Loosen the mounting screws and remove the glove box housing (A).

Disconnect the trunk lock switch connector (A) and the glove box lamp connector (B).

Disconnect the glove box switch connector (A).

Installation is the reverse of removal.
- Make sure the connector is properly connected.
- Replace any damaged clips.
|
Steering Column Shroud Panel Replacement
[Steering Column Cover Lower Panel]
- Using a flat-tip screwdriver, wrap protective tape around the tip and apply protective tape around the relevant parts to prevent damage.
- Wear gloves to protect your hands.
|
Remove the airbag lower panel.
Loosen the mounting screws and remove the steering column lower shroud panel (A).

Installation is the reverse of removal.
- Replace any damaged clips.
|
[Steering Column Cover Upper Panel]
- Using a flat-tip screwdriver, wrap protective tape around the tip and apply protective tape around the relevant parts to prevent damage.
- Wear gloves to protect your hands.
|
Remove the cluster fascia.
Installation is the reverse of removal.
- Replace any damaged clips.
|
Crash Pad Side Cover Replacement
- Using a flat-tip screwdriver, wrap protective tape around the tip and apply protective tape around the relevant parts to prevent damage.
- Wear gloves to protect your hands.
|
Using a screwdriver or remover, remove the crash pad side cover (A). [LH]
[RH]
Installation is the reverse of removal.
- Replace any damaged clips.
|
Main Airbag Assembly Replacement
- Using a flat-tip screwdriver, wrap protective tape around the tip and apply protective tape around the relevant parts to prevent damage.
- Wear gloves to protect your hands.
|
Remove the following components:
- Front pillar garnish (Refer to Group BD - "Interior Trim")
- Hood side trim (Refer to Group BD - "Interior Trim")
- Floor console assembly (Refer to Group BD - "Consoles")
- Center Fascia Lower Panel
- Cluster Fascia Panel
- Cluster Assembly
- Audio or AVN Head Unit
- Center Fascia Upper Panel
- LCD Monitor Assembly
- Crash Pad Lower Panel
- Glove Box Housing
Remove the steering wheel. (Refer to Group ST - "Steering Wheel")
Remove the multifunction switch assembly. (Refer to Group BE - "Multifunction Switch")
Using a screwdriver or remover, remove the center speaker grille (A).

Loosen the mounting screws and remove the center speaker (A).

Disconnect the center speaker connector (A).

Using a screwdriver or puller, remove the photo sensor (A).
Disconnect the photo sensor connector (B).

Loosen the mounting screws and remove the cube (A).

Disconnect the cubis connector (A).

Loosen the mounting screws and remove the center airbag panel (A).

Loosen the mounting screws and remove the ignition key bezel (A).

Disconnect the connector of the start/stop button (A).

Using a screwdriver or remover, remove the airbag switch assembly (A).
Disconnect the crash pad switch connector (B).

Loosen the mounting bolts.
Disconnect the passenger airbag connectors (A).

Loosen the mounting screw, bolts and nuts, then remove the main airbag assembly (A).

Installation is the reverse of removal.
- Make sure the crash pad cover is correctly installed on the guide pins.
- Before tightening the bolts, make sure the airbag wire harness is not pinched.
- Make sure the connectors are connected correctly and the antenna wire is connected properly.
- Enter the radio anti-theft code, then enter the customer's preset radio stations.
|
Cowl Cross Bar Assembly Replacement
- Using a flat-tip screwdriver, wrap protective tape around the tip and apply protective tape around the relevant parts to prevent damage.
- Wear gloves to protect your hands.
|
Remove the hood latch cover. (Refer to Group BD — "Hood Latch Cover")
Remove the main airbag assembly. (Refer to Group BD - "Crash Pad")
Disconnect the steering column connectors. (Refer to Group ST - "Steering Column and Shaft")
Down the steering column after loosening the mounting bolts. (Refer to Group ST - "Steering Column and Shaft")
Disconnect the connectors from the fan unit.
Disconnect the wiring connectors. [Driver]

[Passenger]

Disconnect the connectors.

Loosen the mounting bolt, then remove the duct (A).

Disconnect the clips securing the airbag connectors (A).

Disconnect the connectors (A) from the mounting clips.

Loosen the mounting bolts and nuts, then remove the hood cross member assembly (A).

Installation is the reverse of removal.
- Make sure the crash pad cover is correctly installed on the guide pins.
- Before tightening the bolts, make sure the airbag wire harness is not pinched.
- Make sure the connectors are connected correctly and the antenna wire is connected properly.
- Enter the radio anti-theft code, then enter the customer's preset radio stations.
|
?
Test yourself
A quick Kia Cadenza VG Owner's Manual quiz: every answer comes with an explanation and a link to the manual page.
Was this page helpful?
