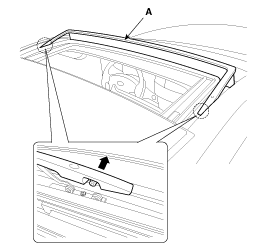
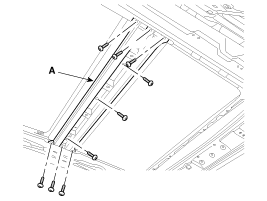
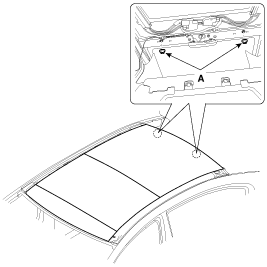
Loosen the mounting screws, then remove the sliding glass (A).
Do not damage the screws.
Installation is the reverse of removal.
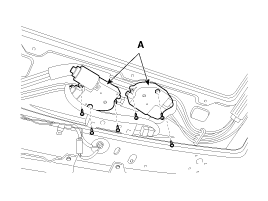
Motor Replacement
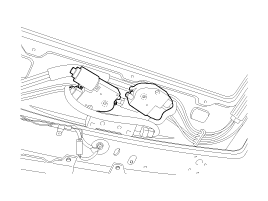
Check the guide position, whether it is closed or not, when removing the motor.
Remove the headliner. (Refer to Group BD - "Roof Trim")
Loosen the mounting screws, then remove the motor (A).
Installation is the reverse of removal.
Be sure to initialize the motor.
Fully open the sliding glass.
Using a screwdriver or remover, remove the roof moulding (A).
The roof molding must be replaced with a new part.
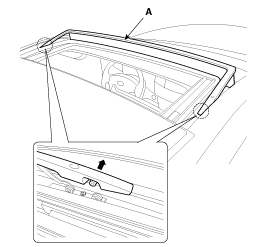
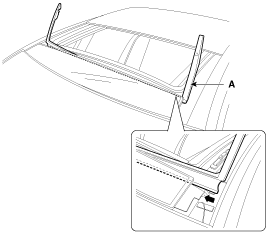
Remove the wind deflector mounting bracket (A).
Remove the wind deflector bar (A).
Installation is the reverse of removal.
Wind Deflector Replacement, Roll Blind Replacement
[Removal]
Loosen the mounting screws, then remove the lower roll blind bracket (A).
Remove the roll blind (A) by pulling it at a right angle.
When removing the blind, be careful that the edge (C) does not strike the vehicle frame due to roll blind tension.
[Installation]
Install the sunshade (A).
When installing the roll blind bracket, install the roll blind by feel, pulling approximately 15~20 cm (5.9055~7.8740 in.), because the screw (B) is marked with a dotted line on the roll blind.
When the roll blind tension is released, press the edge (C), turn it counterclockwise 19~21, and install it after removing the pusher.
Install the screws to the lower roll blind bracket (A).
Panoramic Roof Assembly Replacement
[Removal]
Remove the following components:
Front Seat (Refer to Group BD - "Front Seat")
Rear Seat (Refer to Group BD - "Rear Seat")
Interior Trim (Refer to Group BD - "Interior Trim")
Roof Trim (Refer to Group BD - "Roof Trim")
Rear Window Glass (Refer to Group BD - "Rear Window Glass")
Roof Antenna (Refer to Group BE - "AVN Head Unit")
Loosen the sunroof mounting nuts (A).
Tightening torque: 19.6 - 29 N·m
[Front][Rear]
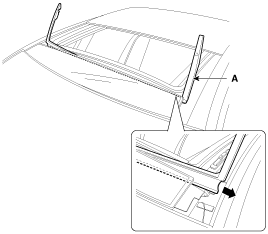
Using a screwdriver or remover, remove the roof moulding (A).
The roof molding must be replaced with a new part.
Fully open the sliding glass.
Remove the wind deflector mounting bracket (A).
Remove the wind deflector bar (A).
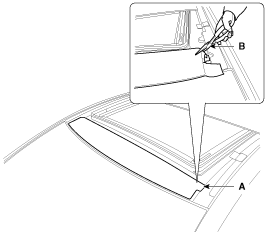
Apply tape to the front glass (A) to break it.
Hold the corner of the front glass (A) with pliers (B), then break it by applying force to the pliers handles.
Be careful of broken glass fragments.
Remove the broken front glass (A) from the vehicle.
Carefully and safely remove all broken glass fragments from the vehicle.
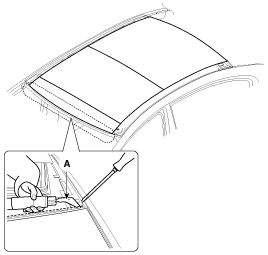
Open the gap between the body and the sunroof using a flat-head screwdriver, then cut the front sealant using the tool (09816-2P121, 09816-2P122) (A).
This blade is angled upward. (09816-2P121, 09816-2P122)
This blade tends to push downward. (09816-2P123, 09816-2P124)
Be careful not to damage the sunroof when opening the gap between the body and the sunroof using a flat-head screwdriver.
Open the gap between the body and the sunroof using a flat-head screwdriver, then use the tool (09816-2P121, 09816-2P122) (A).
This blade is angled upward. (09816-2P121, 09816-2P122)
This blade tends to push downward. (09816-2P123, 09816-2P124)
Be careful not to damage the sunroof when opening the gap between the body and the sunroof using a flat-head screwdriver.
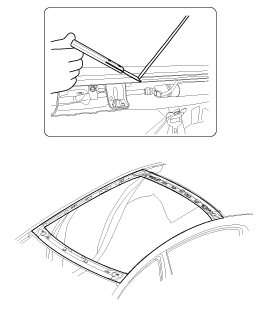
Open the gap between the body and the sunroof using a flat-head screwdriver, then cut the rear sealant using the tool (09816-2P127) (A).
Be careful not to break the center hole (B).
Be careful not to break the nut hole (C).
Be careful not to damage the sunroof when opening the gap between the body and the sunroof using a flat-head screwdriver.
Cut the tape between the sunroof and the body, then remove the sunroof (A).
When installing the sunroof, work with four people.
[Installation]
Using a utility knife, scrape off the old adhesive to a thickness of approximately 2 mm (0.08 in.) on the mating surface around the entire sunroof flange.
Do not scrape down to the painted body surface; damaged paint will interfere with proper bonding.
Remove the grommet and clips from the body.
Mask the surrounding surfaces before painting.
Clean the body bonding surface with a sponge moistened with alcohol. After cleaning, make sure that oil, grease, and water do not contaminate the clean surface.
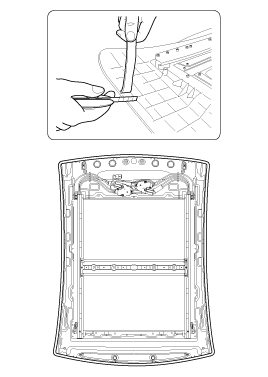
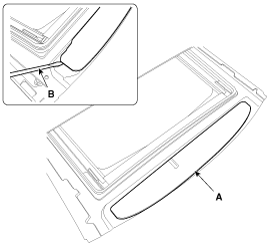
Using a utility knife (B), remove the left glass parts of the sunroof panel (A).
Using a sponge, apply a thin coat of body primer over the original adhesive remaining around the windshield opening flange. Allow the body primer to dry for at least 10 minutes:
Do not apply glass primer to the body. Be careful not to mix up the glass primer and body primer sponges.
Never touch primed surfaces with your hands.
Mask the surrounding surfaces before painting.
Apply a thin layer of glass primer to the outer side of the fasteners.
Never touch the primed surface with your hands. If you do, the adhesive may not bond properly to the glass, causing a leak after the windshield is installed.
Do not apply body primer to the glass.
Keep water, dust, and abrasive materials off the primer.
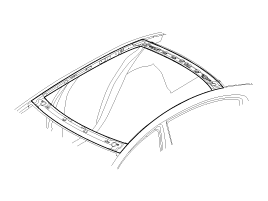
Pack the adhesive into the cartridge without air pockets to ensure continuous delivery. Place the cartridge in the sealant gun and apply a bead of sealant (B) along the edge of the sunroof (A), as shown in the illustration. Apply the adhesive within 30 minutes after applying the glass primer. Make the bead slightly thicker at each corner.
Secure the sunroof to the center shelf (A) of the body, then carefully install the sunroof onto the body frame.
When installing the sunroof, work with four people.
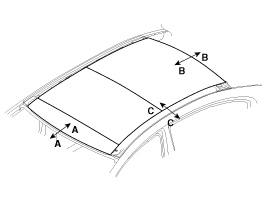
After installing the panoramic roof, check the gap and flush on each side.
Section
Sale
Gap
Front Edge
A-A
2±1 mm
7.5±1 mm
(0.0787 ± 0.0394 in.)
(0.2953 ± 0.0394 in.)
Rear Edge
B-B
1.2±1 mm
5±1 mm
(0.0472 ± 0.0394 in.)
(0.1969 ± 0.0394 in.)
Side edge
C-C
0±1 mm
4.1±1 mm
(0 ± 0.0394 in.)
(0.1614 ± 0.0394 in.)
Install the nuts (A) to the sunroof.
Tightening torque: 19.6 - 29 N·m
[Front][Rear]
Fully open the sliding glass.
Pack the adhesive into the cartridge without air pockets to ensure continuous delivery. Place the cartridge in the sealant gun and run a sealant bead (B) along the edge of the new front glass (A), as shown. Apply the adhesive within 30 minutes after priming the glass. Make the bead slightly thicker at each corner.
Install the front glass (A).
Install the wind deflector bar (A).
Install the wind deflector mounting bracket (A).
Install the roof molding (A).
The roof molding must be replaced with a new part.
Fully close the sliding glass.
After installing the front glass (A), check the gap and flush on each side.
Section
Sale
Gap
Front Edge
A-A
2±1 mm
7.5±1 mm
(0.0787 ± 0.0394 in.)
(0.2953 ± 0.0394 in.)
Rear Edge
B-B
0±1 mm
4.5±1 mm
(0 ± 0.0394 in.)
(0.1772 ± 0.0394 in.)
Side edge
C-C
0±1 mm
0 mm
(0 ± 0.0394 in.)
(0 in.)
Scrape or wipe off excess adhesive with a spatula or a clean towel. To remove adhesive from painted surfaces or the windshield, wipe with a soft cloth moistened with alcohol.
Allow the adhesive to dry for at least one hour, then spray water over the roof and check for leaks. If a leak occurs, allow it to dry, then seal with sealant:
Allow the vehicle to stand for at least four hours after windshield installation. If the vehicle must be driven within 4 hours, drive it slowly.
Keep the windshield dry for the first hour after installation.
Install all remaining removed parts. Install the rear view mirror after the adhesive has fully dried. Advise the customer not to do the following things for two to three days:
Close doors gently and raise all windows.
Excessive body twisting (for example, when driving onto or off of an angled road surface or over uneven roads).
Installation of the Following Components
Roof Antenna (Refer to Group BE - "AVN Head Unit")
Rear Window Glass (Refer to Group BD - "Rear Window Glass")
Roof Trim (Refer to Group BD - "Roof Trim")
Interior Trim (Refer to Group BD - "Interior Trim")
Rear Seat (Refer to Group BD - "Rear Seat")
Front Seat (Refer to Group BD - "Front Seat")
Adjustment
Glass Alignment Inspection
Check for abnormal noise or binding during operation.
With the sunroof fully closed, check for water leaks.
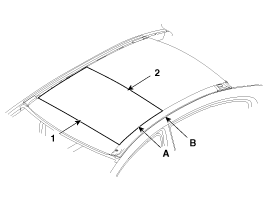
The roof panel (A) must be flush with the sliding glass (B) seal, within the standard value "E" around the entire perimeter. If not, perform the following adjustment. Tightening Torque: Standard value "E" [mm (in.)] (1) Front edge: 1.2 mm (0.0472 in.) (2) Rear edge: 1.0 mm (0.0394 in.)
If the position is not as specified, slightly loosen the glass adjusting screws (A) to adjust the glass height, then tighten them.
Do not damage the screws.
Turn the ignition switch to ON and fully close the panoramic sunroof.
Turn the ignition switch to ON and fully close the panoramic sunroof.
Press and hold the CLOSE button for more than 10 seconds until the sunroof moves slightly.
Release the sunroof control lever.
Press and hold the CLOSE button again until the sunroof does the following.
Tilt → Slide Open → Slide Close. Then release the lever.
The panoramic roof reset procedure is complete.
At the time of manufacture.
If the initial setting is erased due to loss of power.
After using the manual handle.
Use the sunroof emergency handle to close and open the sunroof manually only in the following case.
To close the sunroof before driving the vehicle in rainy weather during the day or on the highway, if the sunroof cannot be closed due to a failure of the engine or the sunroof controller.
Operation Method
Remove the headliner.
Insert the emergency handle upward into the hexagonal drive of the sunroof motor. Push firmly enough to disengage the motor clutch; otherwise the emergency handle will slip out due to incomplete engagement with the motor.
Carefully turn the emergency handle clockwise to close the sunroof.
After closing the sunroof, move the handle back and forth. When removing the tool from the motor, make sure the motor clutch re-engages.
Instead of the emergency handle, you can use a 5 mm hex head with a speeder-type handle.
Do not use power tools to operate the sunroof.
Components may be damaged.
How to Initialize the Motor: Whenever the battery is disconnected, discharged, or the related fuse is replaced or reinstalled, the panoramic roof system must be reset using the procedure below. When to Initialize the Motor. Panoramic Roof Emergency Handle Operation
?
Test yourself
A quick Kia Cadenza VG Owner's Manual quiz: every answer comes with an explanation and a link to the manual page.