In the Event of a Flat Tire
In the event of a flat tire, the Kia Opirus is equipped with a full-size spare tire and practical tools in the cargo area. This section guides you step by step through a safe and efficient tire change, from securing the vehicle to positioning the jack. Important safety notes on using the jack, fastening the wheel nuts and checking the tire pressure are explained in detail. If you follow these instructions, you can handle a breakdown with confidence and without additional risk to the vehicle or occupants.
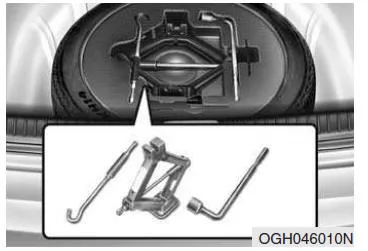
The spare tire, jack, jack handle and wheel nut wrench are located in the lower cargo area. Lift the cover in the cargo floor to access the spare tire and tools.
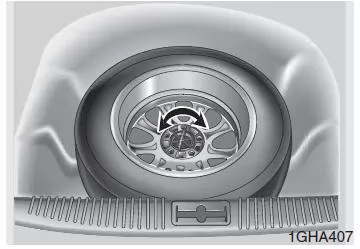
Removing the Spare Tire
Turn the handle of the retaining bolt in the wheel counterclockwise to release the spare tire.
Install the spare tire in the reverse order.
Stow the spare tire and tools carefully to prevent rattling noises while driving.
Wheel change
Instructions for Using the Jack
The jack is intended only for changing a tire in an emergency.
Follow the instructions for using the jack to reduce the risk of injury.
CAUTION - Tire Change- Never attempt to repair your vehicle on a road with moving traffic.
- Be sure to move your vehicle completely off the road or onto the emergency lane of a motorway before starting the tire change. Use the jack only on level and firm ground. If you cannot find level and firm ground away from the road, call a roadside assistance service.
- Make sure you place the jack only at the lifting points provided on the front and rear of the vehicle. Never attempt to lift the vehicle at any other point.
- A raised vehicle can easily roll off the jack and cause serious or fatal injuries. No person may get fully or partially under a vehicle that is supported only by a jack. Secure a raised vehicle with support stands first.
- Do not start the engine or allow it to run while the vehicle is raised on the jack.
- Make sure no one is inside the vehicle while it is raised on the jack.
- Make sure children are kept in a safe place away from the road and away from the vehicle being raised on the jack during a wheel change.

Changing a Wheel
1. Park the vehicle on level ground and firmly apply the parking brake.
2. Move the shift lever to the P (Park) position.
3. Switch on the hazard warning flashers.
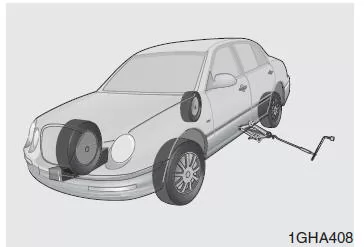
4. Remove the wheel nut wrench, jack, jack handle and spare wheel from the vehicle.
5. Chock the wheel diagonally opposite the wheel being changed (front or rear). The wedges shown are not included with the vehicle.
CAUTION - Changing the TireTo prevent the vehicle from moving while it is raised, firmly apply the parking brake and chock the wheel diagonally opposite the wheel being changed.
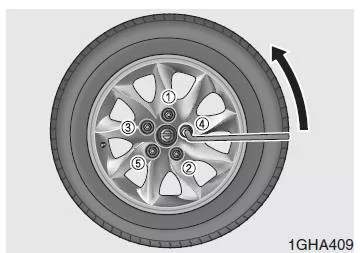
6. Loosen all wheel nuts by one turn counterclockwise. Do not remove any wheel nut until the wheel has been raised so that it no longer touches the ground.
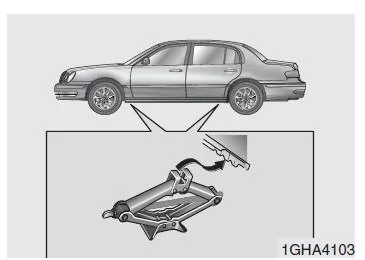
7. Place the jack under the correct jacking point next to the damaged wheel, at the front or rear.
The jacking points consist of metal plates with two cutouts and a raised central locating point that fits a recess in the jack. The jacking brackets are welded to the body.
CAUTION - Jack PositionTo reduce the risk of injury, use only the specified jacking points to lift the vehicle. Never lift the vehicle at any other point.
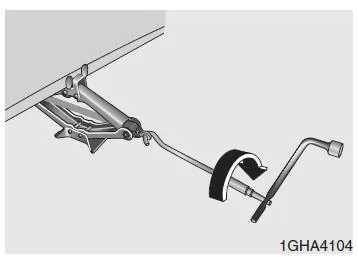
8. Insert the jack handle into the jack and turn it clockwise to raise the vehicle.
Raise the vehicle only far enough that the wheel being changed just clears the ground, or at most 30 mm above the ground.
Before removing the wheel nuts, make sure the vehicle is stable on the jack and cannot move.
9. Turn the wheel nuts counterclockwise to remove them.
Then remove the wheel from the vehicle.
10. Position the spare wheel on the hub and install the wheel nuts. Make sure the tapered side of each wheel nut faces the wheel.
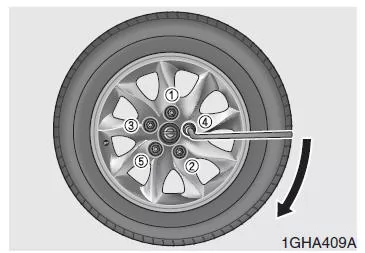
11. Tighten the wheel nuts, then lower the vehicle until the fitted wheel is fully on the ground. Now tighten the wheel nuts in a crisscross pattern, clockwise, to the specified torque.
If you are unsure whether the wheel nuts have been tightened sufficiently, have them checked by a qualified workshop at the earliest opportunity. For the specified tightening torque, refer to the technical data in Chapter 8 of this owner's manual.
If the wheel nuts are not tightened sufficiently, this may be noticed as a pulsating brake pedal, steering wheel shimmy, or loss of driving stability.
If you have replaced the standard wheels with aftermarket wheels, remember that different wheels may require different wheel nuts. In this case, use the wheel nuts supplied with the respective wheel and take the correct tightening torque from the wheel manufacturer's documentation.
CAUTIONThe wheel bolts and wheel nuts on your vehicle have a metric thread. When installing a wheel, make sure you use the same wheel nuts that were removed, or, if replacing the wheel nuts, use metric nuts of the same design. If nuts with a non-metric thread are fitted, the wheel will not be secured adequately and the wheel bolt threads will be damaged, so the wheel bolts must be replaced.
CAUTIONPlease note that most wheel nuts do not have a metric thread. Before fitting any aftermarket wheel nuts, make sure they have a metric thread and match the design of the original nuts. If in doubt, consult an authorized Kia dealer.
CAUTION - Wheel BoltsDamaged wheel bolts may prevent the wheels from being secured properly. Wheels could come loose while driving and cause an accident.
Store the jack and tools securely in the luggage compartment to prevent rattling while driving.
WARNINGAs soon as possible after fitting the spare wheel, check the tire pressure and correct it if necessary.
For the specified tire pressure values, refer to the technical data in Chapter 8 of this owner's manual.
The Kia Opirus 2003–2011 provides a reliable emergency solution for a tire puncture with its standard spare wheel and tool kit. The clear wheel-change instructions help ensure safety and make the procedure easier.
Particular emphasis is placed on correct positioning of the jack and proper tightening of the wheel nuts. This ensures the wheel sits securely and stably, and the Kia Opirus remains a dependable companion even after a breakdown.
Maintaining the recommended tire pressures after a wheel change is essential for driving stability and safety.
Test yourself
A quick Kia Opirus quiz: every answer comes with an explanation and a link to the manual page.