Transaxle Range (TR) Switch Removal/Installation [FS5 A EL]
Water or foreign objects entering the connector can cause a poor connection or corrosion. Be sure not to drop water or foreign objects on the connector when disconnecting it.
1. Engage the parking brake and use wheel chocks at the front and rear of the wheels.
2. Shift the selector lever to the N position.
3. Perform the following procedures.
a. Remove the battery cover..
b. Disconnect the negative battery cable.
c. Remove the air cleaner component..
4. Remove in the order indicated in the table.
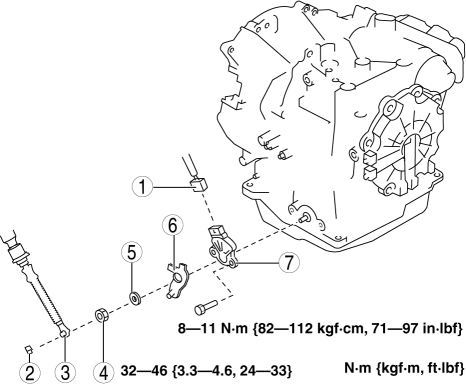
Connector
Clip
Selector cable
Manual shaft nut
(See Manual Shaft Nut Removal Note.)
(See Manual Shaft Nut Installation Note.)
Washer
Manual shaft lever
TR switch
(See TR switch Installation Note.)
5. Install in the reverse order of removal.
6. Inspect the TR switch..
Manual Shaft Nut Removal Note1. Set the adjustable wrench as shown to hold the manual shaft lever and loosen the manual shaft nut.
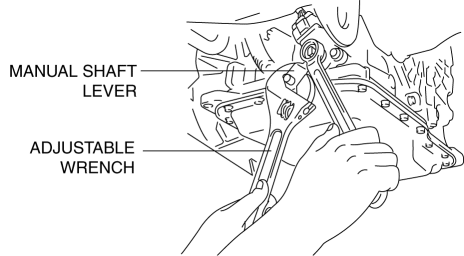
CAUTION:
Do not use an impact wrench. Hold the manual shaft lever when removing the manual shaft nut, or the transaxle may be damaged.
1. Verify that the manual shaft is aligned with the N position.
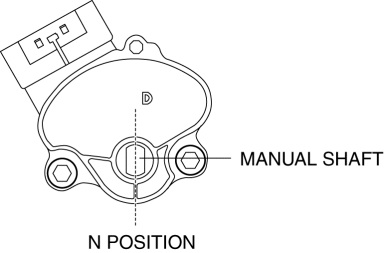
2. Adjust the TR switch between terminals B and C until the resistance becomes specification.
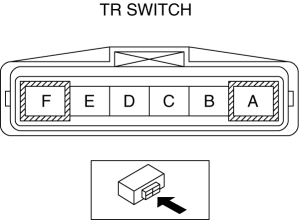
- TR switch specification
713—787 ohms
3. Tighten the TR switch installation bolts.
- Tightening torque
8—11 N·m {82—112 kgf·cm, 71—97 in·lbf}
1. Set the adjustable wrench as shown to hold the manual shaft lever and tighten the manual shaft nut.
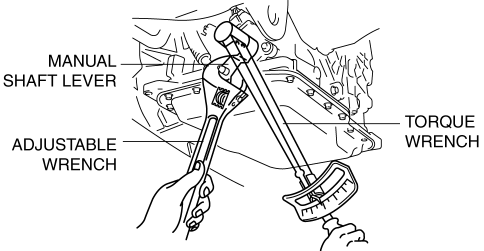
CAUTION:
Do not use an impact wrench. Hold the manual shaft lever when installing the manual shaft nut, or the transaxle may be damaged
- Tightening torque
32—46 N·m {3.3—4.6 kgf·m, 24—33 ft·lbf}
Test yourself
A quick Mazda 3 quiz: every answer comes with an explanation and a link to the manual page.