Disconnecting/connecting the quick release connector without cleaning it may possibly cause damage to the fuel pipe and quick release connector. Always clean the quick release connector joint area before disconnecting/connecting using a cloth or soft brush, and make sure that it is free of foreign material.
Note
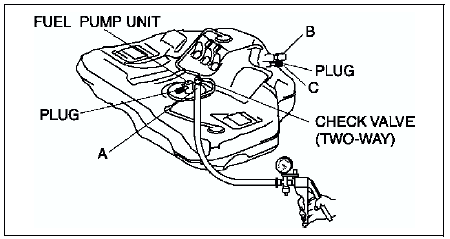
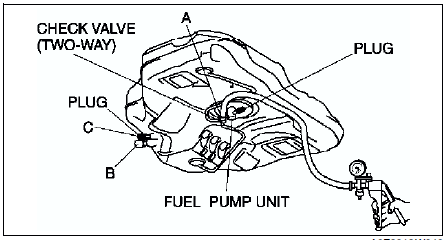
This inspection is for two rollover valves integrated in the fuel tank.
1. Disconnect the plastic fuel hose and the fuel pump unit connector. (See FUEL PUMP UNIT REMOVAL/INSTALLATION.)
2. Remove the fuel tank with the fuel pump unit. (See FUEL TANK REMOVAL/INSTALLATION.)
3. Plug the fuel pipe of the fuel pump unit.
4. Connect the pump to port A.
5. Level the fuel tank.
6. Apply pressure of -2.0 kpa {-34 mmHg, -1.3 inHg}
to port A.
(1) Plug port C and verify there is vacuum from port B.
If there is no vacuum, replace the fuel tank.
7. Apply pressure of +5.9 kPa {+44 mmHg, +1.7 inHg}
to port A.
If there is no airflow, replace the fuel tank.
If there is airflow, turn the fuel tank upside-down and proceed to next step.
8. Turn the fuel tank upside-down and apply pressure of -2.0 kPa {-15 mmHg, -0.6 inHg}
to port A.
(1) Plug port C and verify there is no vacuum from port B.
If there is vacuum, replace the fuel tank.
?
Test yourself
A quick Mazda 6 quiz: every answer comes with an explanation and a link to the manual page.