Variable valve timing actuator inspection
- Variable valve timing actuator can not be disassembled it is a precision unit.
1. Disconnect the negative battery cable.
2. Remove the plug hole plate.
3. Remove the high-tension lead.
4. Remove the oil control valve connector.
5. Remove the ventilation hose.
6. Remove the cylinder head cover.
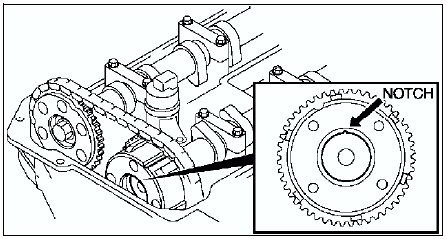
7. Confirm that notch of the rotor and bump of the cover at the variable valve timing actuator are aligned and fitted.
- If the notch and the bump are not aligned, turn the crankshaft clockwise two rotations.
Verify that the bump and the notch are aligned.
- If the bump and notch are still not aligned, replace the variable valve timing actuator.
- If, when turning the crankshaft, there is a hitting noise from the variable valve timing actuator each time the cam passes the fully lifted position, it means that the actuator is not secured. Replace the actuator.
8. Install the cylinder head cover. (See Cylinder Head Cover Installation Note.)
9. Install the ventilation hose.
10. Install the oil control valve connector.
11. Install the high-tension lead. (See HIGH-TENSION LEAD REMOVAL/INSTALLATION.)
12. Install the spark plugs. (See SPARK PLUG REMOVAL/INSTALLATION.)
13. Installs plug hole plate.
Test yourself
A quick Mazda 6 quiz: every answer comes with an explanation and a link to the manual page.