Auxiliary heater
The auxiliary heater in the Mercedes E-Class (4th gen, W212, 2009–2016) provides pleasant warmth before you set off and significantly increases comfort in winter. The system can be conveniently controlled with the remote control and timer. Numerous safety instructions ensure safe operation, even in difficult conditions.
Important Safety Notes
DANGERIf the exhaust tailpipe is blocked or sufficient ventilation is not possible, toxic exhaust gases, especially carbon monoxide, can enter the vehicle. This applies, for example, in enclosed spaces, or if the vehicle becomes stuck in snow. Risk of death!
Switch off the auxiliary heater in enclosed spaces without exhaust extraction, e.g. in a garage. If the vehicle is stuck in snow and you have to run the auxiliary heater, keep the exhaust tailpipe and the area around the vehicle free of snow. Open a window on the side of the vehicle facing away from the wind to ensure a sufficient supply of fresh air.
WARNINGWhen the auxiliary heater is switched on, parts of the vehicle, e.g. the exhaust system, can become very hot.
Flammable materials, e.g. leaves, grass or twigs, can ignite if they come into contact with- hot parts of the exhaust system
- the exhaust gas itself
Risk of fire!
Make sure that while the auxiliary heater is switched on- hot vehicle parts do not come into contact with flammable materials
- the exhaust gases can escape freely at the exhaust tailpipe
- the exhaust gases do not come into contact with flammable materials.
The auxiliary heater and the exhaust outlet are located in front of the right front wheel.
NoteOperating the auxiliary heater/ventilation places a load on the vehicle battery. Therefore, after heating or ventilating twice at the latest, drive the vehicle for a longer distance.
Info
Switch the auxiliary heater on regularly once a month for about ten minutes.
The auxiliary heater heats the vehicle interior air to the set temperature. It does not rely on heat output from the running engine. The auxiliary heater operates directly on the vehicle's fuel. For this reason, the fuel tank must be filled at least to the reserve level for the auxiliary heater to work.
The auxiliary heater or parking ventilation adjusts automatically to changes in outside temperature and weather. For this reason, the auxiliary heater may switch from ventilation to heating mode, or from heating to ventilation mode.
The auxiliary heater switches off automatically after 50 minutes. You can have this period changed. For this, contact a qualified specialist workshop.
The parking ventilation cannot cool the vehicle interior air below the outside temperature.
Before Switching On
 Turn the key in the ignition to position 2.Set the desired temperature.
The auxiliary heater or parking ventilation can also be switched on when climate control is set manually. If automatic mode is selected, you will get an optimal interior climate. Set the temperature to 22 .
You can switch the auxiliary heater or parking ventilation on or off either using the button on the center console or using the remote control.
Using the on-board computer, you can set up to three departure times, one of which you can preselect each time.
Switching the auxiliary heater or parking ventilation on or off using the center console
| The colors of the indicator lights on the button have the following meanings: | |
|---|---|
| blue | Parking ventilation is switched on |
| red | Auxiliary heater is switched on |
| yellow | Departure time is preselected |
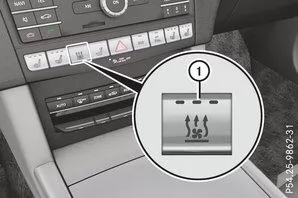
Switching the auxiliary heater or parking ventilation on: button press.
comes on.Switching the auxiliary heater or parking ventilation off: buttonpress.
goes out.Switching the auxiliary heater or parking ventilation on or off using the remote control
General Notes
One remote control is part of the vehicle equipment. You can use up to two additional remote controls per vehicle. For more information, contact a qualified specialist workshop.
Store the auxiliary heater remote control so that the auxiliary heater cannot be switched on unintentionally. Take care to keep the auxiliary heater remote control out of reach, especially of children.
The range of the remote control is approximately 300 meters . The range is reduced by:- Sources of radio interference
- solid obstacles between the remote control and the vehicle
- unfavorable position of the remote control relative to the vehicle
- Transmitting from enclosed spaces
If the remote control battery is low, the battery symbol on the left of the display is shown empty. Replace the remote control battery and observe the important safety instructions when replacing the battery .
Switching the auxiliary heater or parking ventilation on and off
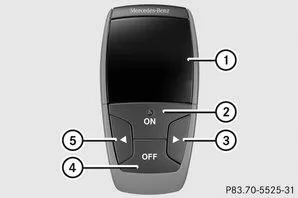
Remote Control
|
Display |
 |
 Auxiliary heater or parking ventilation on |
| Checking status | |
 |
 Setting the departure time |
 |
 Auxiliary heater or parking ventilation off |
 |
 Setting the departure time |
Switching on: press buttonpress and hold.Switching off: press buttonpress and hold.
Checking the status of the auxiliary heater or parking ventilation
Buttonpress briefly.The following display indications are possible:
| Display | Meaning |
 |
The auxiliary heater or parking ventilation is switched off. |
 |
The parking ventilation is switched on. The number on the display shows the remaining run time (in minutes) of the parking ventilation. |
 |
The auxiliary heater is switched on. The number on the display shows the remaining run time (in minutes) of the auxiliary heater. |
 |
A departure time is activated. The time on the display shows the departure time. |
 |
A departure time is activated. The parking ventilation is currently active. The number on the display shows the remaining run time (in minutes) of the parking ventilation. If the vehicle is not started after this time has elapsed, the run time is extended by five minutes. |
 |
A departure time is activated. The auxiliary heater is currently active. The number on the display shows the remaining run time (in minutes) of the auxiliary heater. If the vehicle is not started after this time has elapsed, the run time is extended by five minutes. |
If the engine has not yet reached its operating temperature when starting, the auxiliary heater run time is extended. The auxiliary heater then keeps running until the operating temperature is reached. In this case, the remote control display shows the symbol and a run time of zero minutes.
Setting the departure time
Make sure the time in the vehicle is set correctly before setting the departure time (see separate Operator's Manual). Otherwise, the auxiliary heater may switch on at the wrong time and possibly in an unsuitable parking location. When setting the departure time, also observe the important safety information.
Buttonpress briefly.ButtonorPress repeatedly until the time you want to change appears in the display.
Buttonsandpress simultaneously. flashes in the remote control display.
Use the buttonsorto set the desired departure time.
The longer you press one of the buttonsorthe faster the displayed time changes.
Buttonsandpress simultaneously.
Activate set departure time
Buttonpress briefly.ButtonorPress repeatedly until the desired departure time appears in the display.
Buttonpress. , the departure time and, depending on the selected departure time, the letter A, B or C appear in the display.
Deactivate set departure time
Buttonpress briefly.Buttonpress.
Buttonpress.
Replacing the remote control battery
Important Safety Notes
WARNINGBatteries contain toxic and corrosive substances. If batteries are swallowed, serious health damage can occur. Risk to life!
Keep batteries out of reach of children. If batteries have been swallowed, seek medical attention immediately.
Environmental Note
 |
Batteries contain pollutants. It is prohibited by law to dispose of them with household waste. They must be collected separately and sent for environmentally sound recycling. |
 |
Dispose of batteries in an environmentally responsible way. Take discharged batteries to a qualified workshop or to a used battery collection point. |
Replacing the battery
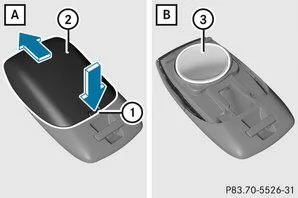
When the battery needs to be replaced, the battery symbol on the left of the display is shown empty. For battery replacement, you need a lithium battery of type CR2450.
Using a pointed object, press into the recesspress.The battery coverslide backward in the direction of the arrow.
Remove the old battery.Insert the new battery with the markings facing up.
The battery coverslide against the direction of the arrow onto the remote control until it clicks into place.Use the remote control to check the auxiliary heater functions on the vehicle.
Problems with the auxiliary heater or auxiliary ventilation
| Display messages | Possible causes/consequences and solutions |
|---|---|
FAIL |
Signal transmission between transmitter and vehicle is disrupted.
Try again to switch the auxiliary heater on or off with the remote control. |
| FAIL | The auxiliary heater cannot be switched on or has switched off during operation. The starter battery is not sufficiently charged. Charge the starter battery.
The auxiliary heater cannot be switched on or has switched off during operation. The fuel tank is not filled to the reserve level. Refuel at the next filling station.
The auxiliary heater or auxiliary ventilation cannot be switched on or has switched off during operation. The auxiliary heater or auxiliary ventilation is defective. Have the auxiliary heater or auxiliary ventilation checked by a qualified workshop. |
The Mercedes E-Class W212 (model years 2009–2016) features a modern auxiliary heater that provides pleasant temperatures before the journey begins. Operation via the center console or remote control offers maximum flexibility.
Thanks to automatic adjustment to the weather and convenient departure time programming, everyday driving becomes noticeably more comfortable.
Question: Why should the auxiliary heater be switched on regularly?
Answer: To maintain its functionality and prevent malfunctions.
Question: What safety information applies when operating the auxiliary heater?
Answer: Do not operate the vehicle in enclosed spaces and keep the exhaust tailpipe clear to avoid carbon monoxide poisoning.
Test yourself
A quick Mercedes-Benz E-Class quiz: every answer comes with an explanation and a link to the manual page.