Wheel Alignment
Inspection
DESCRIPTION
Measure wheel alignment under unladen conditions.
PRELIMINARY CHECK
Check the following:
Tires for improper air pressure and wear. Refer to TIRE AIR PRESSURE : Service Data.
Road wheels for runout.
Wheel bearing axial end play.
2WD: Refer to Inspection.
4WD: Refer to Inspection.
Lower link and upper link ball joint axial end play. Refer to Inspection.
Shock absorber operation.
Each mounting part of axle and suspension for looseness and deformation.
Lower link for cracks, deformation and other damage.
vehicle height (posture).
After setting the vehicle to the normal height, and adjust th wheel alignment. (With dynamic digital suspension and electronic air suspension)
GENERAL INFORMATION AND RECOMMENDATIONS
A four-wheel thrust alignment should be performed.
This type of alignment is recommended for any NISSAN/INFINITI vehicle.
The four-wheel “thrust” process helps ensure that the vehicle is properly aligned and the steering wheel is centered.
The alignment rack itself should be capable of accepting any NISSAN/INFINITI vehicle.
The rack should be checked to ensure that it is level.
Make sure the machine is properly calibrated.
Your alignment equipment should be regularly calibrated in order to give correct information.
Check with the manufacturer of your specific equipment for their recommended Service/Calibration Schedule.
ALIGNMENT PROCESS
IMPORTANT:
Use only the alignment specifications listed in this Service Manual.
When displaying the alignment settings, many alignment machines use “indicators” : (Green/red, plus or minus, Go/No Go). Never use these indicators.
The alignment specifications programmed into your machine that operate these indicators may not be correct.
This may result in an ERROR.
Most camera-type alignment machines are equipped with both “Rolling Compensation” method and optional “Jacking Compensation” method to “compensate” the alignment targets or head units. “Rolling Compensation” is the preferred method.
If using the “Rolling Compensation” method, after installing the alignment targets or head units, push or pull on the rear wheel to move the vehicle. Do not push or pull on the vehicle body.
If using the “Jacking Compensation” method, after installing the alignment targets or head units, raise the vehicle and rotate the wheels 1/2 turn both ways.
Follow all instructions for the alignment machine you're using for more information.
Adjustment
CAMBER, CASTER
Adjust with the front/rear side adjusting bolts  on the lower link.
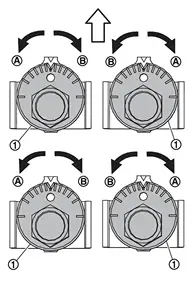
| : vehicle front |
See the following table for the amount of cam bolt scale movement and the variation of camber and caster.
 |
: vehicle outside |
 |
: Vehicle inside |
| Amount of cam bolt scale movement | Front | 3 segment on vehicle outside | 3 segment on vehicle inside | 3 segment on vehicle inside | 3 segment on vehicle outside | 3 segment on vehicle inside | 3 segment on vehicle outside | Amount of movement 0 | Amount of movement 0 |
|---|---|---|---|---|---|---|---|---|---|
| Rear | 3 segment on vehicle inside | 3 segment on vehicle outside | 3 segment on vehicle inside | 3 segment on vehicle outside | Amount of movement 0 | Amount of movement 0 | 3 segment on vehicle inside | 3 segment on vehicle outside | |
| Camber angle | 0° | 0° | +0° 23′ | -0° 22′ | +0° 12′ | -0° 11′ | +0° 12′ | -0° 11′ | |
| Caster angle | -0° 36′ | +0° 37′ | 0° | 0° | +0° 18′ | -0° 18′ | -0° 18′ | +0° 18′ | |
Note the following, and adjust as shown in the figure. Obtain the point at the intersection of the measured values on the figure.
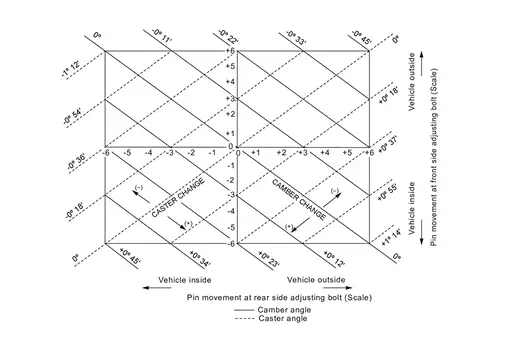
If the coordinate (scale) of the intersection point is positive, move the adjusting bolt to the vehicle inside.
If the coordinate (scale) of the intersection point is negative, move the adjusting bolt to the vehicle outside.
| Camber, caster | :Refer to Wheel Alignment. |
TOE-IN
Loosen the steering outer socket, and then adjust the length using steering inner socket.
Toe-in :Refer to Wheel Alignment. - After toe-in adjustment, rack end value reset. Refer to Work Procedure.
- After toe-in adjustment, adjust neutral position of steering angle sensor. Refer to Work Procedure.