Front door finisher
Exploded View
LHD models

1. Front door panel
2. Front door finisher
3. Cap
4. Pull handle
5. Power window switch finisher 6. Pull handle bracket
 : Clip
 : Pawl
 : Metal clip
Removal and Installation
REMOVAL
CAUTION:• When removing, always use a remover tool that is made of plastic.
• Never damage the door panel.
1. Fully open door window.2. Remove pull handle.
1. Remove cap from the pull handle.
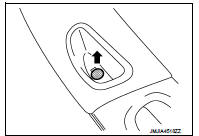
2. Remove pull handle fixing screw.
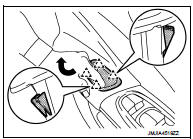
3. Lift up the pull handle while rotating it in direction indicated by the arrow as shown in the figure. Disengage pawls and remove the pull handle.
 : Pawl
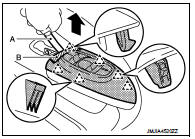
3. Remove power window switch finisher and power window switch as a unit.
1. Disengage power window switch finisher fixing pawls with a remover tool (A).
 Pawl
CAUTION:
Apply protective tape (B) on the part to protect it from damage.
2. Pull up power window switch finisher and power window switch as a unit and disconnect harness connector.
4. Remove front door corner cover. Refer to MIR-43, "DOOR MIRROR ASSEMBLY : Removal and Installation".
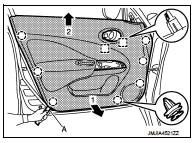
5. Remove front door finisher.
1. Disengage front door finisher fixing clips and metal clips with a remover tool (A).
 : Clip
 : Metal clip
CAUTION:
Insert a remover tool between body side panel and clip and disengage pawl.
2. Pull toward the direction of the arrows as shown in the figure to remove.
NOTE
:
Remove power window switch. Refer to PWC-44, "Removal and Installation".
INSTALLATION
Note the following item, and install in the reverse order of removal.
CAUTION:When installing front door finisher, check that clips, and metal clips are securely in body panel holes, and press them in.