Luggage floor trim
Exploded View
2WD models
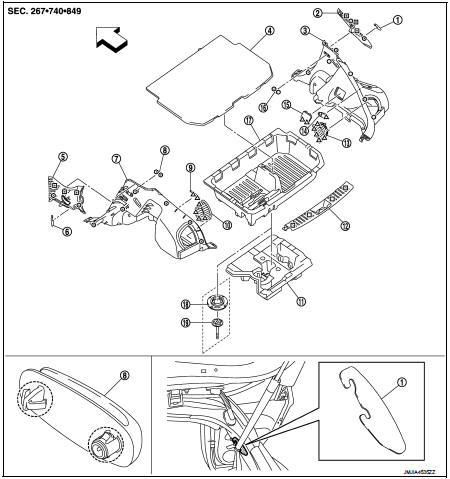
1. Rear pillar cap RH 2. Luggage side upper finisher RH 3. Luggage side lower finisher RH 4. Luggage floor board
5. Luggage side upper finisher LH 6. Rear pillar cap LH
7. Luggage side lower finisher LH 8. Seat belt hook LH
9. Shock absorber mask LH 10. Luggage side lower finisher grille LH 11. Repair kit holder (Models without spare tire) 12. Luggage rear plate
13. Luggage side lower finisher grille RH 14. Luggage room lamp
15. Shock absorber mask RH 16. Seat belt hook RH
17. Luggage floor box
18. Luggage floor rear center spacer (Models with spare tire) 19. Spare tire clamp (Models with spare tire)
 Clip
 : Pawl
 : Metal clip
 : Vehicle front
4WD models
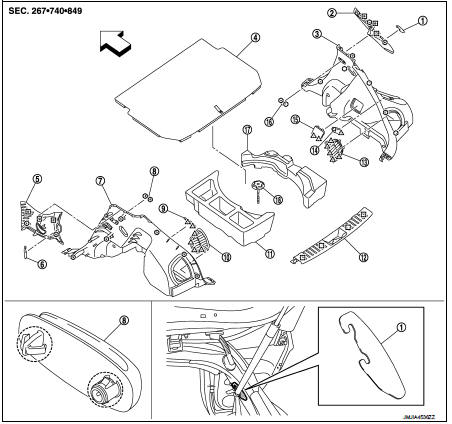
1. Rear pillar cap RH 2. Luggage side upper finisher RH 3. Luggage side lower finisher RH 4. Luggage floor board
5. Luggage side upper finisher LH 6. Rear pillar cap LH
7. Luggage side lower finisher LH 8. Seat belt hook LH
9. Shock absorber mask LH 10. Luggage side lower finisher grille LH 11. Luggage floor rear spacer LH 12. Luggage rear plate
13. Luggage side lower finisher grille RH 14. Luggage room lamp
15. Shock absorber mask RH 16. Seat belt hook RH
17. Luggage floor rear spacer RH 18. Spare tire clamp
 : Clip
 : Pawl
 : Metal clip
 Vehicle fro
Luggage rear plate : Removal and Installation
CAUTION:• When removing, always use a remover tool that is made of plastic.
• Never damage the body.
REMOVE
1. Remove back door weather-strip. • TYPE1: Refer to DLK-170, "BACK DOOR WEATHER-STRIP : Removal and Installation". • TYPE2: Refer to DLK-333, "BACK DOOR WEATHER-STRIP : Removal and Installation". • TYPE3: Refer to DLK-468, "BACK DOOR WEATHER-STRIP : Removal and Installation".• TYPE4: Refer to DLK-584, "BACK DOOR WEATHER-STRIP : Removal and Installation".
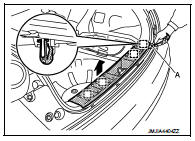
2. Remove luggage floor board.3. Remove luggage floor box. (Models withe 2WD) 4. Disengage luggage rear plate fixing metal clips with a remover tool (A), and then remove luggage rear plate.
 : Metal clip
INSTALLATION
Note the following item, and install in the reverse order of removal.
CAUTION:When installing luggage rear plate, check that metal clips are securely in body panel holes, and press them in.
Luggage side lower finisher : Removal and Installation
REMOVAL
CAUTION:• When removing, always use a remover tool that is made of plastic.
• Never damage the body.
1. Remove luggage room lamp. Refer to INL-39, "Removal and Installation". 2. Remove luggage floor board. 3. Remove luggage floor box.(Models with 2WD) 4. Remove luggage rear plate. Refer to INT-30, "LUGGAGE REAR PLATE : Removal and Installation". 5. Remove rear body side welt. Refer to INT-20, "BODY SIDE WELT : Removal and Installation". 6. Remove rear seat cushion. • 2WD models: Refer to SE-33, "SEAT CUSHION : Removal and Installation".• 4WD models: Refer to SE-42, "SEAT CUSHION : Removal and Installation".
7. Remove rear seat back. • 2WD models: Refer to SE-33, "SEATBACK : Removal and Installation".• 4WD models: Refer to SE-43, "SEATBACK : Removal and Installation".
8. Remove side hinge. • 2WD models: Refer to SE-38, "SEATBACK HINGE : Removal and Installation".• 4WD models: Refer to SE-48, "SEATBACK HINGE : Removal and Installation".
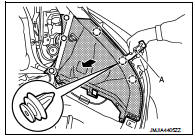
9. Disengage luggage side lower finisher fixing clips with a remover tool (A), and then remove luggage side lower finisher.
 : Clip
INSTALLATION
Note the following item, and install in the reverse order of removal.
CAUTION: When installing luggage side lower finisher, check that clips are securely in body panel holes, and press them in. Removal and installation of shock absorber mask CAUTION: When removing, always use a remover tool that is made of plastic.REMOVAL
Disengage shock absorber mask fixing pawls with a remover tool (A), and then remove shock absorber mask.
 : Pawl
CAUTION: Apply protective tape (B) on the parts to protect it from damage.
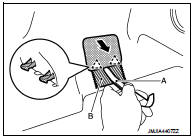
INSTALLATION
Install in the reverse order of removal.
Removal and installation of luggage side lower finisher grille CAUTION: When removing, always use a remover tool that is made of plastic.REMOVAL
Disengage luggage side lower finisher grille fixing pawls with a remover tool (A), and then remove luggage side lower finisher grille.
 : Pawl
CAUTION: Apply protective tape (B) on the parts to protect it from damage.
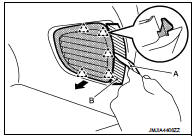
INSTALLATION
Install in the reverse order of removal.
CAUTION:• When removing, always use a remover tool that is made of plastic.
• Never damage the body.
1. Remove luggage side lower finisher. Refer to INT-31, "LUGGAGE SIDE LOWER FINISHER : Removal and Installation". 2. Remove rear seat belt (floor) anchor bolt. Refer to SB-12, "SEAT BELT RETRACTOR : Removal and Installation".3. Disengage luggage side upper finisher fixing clips and metal clips with a remover tool (A), and then remove luggage side upper finisher.
 : Clip
 : Metal clip

INSTALATION
Note the following item, and install in the reverse order of removal.
CAUTION:When installing luggage side upper finisher, check that clips, and metal clips are securely in body panel holes, and press them in.