Intake manifold
Exploded View
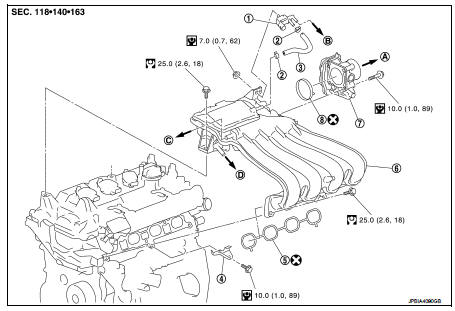
1. EVAP canister purge volume control solenoid valve
2. Hose clamp
3. Vacuum hose
4. Intake manifold support 5. Gasket
6. Intake manifold
7. Electric throttle control actuator 8. Gasket
A. To air cleaner
B. To centralized under-floor piping C. To brake booster
D. To rocker cover
 : Always replace after every
disassembly.
 : N·m (kg-m, in-lb)
 : N·m (kg-m, ft-lb)
Removal and Installation
REMOVAL
1. Drain engine coolant. Refer to CO-11, "Draining".
CAUTION:• Perform this step when the engine is cold.
• Never spill engine coolant on drive belt.
2. Remove air duct (inlet) and air duct assembly. Refer to EM-161, "Exploded View". 3. Remove reservoir tank.4. Pull out oil level gauge.
CAUTION:Cover the oil level gauge guide openings to avoid entry of foreign materials.
5. Disconnect water hoses from electric throttle control actuator as follows: • Drain engine coolant from radiator or attach plug to prevent engine coolant leakage when engine coolant is not drained. Refer to CO-11, "Draining".
CAUTION:Perform this step when the engine is cold.
6. Remove electric throttle control actuator.
CAUTION:• Handle carefully to avoid any shock to electric throttle control actuator.
• Never disassemble electric throttle control actuator.
7. Disconnect harness connector and vacuum hose from purge control solenoid valve.
CAUTION:Never impact it
.
8. Disconnect vacuum hose for brake booster from intake manifold.9. Remove mounting bolts of intake manifold. (The joint of intake manifold and rocker cover.)
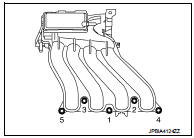
10. Loosen mounting bolts in reverse order as shown in the figure.
Cover engine openings to avoid entry of foreign materials.
11. Remove intake manifold.
12. Remove EVAP canister purge volume control solenoid valve from intake manifold if necessary.
CAUTION:Never impact it.
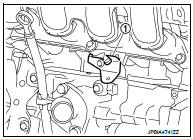
13. Remove intake manifold support (1) if necessary.
CAUTION:The intake manifold support functions as a guide for installing the intake manifold.
INSTALLATION
Note the following, and install in the reverse order of removal.
Intake Manifold
1. Install the gasket to the intake manifold.
• Align the protrusions used for checking gasket installation condition with the clearance grooves (A) of the intake manifold mounting groove.
NOTE:
Gasket for electronically-controlled throttle can be installed when the electronically-controlled throttle is installed.

2. Place the intake manifold into the installation position.
CAUTION:Check that the oil level gauge guide is not detached from the securing clip of the water inlet due to interference of intake manifold.
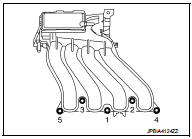
3. Tighten bolts in the numerical order as shown in the figure.
4. Tighten mounting bolts of intake manifold. (The joint of intake manifold and rocker cover.) Electric Throttle Control Actuator • Tighten bolts of electric throttle control actuator equally and diagonally in several steps. • Perform “Throttle Valve Closed Position Learning” after repair when removing harness connector of the electric throttle control actuator. Refer to EC-543, "Description".
• Perform “Throttle Valve Closed Position Learning” and “Idle Air Volume Learning” after repair when replacing electric throttle control actuator. Refer to EC-544, "Description"