Wheel change
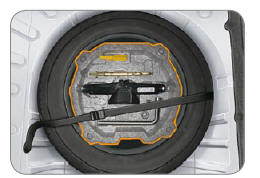
- Park the vehicle on a level, firm, non-slip surface.
- Apply the parking brake, switch off the ignition and engage first gear or reverse (P position for automatic gearbox).
Never get under a vehicle raised with a jack.
Access to the spare wheel and jack in the boot
- Lift the floor using the handle. Lock the handle behind the boot seal.
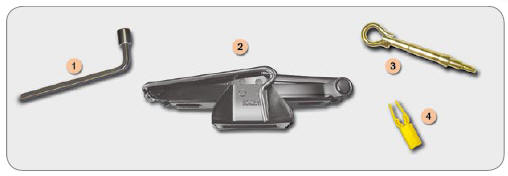
Tools provided
The following tools are stored in the holder located in the centre of the spare wheel:
- Wheel brace.
Used to remove the wheel trim and the wheel fixing bolts.
- Jack with integrated handle.
Used to raise the vehicle.
- Removable towing eye.
See corresponding chapter.
- "Bolt cover" tool.
Used to remove the bolt covers (caps) on alloy wheels.
Removing the wheel
- For vehicles fitted with steel wheels, release the wheel trim using wheel brace 1 by pulling at the valve opening.
- For vehicles fitted with aluminium alloy wheels, remove the bolt covers using tool 4.
- Loosen the wheel bolts.
- Remove the jack from the tool holder.
- Place jack 2 at one of the four lifting points on the underbody (the one closest to the wheel to be changed).
- Extend jack 2 until its base is in contact with the ground.
- Unscrew the bolts and remove the wheel.
Refitting the wheel
- Fit the wheel.
- Screw in the bolts by hand.
- Pre-tighten the bolts with the wrench.
- Fold jack 2 and remove it.
- Tighten the bolts with wrench 1.
- For vehicles fitted with steel wheels, refit the wheel trim, starting by aligning its notch with the valve, and press with the palm of your hand.
- For vehicles fitted with aluminium alloy wheels, refit the bolt caps.
- Reposition the tool holder; it supports the boot floor. This prevents deformation when loading the boot.
- Tighten the spare wheel retaining strap to prevent vibration and for your safety in the event of a collision.
Reminder: for your safety, always change a wheel:
- on level, stable, non-slip ground,
- with the parking brake applied,
- with first or reverse gear engaged (P position for automatic gearbox),
- never get under a vehicle supported only by a jack.
After changing a wheel:
- have the tightness of the bolts and the spare wheel pressure checked promptly,
- have the punctured wheel repaired and refit it to the vehicle as soon as possible,
- have the spare wheel checked and return it to its boot well.
Recommendations when using the temporary spare wheel *
Your vehicle may be fitted with a spare wheel with a different rim from the standard wheel.
After use, replace it as soon as possible.
Observe the following instructions so as not to alter the vehicle's handling:
- do not drive above 80 km/h,
- do not fit a wheel trim,
- drive with caution,
- check the inflation pressure indicated on the label.
Information on the instrument cluster display:
 Puncture warning light
 Tyre pressure monitoring
system warning light (underinflation)
These original wheels are fitted with a pressure sensor (see the "Under-inflation detection" section). The alarm detects when the wheel fitted with the sensor is moved away or missing, and signals the fault.
Troubleshoot and have the vehicle checked by the PEUGEOT network.
Specific features of aluminium wheels
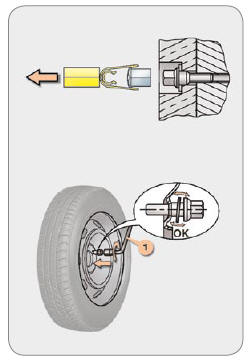
Bolt caps
The bolts on aluminium wheels are covered by chrome-plated caps.
Remove them using the yellow tool before loosening the bolts.
Refitting the spare wheel
If your vehicle is fitted with a steel spare wheel, it is normal when tightening the bolts that the washers do not contact the rim. The spare wheel is held in place by the conical seat of each bolt.
Fitting snow tyres
If you fit snow tyres mounted on steel rims to your vehicle, you must use the specific bolts available from the PEUGEOT network.
Locking wheel bolts
Your wheels are fitted with locking bolts (one per wheel), concealed under chrome-plated caps to be removed using the yellow tool, before unscrewing them using the locking bolt socket and wheel brace 1.
This locking bolt socket was supplied with your vehicle at delivery, together with the spare key. Carefully note the code number engraved on the head of the locking bolt socket. It will allow you to obtain a spare locking bolt socket from your network. The same advice applies to the spare key.
Test yourself
A quick Peugeot 407 quiz: every answer comes with an explanation and a link to the manual page.