Body Electrical System
Repair Procedures
In this manual: Body Electrical System
18steps
~108min
4/5difficulty
Done 0 of 18
Inspection
|

- Remove the front door trim panel. (Refer to Body - "Front Door Trim")
- Remove the front door module. (Refer to Body - "Front Door Module")
- Disconnect the actuator connector.
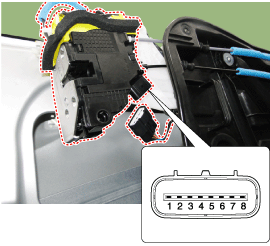
No Terminal Information left Right Side 1 AJAR Switch Motor 2 2 COM Motor 1 3 Lock/Unlock Switch - 4 Key Lock Switch Key Unlock Switch 5 Key Unlock Switch Key Lock Switch 6 - Lock/Unlock Switch 7 Motor 1 COM 8 Motor 2 AJAR switch - Check actuator operation by connecting power and ground as specified in the table. To prevent actuator damage, apply battery voltage only momentarily.
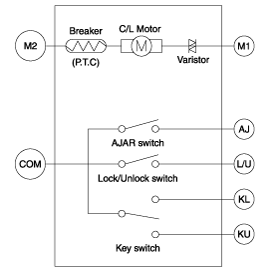
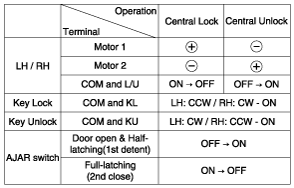
- Remove the rear door trim panel. (Refer to Body - "Rear Door Trim")
- Remove the rear door module. (Refer to Body - "Rear Door Module")
- Disconnect the actuator connectors.
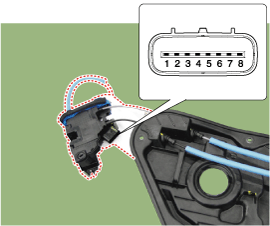
No Terminal Information left Right Side 1 AJAR Switch Motor 2 2 COM Motor 1 3 Lock/Unlock Switch - 4 - - 5 - - 6 - Lock/Unlock Switch 7 Motor 1 COM 8 Motor 2 AJAR Switch - Check actuator operation by connecting power and ground as specified in the table. To prevent actuator damage, apply battery voltage only momentarily.


- Remove the trunk lid trim. (Refer to Body - "Trunk Lid Trim")
- Disconnect the actuator connector.
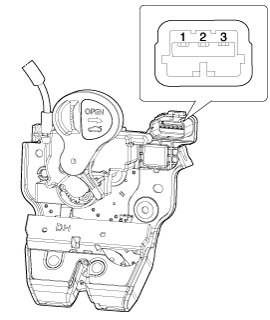
- Check actuator operation by connecting power and ground as specified in the table. To prevent actuator damage, apply battery voltage only momentarily.
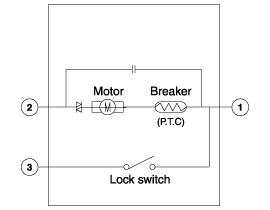
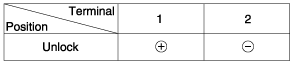
- When inspecting the trunk, the power supply option refers to the trunk module.
- Disconnect the negative (-) battery terminal.
- Remove the luggage compartment trim (Refer to Body - Luggage Compartment Trim).
- Disconnect the trunk open switch assembly connector (A).

- Check the continuity between the terminals in the half-latched state according to the table.

- Disconnect the connector (A).
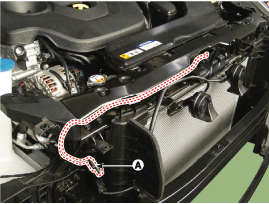
- Check the continuity between the terminals and ground as specified in the table. (Refer to Body - "Hood Latch")

Test yourself
A quick Hyundai Sonata LF quiz: every answer comes with an explanation and a link to the manual page.
Was this page helpful?