Clearance Warning Ecu
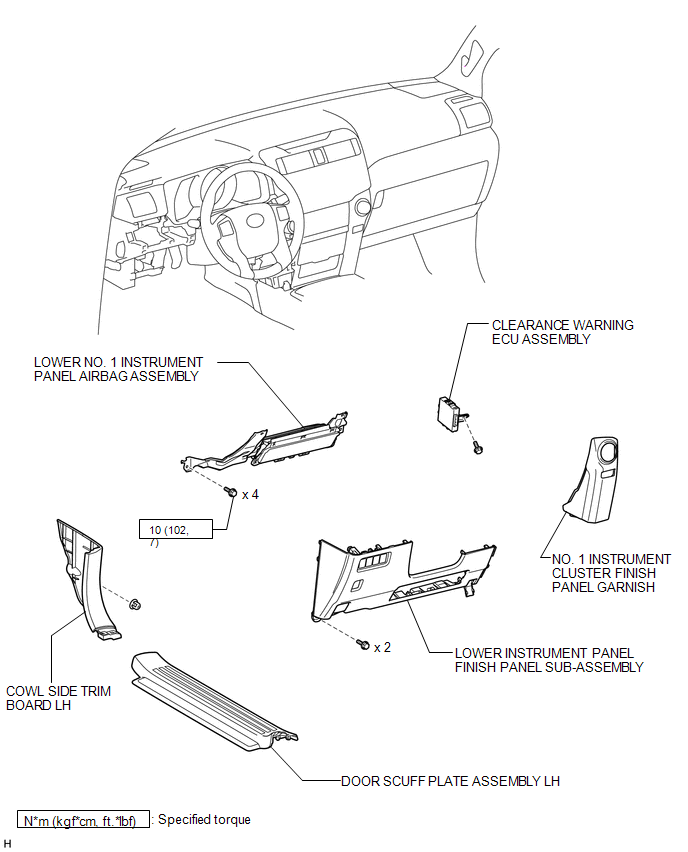
Removal REMOVAL PROCEDURE
1. DISCONNECT CABLE FROM NEGATIVE BATTERY TERMINAL
CAUTION:
Wait at least 90 seconds after disconnecting the cable from the negative (-) battery terminal to disable the SRS system.
NOTICE:
When disconnecting the cable, some systems need to be initialized after the cable is reconnected (See page  ).
2. REMOVE DOOR SCUFF PLATE ASSEMBLY LH
3. REMOVE COWL SIDE TRIM BOARD LH
4. REMOVE NO. 1 INSTRUMENT CLUSTER FINISH PANEL GARNISH
5. REMOVE LOWER INSTRUMENT PANEL FINISH PANEL SUB-ASSEMBLY
6. REMOVE LOWER NO. 1 INSTRUMENT PANEL AIRBAG ASSEMBLY
7. REMOVE CLEARANCE WARNING ECU ASSEMBLY
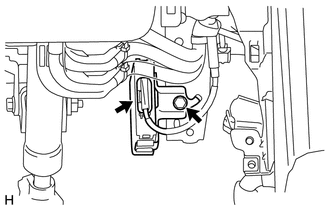
(a) Disconnect the connector.
(b) Remove the bolt and clearance warning ECU.
Installation INSTALLATION CAUTION / NOTICE / HINTHINT:
A bolt without a torque specification is shown in the standard bolt chart (See page  ).
PROCEDURE
1. INSTALL CLEARANCE WARNING ECU ASSEMBLY
(a) Install the clearance warning ECU with the bolt.
(b) Connect the connector.
2. INSTALL LOWER NO. 1 INSTRUMENT PANEL AIRBAG ASSEMBLY
3. INSTALL LOWER INSTRUMENT PANEL FINISH PANEL SUB-ASSEMBLY
4. INSTALL NO. 1 INSTRUMENT CLUSTER FINISH PANEL GARNISH
5. INSTALL COWL SIDE TRIM BOARD LH
6. INSTALL DOOR SCUFF PLATE ASSEMBLY LH
7. CONNECT CABLE TO NEGATIVE BATTERY TERMINAL
NOTICE:
When disconnecting the cable, some systems need to be initialized after the cable is reconnected (See page ).
8. CHECK SRS WARNING LIGHT
(a) Check the SRS warning light (See page ).
Test yourself
A quick Toyota 4Runner quiz: every answer comes with an explanation and a link to the manual page.