Installation
1. INSTALL NO. 2 TELEPHONE BRACKET
(a) Install the bracket with the 2 bolts.
2. INSTALL NO. 1 TELEPHONE BRACKET
(a) Install the bracket with the 3 bolts.
(b) Connect the 2 connectors.
3. INSTALL MAYDAY BATTERY WITH BRACKET
(a) Attach the 2 claws to install the mayday battery.
(b) Install the bracket with the bolt.
Torque:
13 N·m {133 kgf·cm, 10 ft·lbf}
4. INSTALL DCM (TELEMATICS TRANSCEIVER)
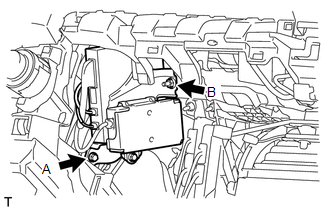
(a) Insert the DCM (telematics transceiver) with bracket into the vehicle.
(b) Install the DCM (telematics transceiver) with bracket with the bolt and nut. Torque: for bolt A : 13 N·m {133 kgf·cm, 10 ft·lbf} for nut B : 12 N·m {122 kgf·cm, 9 ft·lbf} |
 |
(c) Connect the connectors.
5. INSTALL LOWER INSTRUMENT PANEL SUB-ASSEMBLY

6. INSTALL INSTRUMENT PANEL BOX DOOR COVER
7. INSTALL LOWER NO. 2 INSTRUMENT PANEL AIRBAG ASSEMBLY
8. INSTALL LOWER INSTRUMENT COVER LH
9. INSTALL NO. 2 INSTRUMENT PANEL UNDER COVER SUB-ASSEMBLY
10. INSTALL NO. 2 INSTRUMENT CLUSTER FINISH PANEL GARNISH
11. INSTALL COWL SIDE TRIM BOARD RH
12. INSTALL DOOR SCUFF PLATE ASSEMBLY RH
13. CONNECT CABLE TO NEGATIVE BATTERY TERMINAL
NOTICE:
When disconnecting the cable, some systems need to be initialized after the cable is reconnected (See page ).
14. CHECK SRS WARNING LIGHT
(a) Check the SRS warning light (See page ).
15. PERFORM REGISTRATION
(a) Perform registration (See page ).
NOTICE:
When replacing the mayday battery or DCM (telematics transceiver) (together with the mayday battery), perform registration.
Test yourself
A quick Toyota 4Runner quiz: every answer comes with an explanation and a link to the manual page.