Reassembly
HINT:
When installing the rear spoiler protector, heat the rear spoiler surface using a heat light.
Standard:
Item | Temperature |
|---|---|
Rear Spoiler |
20 to 30 °C |
1. INSTALL NO. 3 BACK DOOR WIRE
(a) Attach the clamp to install the No. 3 back door wire.
2. INSTALL CENTER STOP LIGHT ASSEMBLY

3. INSTALL REAR SPOILER PROTECTOR LH
HINT:
Use the same procedure to install the rear spoiler protector on the other side.
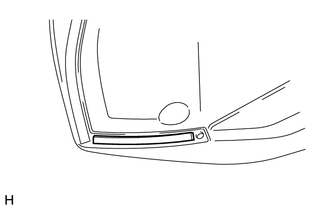
(a) Clean the rear spoiler surface.
(1) Using a heat light, heat the rear spoiler surface.
(2) Remove the double-sided tape from the rear spoiler surface.
(3) Wipe off any tape adhesive residue with cleaner.
(b) Install a new rear spoiler protector.
(1) Remove the peeling paper from the face of a new rear spoiler protector.
HINT:
After removing the peeling paper, keep the exposed adhesive free from foreign matter.
(2) Install the rear spoiler protector as shown in the illustration.
4. INSTALL REAR NO. 2 SPOILER PROTECTOR
HINT:
Use the same procedure to install the rear No. 2 spoiler protector on the other side.
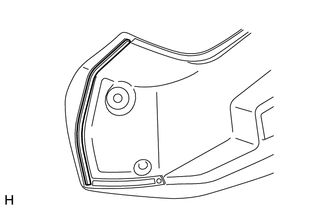
(a) Clean the rear spoiler surface.
(1) Using a heat light, heat the rear spoiler surface.
(2) Remove the double-sided tape from the rear spoiler surface.
(3) Wipe off any tape adhesive residue with cleaner.
(b) Install a new rear No. 2 spoiler protector.
(1) Remove the peeling paper from the face of a new rear No. 2 spoiler protector.
HINT:
After removing the peeling paper, keep the exposed adhesive free from foreign matter.
(2) Install the rear No. 2 spoiler protector as shown in the illustration.
5. INSTALL REAR NO. 1 SPOILER PROTECTOR
HINT:
Use the same procedure to install the No. 1 rear spoiler protector on the other side.
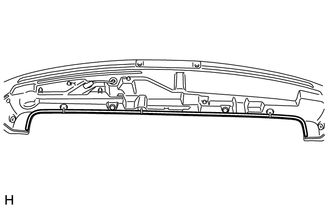
(a) Clean the rear spoiler surface.
(1) Using a heat light, heat the rear spoiler surface.
(2) Remove the double-sided tape from the rear spoiler surface.
(3) Wipe off any tape adhesive residue with cleaner.
(b) Install a new rear No. 1 spoiler protector.
(1) Remove the peeling paper from the face of a new rear No. 1 spoiler protector.
HINT:
After removing the peeling paper, keep the exposed adhesive free from foreign matter.
(2) Install the rear No. 1 spoiler protector as shown in the illustration.
Test yourself
A quick Toyota 4Runner quiz: every answer comes with an explanation and a link to the manual page.