Front Passenger Side Power Window Switch
Components
COMPONENTS
ILLUSTRATION
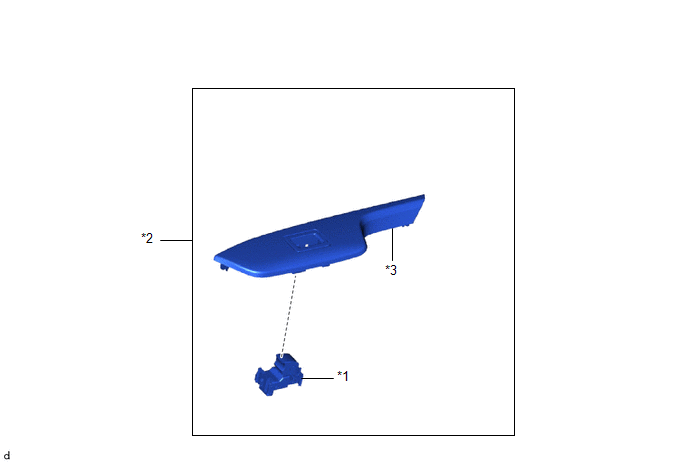
*1 |
POWER WINDOW SWITCH ASSEMBLY |
*2 |
POWER WINDOW SWITCH ASSEMBLY WITH FRONT ARMREST BASE UPPER PANEL |
*3 |
FRONT DOOR ARMREST BASE UPPER PANEL SUB-ASSEMBLY |
- |
- |
Inspection
INSPECTION
PROCEDURE
1. INSPECT POWER WINDOW SWITCH ASSEMBLY
(a) Check the resistance. (1) Measure the resistance according to the value(s) shown in the table below. Standard resistance:
If the result is not as specified, replace the power window switch assembly. |
|
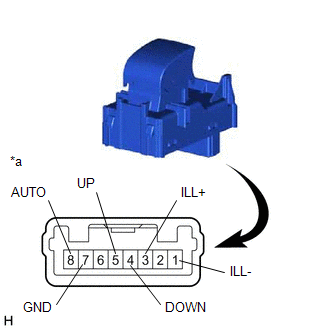
(b) Check that the LED lights up.
(1) Apply battery voltage to the power window switch assembly and check that the LED lights up.
OK:
Battery connection | Specified Condition |
|---|---|
Battery positive (+) → 3 (ILL+) Battery negative (-) → 1 (ILL-) |
LED lights up |
If the result is not as specified, replace the power window switch assembly.
Removal
REMOVAL
PROCEDURE
1. REMOVE POWER WINDOW SWITCH ASSEMBLY WITH FRONT DOOR ARMREST BASE UPPER PANEL SUB-ASSEMBLY (for front passenger side)
Click here
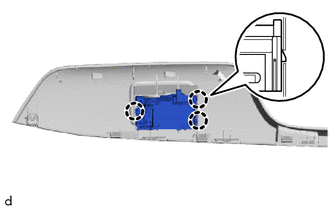
2. REMOVE POWER WINDOW SWITCH ASSEMBLY
(a) Release the clips to remove the power window switch assembly. |
 |
Installation
INSTALLATION
PROCEDURE
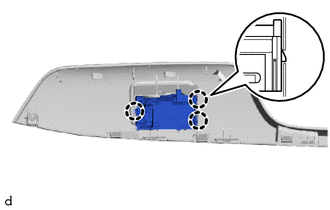
1. INSTALL POWER WINDOW SWITCH ASSEMBLY
(a) Engage the clips to install the power window switch assembly. |
 |
2. INSTALL POWER WINDOW SWITCH ASSEMBLY WITH FRONT DOOR ARMREST BASE UPPER PANEL SUB-ASSEMBLY (for front passenger side)
Click here