Removal
REMOVAL
PRECAUTION / NOTICE / HINT
The procedures required (adjustment, calibration, initialization or registration) that must be performed after parts have been removed, installed or replaced during removal/installation of the continuously variable transmission assembly are shown below.
Procedure Required After Replacing / Removing / Installing PartsReplacement part or procedure | Required Procedure | Effect/Inoperative function when procedure not performed | Link |
|---|---|---|---|
Disconnect the cable from the negative (-) battery terminal. |
Initialize Back Door Lock |
Door Lock Control System |
 |
Memorize Steering Angle Neutral Point |
Lane Departure Alert System (with Steering Control) |
|
|
Pre-Collision System |
|||
|
Verification after Repair |
|
|
CVT Fluid Replacement |
ATF Thermal Degradation Estimate Reset |
The value of the "ATF Thermal Degradation Estimate" Data List item is not estimated correctly. |
|
Replacement of Continuously Variable Transmission Assembly |
Follow the procedures below in the order shown:
|
Fuel economy deterioration |
|
Front wheel alignment adjustment |
Follow the procedures below in the order shown:
|
|
|
CAUTION:
- Since the continuously variable transmission assembly is extremely heavy, be sure to follow the work procedures described in the repair manual.
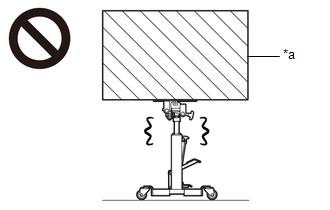
*a
Heavy object exceeding the capacity of the transmission jack
- If the work is not performed according to the procedures in the repair manual, the transmission jack may fall and the components may drop.
- When the engine is hot, do not touch high-temperature areas such as the engine or exhaust pipe.
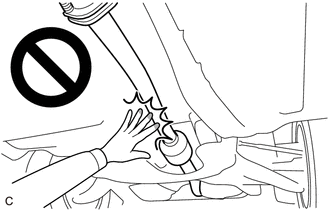
- Contact with high-temperature areas such as the engine and exhaust pipe may cause burns.
PROCEDURE
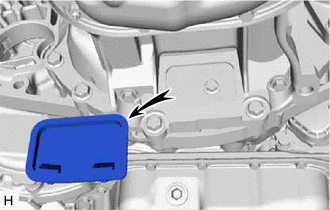
1. REMOVE LOWER ENGINE FLYWHEEL HOUSING COVER
(a) Remove the lower engine flywheel housing cover. |
 |
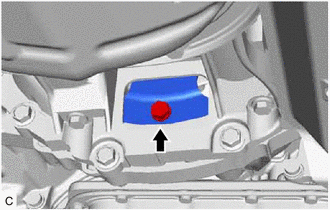
2. REMOVE DRIVE PLATE AND TORQUE CONVERTER CLUTCH ASSEMBLY MOUNTING BOLT
(a) Turn the crankshaft to access the 6 torque converter clutch and drive plate assembly mounting bolts, then remove the mounting bolt of each torque converter clutch and drive plate assembly while holding the crankshaft pulley bolt with a wrench. HINT: There is one black torque converter clutch and drive plate assembly mounting bolt. |
 |
3. REMOVE ENGINE ASSEMBLY WITH TRANSAXLE
Click here
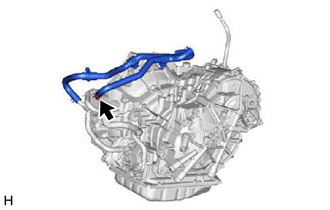
4. DISCONNECT WATER BYPASS HOSE NO. 3
(a) Slide the clip and disconnect the water bypass hose No. 3 from the oil cooler. |
 |
5. DISCONNECT WATER BYPASS HOSE NO. 5
(a) Slide the hose clamp and disconnect the water bypass hose No. 5 from the transaxle oil cooler. |
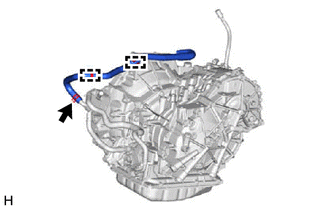 |
(b) Release the 2 clamps to disconnect the water bypass hose No. 5 from the CVT assembly.
6. DISCONNECT ENGINE WIRE
(a) Disconnect the park/neutral position switch connector.
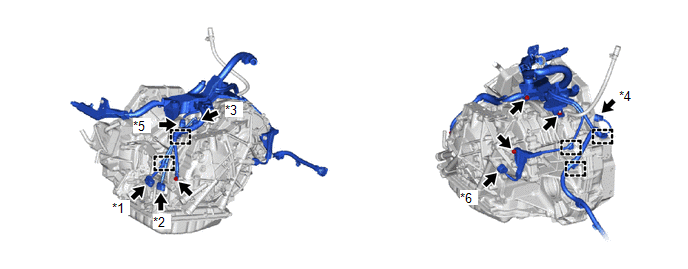
*1 |
Park/neutral position switch connector |
*2 |
Transmission cable connector |
*3 |
Transmission speed sensor (NIN) connector |
*4 |
Transmission speed sensor (NOUT) connector |
*5 |
Transmission speed sensor (NT) connector |
*6 |
Oil pressure sensor connector |
(b) Disconnect the transaxle wire connector.
(c) Disconnect the transaxle speed sensor (NIN) connector.
(d) Disconnect the transaxle speed sensor (NT) connector.
(e) Disconnect the transaxle speed sensor (NOUT) connector.
(f) Disconnect the oil pressure sensor connector.
(g) Remove the 3 bolts and nut, then disconnect the engine wire from the CVT assembly.
(h) Release the 5 clamps to disconnect the engine wire from the CVT assembly.
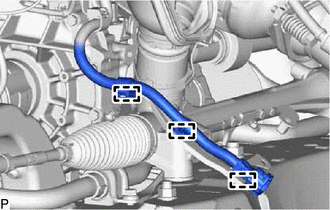
(i) Release the 3 clamps to disconnect the engine wire from the front suspension member sub-assembly. |
 |
7. REMOVE STARTER ASSEMBLY
Click here
8. REMOVE ENGINE REAR SIDE COVER
Click here
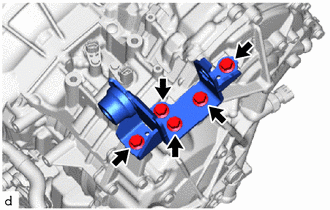
9. REMOVE TRANSVERSE ENGINE MOUNTING BRACKET
(a) Remove the 5 bolts and the transverse engine mounting bracket from the CVT assembly. |
 |
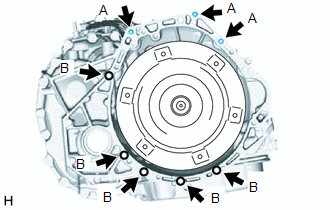
10. REMOVE ENGINE ASSEMBLY
(a) Remove the 8 bolts and the engine assembly from the CVT assembly. NOTICE: To avoid damaging the 2 impact pins, do not pry between the CVT assembly and the engine assembly. HINT:
|
 |
11. REMOVE TORQUE CONVERTER ASSEMBLY
(a) Remove the torque converter assembly from the CVT assembly.
NOTICE:
Remove the torque converter assembly from the input shaft horizontally.
12. REMOVE CVT OIL PUMP T-TYPE OIL SEAL
CAUTION:
- Do not remove the oil pump assembly from the CVT main body assembly, as dust and foreign matter may enter.
- Thoroughly clean the work area, tools to be used and all other equipment before starting the operation, as dust or foreign matter entering the CVT assembly may cause a CVT malfunction that could prevent the vehicle from being driven.
- Do not use cotton work gloves, cloth or paper towels, etc., which may generate lint, dust or other foreign matter.
- Perform this operation as quickly as possible, as dust or foreign matter may enter the CVT assembly while the torque converter assembly is not installed.
- Do not use an air gun until the torque converter assembly is installed, as it may stir up dust or foreign matter.
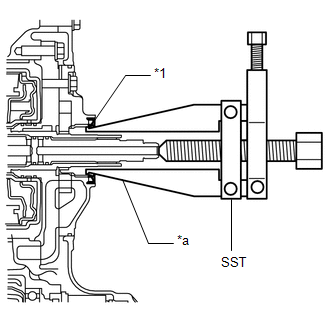
(a) Clean the tips of both SST claws and the centering bolt.
SST: 09308-10010
(b) Using the SST, remove the CVT oil pump T-type oil seal from the CVT assembly. NOTICE: Pay attention to the angle of the SST claws when opening them and make sure they do not contact the oil pump housing, as metal particles may be generated in that case. |
|
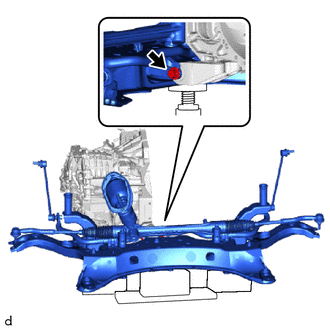
13. REMOVE FRONT SUSPENSION MEMBER SUB-ASSEMBLY
(a) Remove the bolt and front suspension member sub-assembly from the No. 2 engine position control rod. |
 |
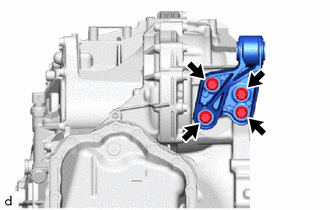
14. REMOVE NO. 2 ENGINE POSITION CONTROL ROD
(a) Remove the 4 bolts and the No. 2 engine position control rod from the CVT assembly. |
 |
15. REMOVE NO. 1 TRANSAXLE CONTROL CABLE BRACKET
(a) Release the clamp of the No. 1 transaxle control cable bracket. |
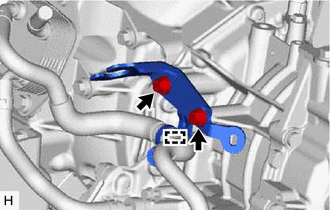 |
(b) Remove the 2 bolts and the No. 1 transaxle control cable bracket from the CVT assembly.
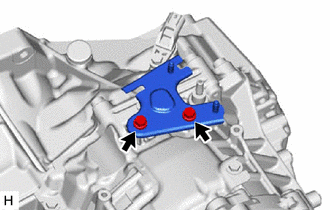
16. REMOVE TRANSAXLE CONTROL CABLE BRACKET
(a) Remove the 2 bolts and the transaxle control cable bracket from the CVT assembly. |
 |
17. REMOVE WIRE HARNESS CLAMP BRACKET
(a) Remove the bolt and the water hose clamp bracket from the CVT assembly. |
|
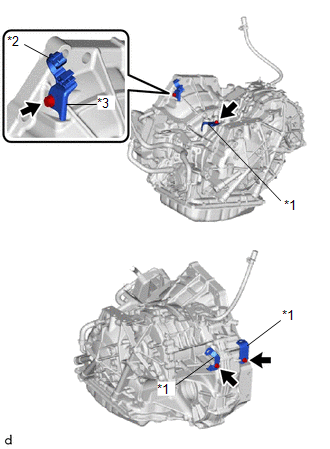
(b) Remove the water bypass hose clamp from the water hose clamp bracket.
(c) Remove the 3 bolts and the 3 wire harness clamp brackets from the CVT assembly.
18. REMOVE PIPE CONNECTOR
(a) Slide the clip and disconnect the No. 1 transaxle oil cooler hose from the pipe connector. NOTICE: Take care not to damage the coating on the hose insertion part of the pipe connector. |
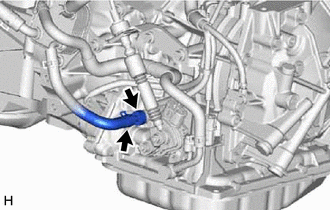 |
(b) Remove the pipe connector from the CVT assembly.
(c) Remove the O-ring from the pipe connector.
19. REMOVE OIL COOLER ELBOW SUB-ASSEMBLY
(a) Slide the clip and disconnect the No. 2 transaxle oil cooler hose from the oil cooler elbow sub-assembly. NOTICE: Be careful not to damage the coating on the hose insertion part of the oil cooler elbow sub-assembly. |
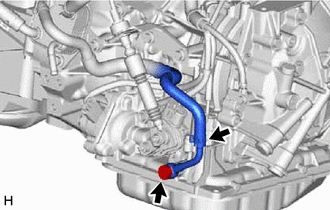 |
(b) Remove the union bolt, oil cooler elbow sub-assembly and gasket from the CVT transaxle assembly.
20. REMOVE AUTOMATIC TRANSMISSION CASE COVER
(a) Remove the 2 clips and automatic transmission case cover from the CVT transaxle assembly. |
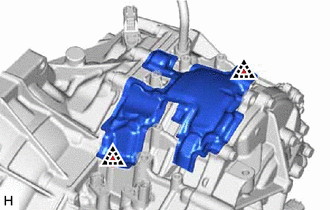 |
21. REMOVE STRAIGHT THREADED PLUG
HINT:
Perform this procedure only when replacement of the straight threaded plug is necessary.
(a) Remove the straight threaded plug and gasket from the CVT transaxle assembly. |
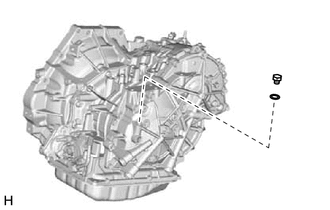 |
22. REMOVE TRANSMISSION BREATHER HOSE SUB-ASSEMBLY
HINT:
Perform this procedure only when replacement of the transmission breather hose sub-assembly is necessary.
(a) Remove the transmission breather hose sub-assembly from the CVT transaxle assembly. |
|
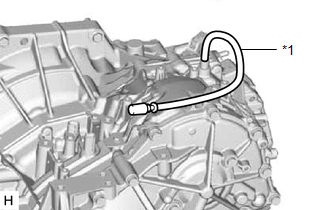
(b) Remove the No. 1 breather plug (CVT) and No. 2 breather plug (CVT) from the breather plug hose. |
|
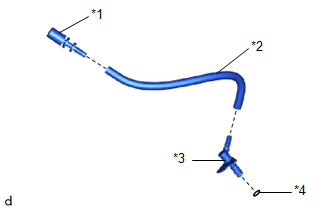
(c) Remove the O-ring from the breather plug.
23. INSPECT TORQUE CONVERTER ASSEMBLY
Click here
24. INSPECT DRIVE PLATE AND RING GEAR SUB-ASSEMBLY
Click here