Installation
INSTALLATION
PRECAUTION / NOTICE / HINT
HINT:
- Repeat the same procedure for the right side and the left side.
- The following procedure applies to the left side.
PROCEDURE
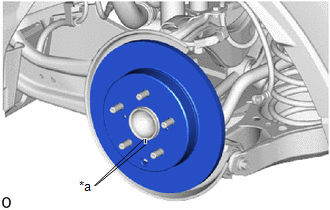
1. INSTALL REAR DISC
(a) Align the alignment marks of the rear disc and the rear axle hub assembly, and install the rear disc. NOTICE: When replacing the rear disc with a new one, select the installation position where the rear disc has the least runout. |
|
2. INSTALL REAR DISC BRAKE CYLINDER BRACKET
(a) Install the rear disc brake cylinder bracket on the rear axle carrier sub-assembly with the 2 bolts.
Torque:
107 N·m {1 091 kgf·cm, 79 ft·lbf}
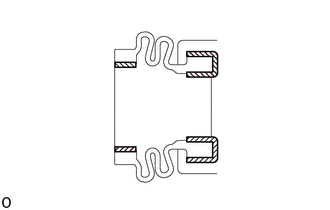
3. INSTALL REAR DISC BRAKE CALIPER SLEEVE DUST BOOT
(a) Apply a thin coat of lithium soap base glycol grease over the entire circumference of 2 new rear disc brake caliper sleeve dust boots.
HINT:
Apply at least 0.3 g (0.01 oz.) of lithium soap base glycol grease to each rear disc brake caliper sleeve dust boot.
 |
Lithium soap base glycol grease |
(b) Install the 2 rear disc brake caliper sleeve dust boots on the rear disc brake cylinder bracket.
4. INSTALL REAR DISC BRAKE CYLINDER SLIDE PIN
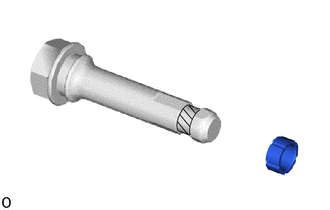
|
Lithium soap base glycol grease |
(a) Apply a thin coat of lithium soap base glycol grease to the contact surface of the No. 2 rear disc brake cylinder slide pin.
(b) Install a new rear disc brake cylinder slide sleeve onto the No. 2 rear disc brake cylinder slide pin.
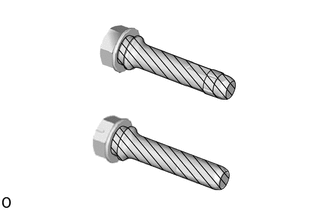
|
Lithium soap base glycol grease |
(c) Apply a thin coat of lithium soap base glycol grease to the sliding part and sealing surfaces of the No. 1 rear disc brake cylinder slide pin and the No. 2 rear disc brake cylinder slide pin.
(d) Install the No. 1 rear disc brake cylinder slide pin and the No. 2 rear disc brake cylinder slide pin on the rear disc brake cylinder bracket. |
|
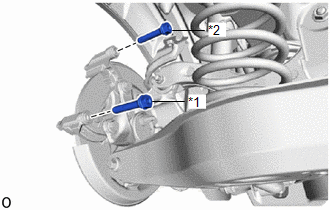
(e) Push the No. 1 rear disc brake cylinder slide pin and the No. 2 rear disc brake cylinder slide pin into each rear disc brake caliper sleeve dust boot to engage the pins with the boots.
5. INSTALL REAR DISC BRAKE PAD SUPPORT PLATE
(a) Install the 4 rear disc brake pad support plates on the rear disc brake cylinder bracket.
NOTICE:
Make sure to install the rear disc brake pad support plate in the correct position and direction.
6. INSTALL REAR DISC BRAKE ANTI-SQUEAL SHIM
Click here
7. INSTALL REAR DISC BRAKE PAD
(a) Install the 2 rear disc brake pads on the rear disc brake cylinder bracket.
NOTICE:
Install the rear disc brake pad so that the rear disc brake pad wear indicator plate is on the lower side of the vehicle.
HINT:
If the rear disc brake pad has an identification mark, make sure to check the installation location.
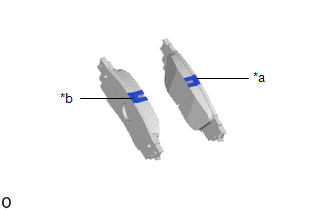
*a |
Inner side (brown) |
*b |
Outer side (green) |
8. INSTALL REAR DISC BRAKE CALIPER ASSEMBLY
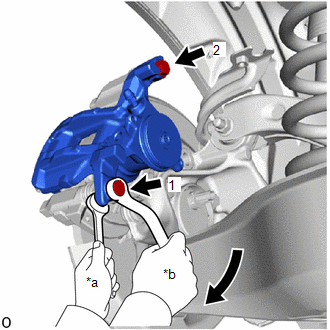
(a) Hold the 2 rear disc brake cylinder slide pins and install the rear disc brake caliper assembly on the rear disc brake cylinder bracket using 2 new bolts in the order shown in the illustration. Torque: 34 N·m {350 kgf·cm, 25 ft·lbf} |
|
9. INSTALL PARKING BRAKE ACTUATOR ASSEMBLY
(a) Apply a thin coat of lithium soap based glycol grease to a new O-ring.
(b) Install the O-ring to the rear disc brake cylinder assembly.
NOTICE:
Be sure to replace the O-ring with a new one when installing the parking brake actuator assembly.
(c) Using a 5 mm hexagon socket wrench, install the parking brake actuator assembly to the rear disc brake cylinder assembly with the 2 bolts.
Torque:
8.4 N·m {86 kgf·cm, 74 in·lbf}
10. CONNECT NO. 2 PARKING BRAKE CABLE ASSEMBLY
(a) Connect the No. 2 parking brake cable assembly connector to the parking brake actuator assembly.
11. CONNECT REAR FLEXIBLE HOSE
(a) Connect the rear flexible hose to the rear disc brake caliper assembly using a new union bolt and new gaskets.
Torque:
30 N·m {310 kgf·cm, 22 ft·lbf}
NOTICE:
Correctly install the rear flexible hose lock in the lock hole of the rear disc brake caliper assembly.
12. BLEED BRAKE LINE
Click here
13. BLEED AIR FROM REAR DISC BRAKE CALIPER ASSEMBLY
CAUTION:
If the rear disc brake caliper assembly has been disassembled, bleed air from the rear disc brake caliper.
NOTICE:
- Bleed the air while keeping the brake fluid level between the MIN and MIN marks of the brake fluid reservoir.
- Do not allow brake fluid to contact painted surfaces. If brake fluid spills onto a painted surface, wipe it off immediately.
HINT:
- Repeat the same procedure for the right side and the left side.
- The following procedure applies to the left side.
- While bleeding air from the rear disc brake caliper assembly, the bolt may be reused during the bleeding procedure. When air bleeding is complete, replace the bolt with a new one.
(a) Perform the rear disc brake pad replacement mode procedure 5 times.
Click here
(b) Release the parking brake.
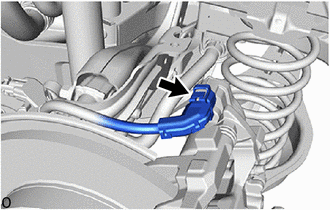
(c) Disconnect the No. 2 parking brake cable assembly connector from the parking brake actuator assembly. |
 |
(d) Remove the No. 1 roof center ventilation grille.
Click here
(e) Remove the brake master cylinder reservoir filler cap.
(f) Add brake fluid to maintain the level between the MIN and MAX marks of the reservoir during brake bleeding.
NOTICE:
- Make sure there is enough brake fluid in the reservoir.
- If brake fluid leaks onto a painted surface, wipe it off immediately.
- Do not remove the brake master cylinder reservoir filter, and be sure to fill the brake master cylinder reservoir with new brake fluid to prevent possible contamination of the brake system. Contamination, for example by dirt particles or mineral oil, may cause brake malfunctions.
(g) Remove the bolt and detach the rear disc brake caliper assembly (*1). NOTICE: Keep the No. 2 rear disc brake cylinder slide pin free of foreign objects. |
|
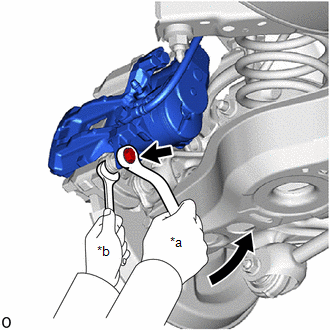
(h) Hold the rear disc brake caliper assembly horizontally, then tilt it 45° toward the bleeder screw side as shown in the illustration. (*2) |
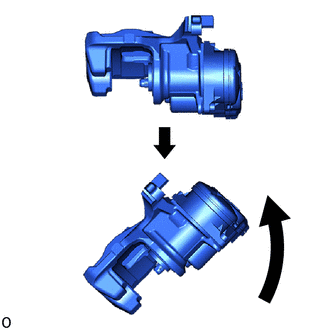 |
(i) Temporarily install the rear disc brake cylinder assembly with the bolt (*3). |
|
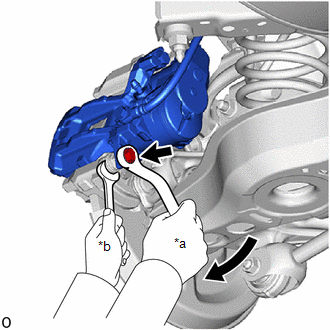
(j) Depress the brake pedal several times, then loosen the bleeder plug while keeping the brake pedal depressed (*4).
(k) When brake fluid stops flowing, tighten the bleeder plug, then release the brake pedal. (*5)
(l) Repeat steps (*1) to (*5) 3 times.
NOTICE:
If there is still air in the system after performing steps (*1) to (*5) 3 times, repeat steps (*1) to (*5) until all air is bled out.
(m) Fully tighten the bleeder plug.
Torque:
8.3 N·m {85 kgf·cm, 73 in·lbf}
(n) Install the rear disc brake cylinder assembly with a new bolt.
Torque:
34 N·m {350 kgf·cm, 25 ft·lbf}
(o) Connect the No. 2 parking brake cable assembly connector to the parking brake actuator assembly.
(p) Check for any brake fluid leaks.
(q) Check the brake fluid level in the reservoir.
Click here
(r) Install the brake master cylinder reservoir filler cap assembly.
(s) Install the No. 1 cowl top ventilator center grille.
Click here
14. INSTALL REAR WHEEL
Click here
15. RESTORE NORMAL OPERATING CONDITIONS
Click here