Steering column assy (TMC MADE)
- PRECAUTION
- DISCONNECT BATTERY NEGATIVE TERMINAL
- REMOVE STEERING WHEEL COVER LOWER No.2
- REMOVE STEERING WHEEL COVER LOWER No.3 (W/O STEERING PAD SWITCH 4 SPOKE STEERING WHEEL)
- REMOVE CONNECTOR COVER (W/ STEERING PAD SWITCH 4 SPOKE STEERING WHEEL)
- REMOVE STEERING WHEEL COVER LOWER No.3 (3 SPOKE STEERING WHEEL ASSY)
- INSPECT PLACE FRONT WHEELS FACING STRAIGHT AHEAD
- REMOVE HORN BUTTON ASSY
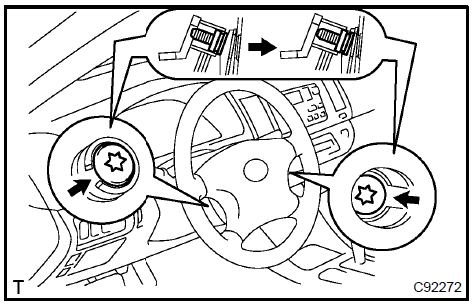
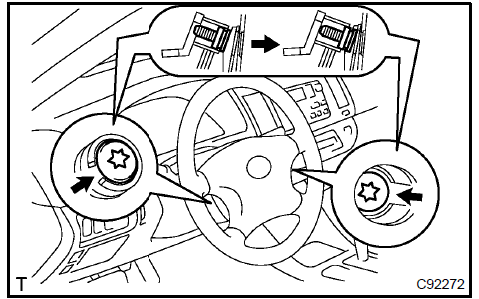
Using a torx) socket wrench, loosen the 2 torx) screws until the groove along the screw circumference catches on the screw case.
Pull out the horn button assy from the steering wheel.
Using a screwdriver, release the lock part of each airbag connector and disconnect the 2 airbag connectors.
Disconnect the horn connector. (4 Spoke steering wheel)
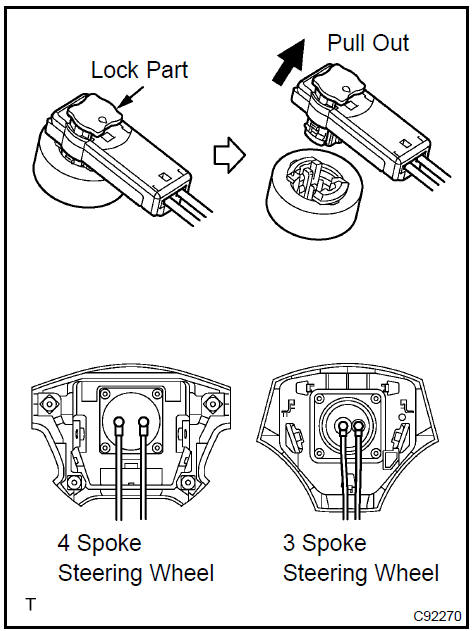
Never disassemble the horn button assy.

Disconnect the connector.
Remove the steering wheel assy set nut.
Place matchmarks on the steering wheel assy and main shaft assy.
- Using SST, remove the steering wheel assy.
SST 09950−50013 (09951−05010, 09952−05010, 09953−05020, 09954−05021)
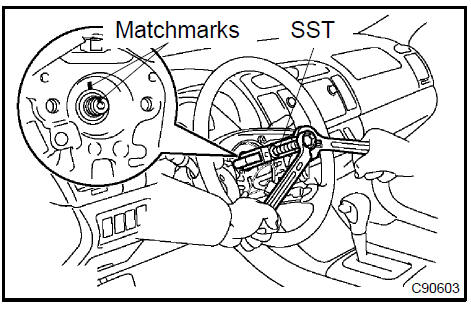 Remove steering wheel assy
- REMOVE INSTRUMENT CLUSTER FINISH PANEL
- REMOVE STEERING COLUMN COVER
a. Remove the 2 screws and steering column cover.
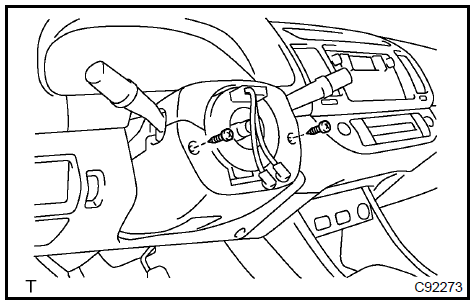 Remove steering column cover 12. DISCONNECT FLOOR SHIFT PARKING LOCK CABLE ASSY
a. Using a screwdriver, disconnect the floor shift parking lock cable from the upper bracket.
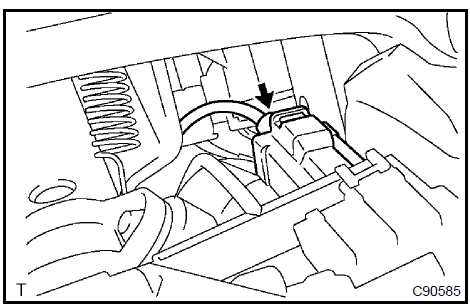 Disconnect floor shift parking lock cable assy
- REMOVE SPIRAL CABLE SUB−ASSY
- REMOVE HEADLAMP DIMMER SWITCH ASSY
a. Disconnect the connector and remove the headlamp dimmer switch assy.
15. REMOVE WINDSHIELD WIPER SWITCH ASSYa. Disconnect the connector and remove the windshield wiper switch assy.
- REMOVE FRONT DOOR SCUFF PLATE LH
- REMOVE COWL SIDE TRIM SUB−ASSY LH
- REMOVE INSTRUMENT PANEL COIN BOX SUB−ASSY
- REMOVE INSTRUMENT PANEL SUB−ASSY UPPER
- REMOVE INSTRUMENT PNL INSERT SUB−ASSY LWR LH
- REMOVE HEATER TO FOOT DUCT No.3
- DISCONNECT STEERING INTERMEDIATE SHAFT SUB−ASSY
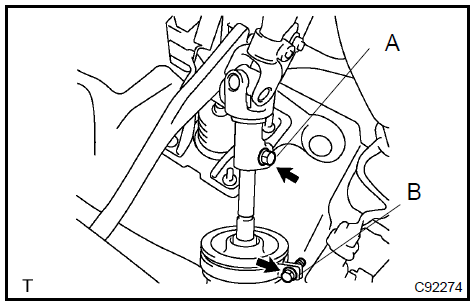
Loosen the bolt A and remove the clamp from the steering column hole cover No.1.
Separate the steering column hole cover No.2 from the steering column hole cover No.1.
Loosen the bolt B.
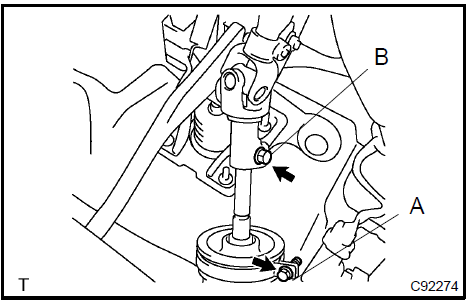
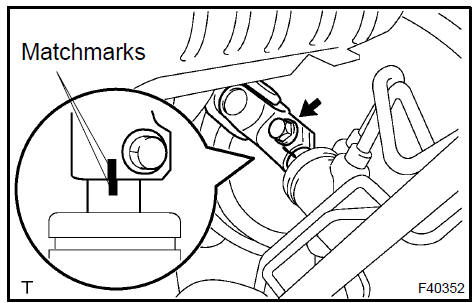
Place matchmarks on the steering intermediate shaft sub−assy and steering gear assy.
Remove the bolt and disconnect the steering intermediate shaft sub−assy.
Disconnect the connectors and wire harness clamps from the steering column assy.
Remove the 3 bolts and steering column assy.
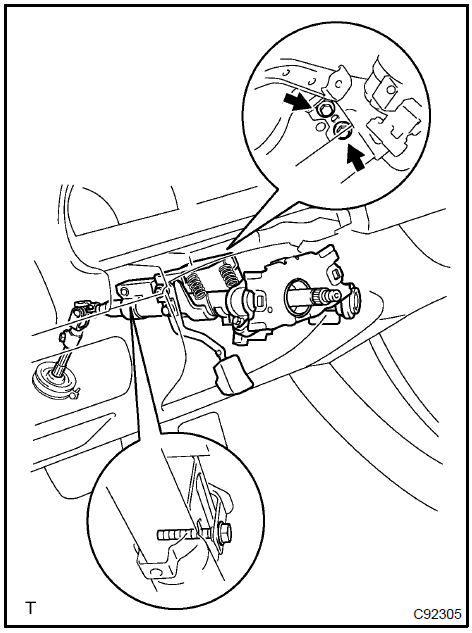 Remove steering column assy 24. REMOVE STEERING INTERMEDIATE SHAFT SUB−ASSY
Place matchmarks on the steering intermediate shaft sub−assy and steering sliding yoke sub−assy.
Remove the bolt and steering intermediate shaft sub− assy.
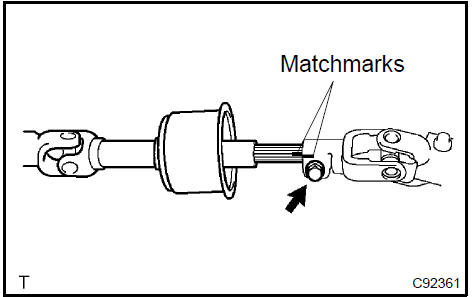 Remove steering intermediate shaft sub-assy
- REMOVE STEERING COLUMN HOLE COVER SUB−ASSY No.2
- REMOVE STEERING SLIDING YOKE SUB−ASSY
Place matchmarks on the steering sliding yoke sub−assy and steering main shaft assy.
Remove the bolt and steering sliding yoke sub−assy from the steering main shaft assy.
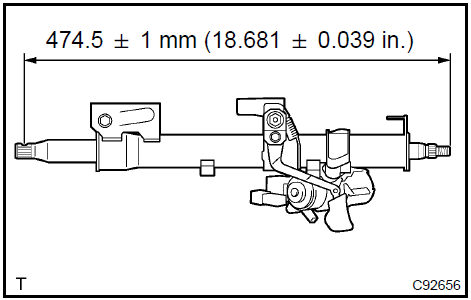
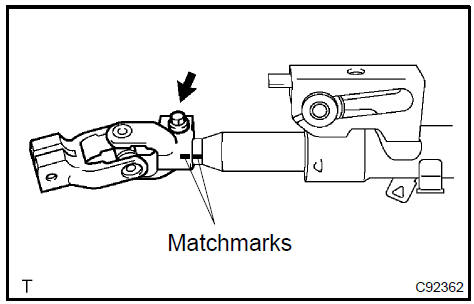 Remove steering sliding yoke sub-assy 27. INSPECT STEERING COLUMN ASSY a. Measure the length of steering main shaft.Standard length: 474.5 ± 1 mm (18.681 ± 0.039 in.)
 Inspect steering column assy 28. REMOVE TRANSPONDER KEY AMPLIFIER (W/ ENGINE IMMOBILISER SYSTEM)
Disengage the claw hung on the upper bracket with a screwdriver.
Pull the transponder key amplifier toward the rear of the vehicle with the claw open.
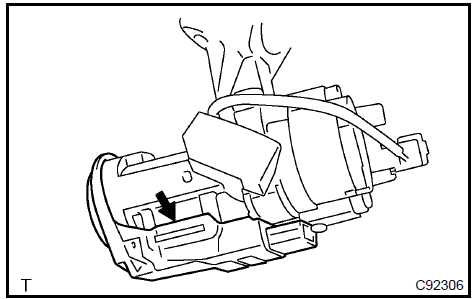 Remove transponder key amplifier (W/engine immobiliser system)
- REMOVE KEY CYLINDER LAMP ASSY (W/ ILLUMINATED ENTRY SYSTEM)
- REMOVE STEERING COLUMN UPPER W/SWITCH BRACKET ASSY
Using a centering punch, mark the center of the 2 lapered− head bolts.
Using a 3 − 4 mm (0.12 − 0.16 in.) drill, drill into the 2 bolts.
Using a screw extractor, remove the 2 bolts and steering column upper w/ switch bracket assy.
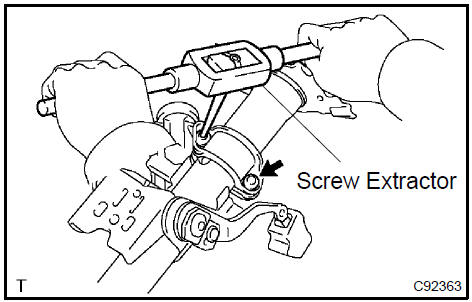 Remove steering column upper W/switch bracket assy
- REMOVE STEERING COLUMN CLAMP UPPER
- REMOVE STEERING MAIN SHAFT ASSY
a. Using a snap ring expander, remove the steering main shaft snap ring (outer side).
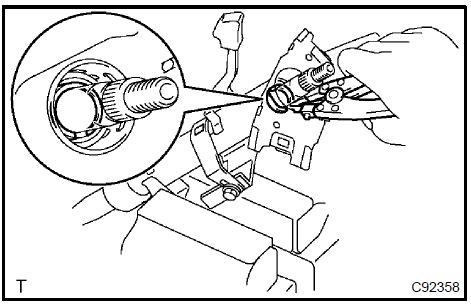
b. Using a brass bar and a hammer, remove the steering main shaft assy and steering main shaft radial ball bearing.
NOTICE: Be careful not to drop the steering main shaft assy.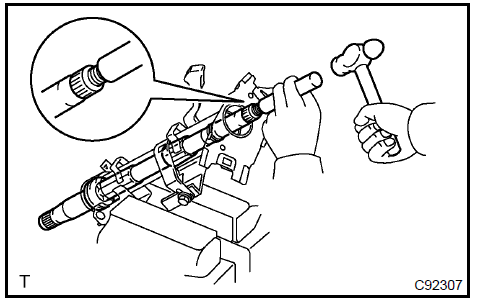
c. Using a snap ring expander, remove the steering main shaft snap ring (inner side).

Place the ignition switch lock cylinder assy at the ACC position.
Push down the stop pin with a screwdriver, and pull out the cylinder assy.
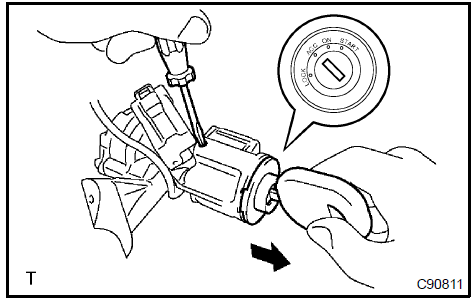 Remove ignition switch lock cylinder assy 34. REMOVE UN−LOCK WARNING SWITCH ASSY
Disconnect the un−lock warning switch assy connector from the ignition or starter switch assy.
Remove the un−lock warning switch assy.
 Remove un-lock warning switch assy 35. REMOVE IGNITION OR STARTER SWITCH ASSY
a. Remove the 2 screws and ignition or starter switch assy from the steering column bracket assy.
36. INSTALL IGNITION OR STARTER SWITCH ASSYa. Install the ignition or starter switch assy to the steering column bracket assy with the 2 screws.
37. INSTALL UN−LOCK WARNING SWITCH ASSYInstall the un−lock warning switch assy.
Connect the un−lock warning switch assy connector to the ignition or starter switch assy.
 Install un-lock warning switch assy 38. INSTALL IGNITION SWITCH LOCK CYLINDER ASSY
Make sure that the ignition switch lock cylinder assy is at the ACC position.
Install the ignition switch lock cylinder assy.
Check that the steering lock mechanism is activated when removing the key.
Check that the steering lock mechanism is deactivated when inserting the key and turning it to ACC position.
Using a snap ring expander, install a new steering main shaft snap ring (inner side) to the steering main shaft assy.
Install the steering main shaft assy to the steering column tube.
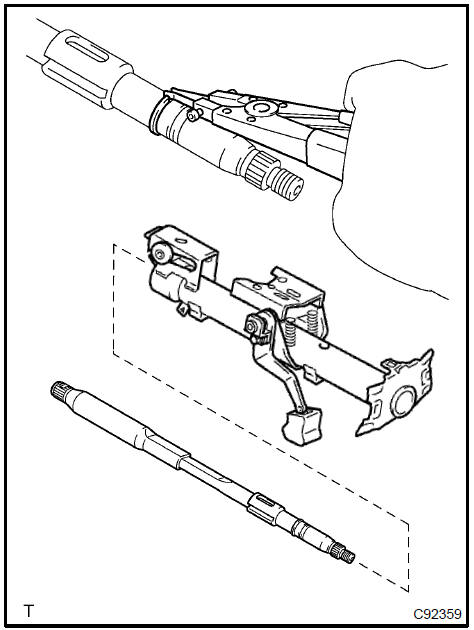
c. Using a snap ring expander, install a new steering main shaft snap ring (outer side) to the steering main shaft assy.

SST 09608−06041
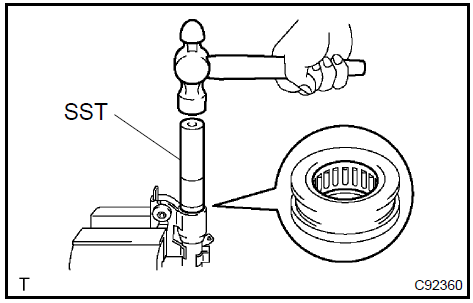
Temporarily install the steering column upper w/switch bracket assy and steering column upper clamp with 2 new tapered−head bolts.
Tighten the 2 tapered−head bolts until the bolt heads break off.
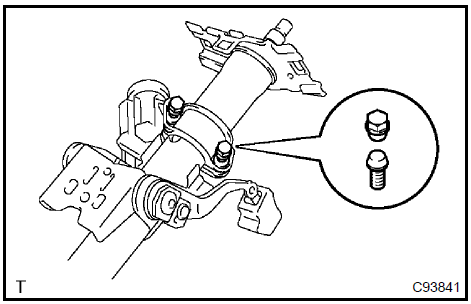 Install steering column upper W/switch bracket assy
- INSTALL KEY CYLINDER LAMP ASSY (W/ ILLUMINATED ENTRY SYSTEM)
- INSTALL TRANSPONDER KEY AMPLIFIER (W/ ENGINE IMMOBILISER SYSTEM)
Align the transponder key amplifier with the installation position of the upper bracket with the amplifier inclined.
Push the trasponder key amplifier up and connect it to the upper bracket.
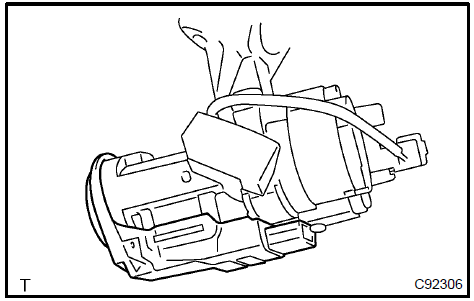 Install transponder key amplifier (W/engine immobiliser system) 45. INSTALL STEERING SLIDING YOKE SUB−ASSY
Align the matchmark with the one on the steering sliding yoke sub−assy and steering main shaft assy.
- Install the steering sliding yoke sub−assy with the bolt. Torque: 35 N·m
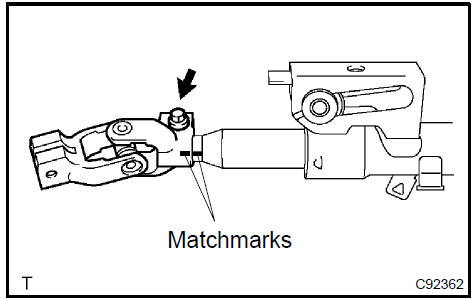 Install steering sliding yoke sub-assy 46. INSTALL STEERING COLUMN HOLE COVER SUB−ASSY No.2
a. Install the steering column hole cover sub−assy No.2 to the steering intermediate shaft sub−assy.
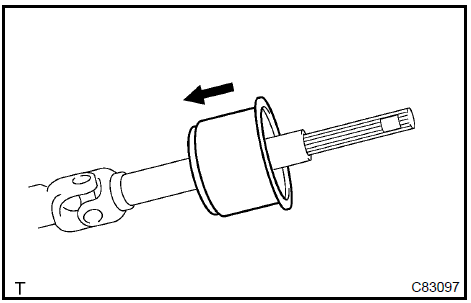 Install steering column hole cover sub-assy No.2 47. INSTALL STEERING INTERMEDIATE SHAFT SUB−ASSY
Align the matchmark with the one on the steering intermediate shaft sub−assy and steering main shaft assy.
Temporarily install the steering intermediate shaft sub− assy with the bolt.
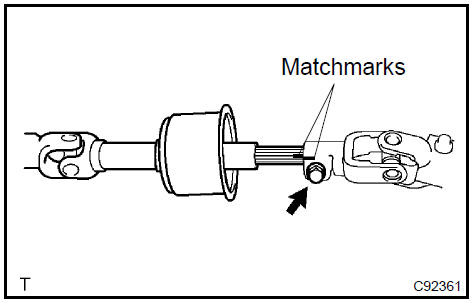 Install steering intermediate shaft sub-assy 48. INSTALL STEERING COLUMN ASSY
- Install the steering column assy with the 3 bolts. Torque: 21 N·m
Connect the connectors and wire harness clamps.
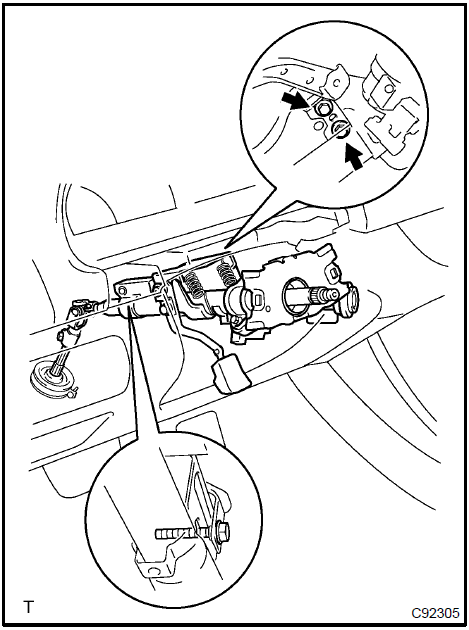 Install steering column assy 49. CONNECT STEERING INTERMEDIATE SHAFT SUB−ASSY
Align the matchmarks on the intermediate shaft sub−assy and steering gear assy.
- Install the steering intermediate shaft sub−assy with the bolt. Torque: 35 N·m
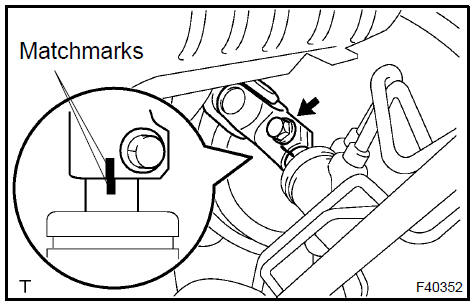
- Tighten the bolt A. Torque: 35 N·m
Install the steering column hole cover No. 2 to the steering hole cover No.1.
Connect the clamp to the steering column hole cover No.1 and tighten the bolt B.
a. Install the windshield wiper switch assy and connect the connector.
51. INSTALL HEADLAMP DIMMER SWITCH ASSYa. Install the headlamp dimmer switch assy and connect the connector.
- PLACE FRONT WHEELS FACING STRAIGHT AHEAD
- INSTALL SPIRAL CABLE SUB−ASSY
- CONNECT FLOOR SHIFT PARKING LOCK CABLE ASSY
Turn the ignition switch to ACC or ON.
Connect the cable to the upper bracket.
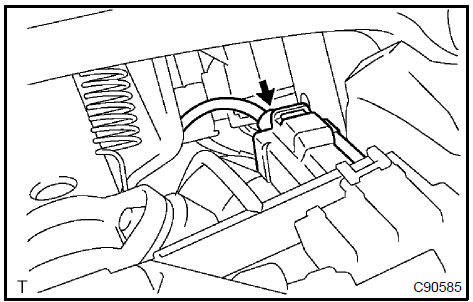 Connect floor shift parking lock cable assy
- CHECK KEY INTERLOCK OPERATION
- INSTALL STEERING COLUMN COVER
a. Install the steering column cover with the 2 screws.
 Install steering column cover
- INSTALL INSTRUMENT CLUSTER FINISH PANEL
- INSTALL HEATER TO FOOT DUCT No.3
- INSTALL INSTRUMENT PNL INSERT SUB−ASSY LWR LH
- INSTALL INSTRUMENT PANEL SUB−ASSY UPPER
- INSTALL INSTRUMENT PANEL COIN BOX SUB−ASSY
- INSTALL COWL SIDE TRIM SUB−ASSY LH
- INSTALL FRONT DOOR SCUFF PLATE LH
- CENTER SPIRAL CABLE
Check that the ignition switch is at OFF.
Check that the battery negative terminal is disconnected.
c. Turn the cable counterclockwise by hand until it becomes harder to turn.
 Center spiral cable
d. Then rotate the cable clockwise about 2.5 turns to align the marks.
HINT: The cable will rotate about 2.5 turns to both right and left of the center.
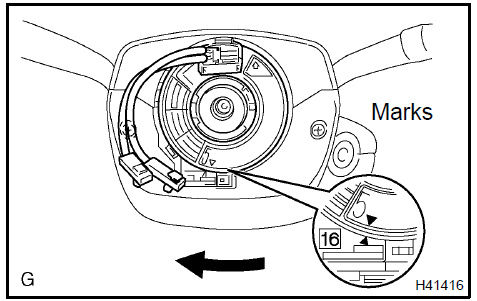
Align the matchmark with the one on the steering wheel assy and steering main shaft assy.
- Install the steering wheel assy with the set nut. Torque: 50 N·m
Connect the connector.
- INSPECT HORN BUTTON ASSY
- INSTALL HORN BUTTON ASSY
- Never use the airbag parts removed from another vehicle.
When replacing parts, replace with new ones.
- Make sure that the horn button assy is installed with the specified torque.
- If the horn button assy has been dropped, or there are cracks, dents or other defects in the case or connector, replace the horn button assy with a new one.
- When installing the horn button assy, take care so that the wirings do not interfere with other parts and that they are not pinched between other parts.
Connect the 2 airbag connectors.
Connect the horn connector. (4 Spoke steering wheel)
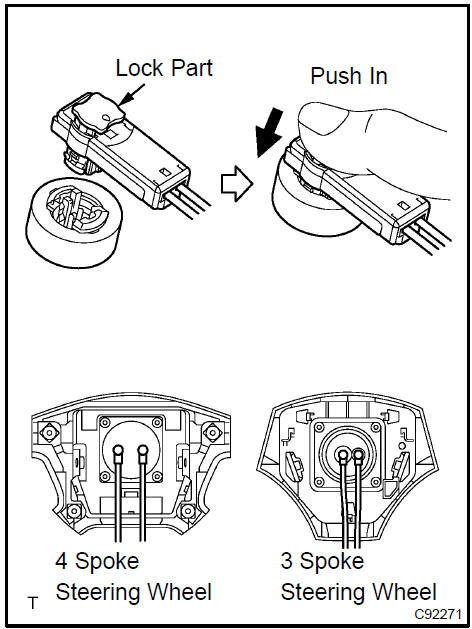
Install the horn button assy after confirming that the circumference groove of the torx) screws is caught on the screw case.
- Using a torx) socket wrench, torque the 2 screws. Torque: 8,8 N·m
- INSTALL STEERING WHEEL COVER LOWER No.2
- INSTALL STEERING WHEEL COVER LOWER No.3 (W/O STEERING PAD SWITCH 4 SPOKE STEERING WHEEL)
- INSTALL CONNECTOR COVER (W/ STEERING PAD SWITCH 4 SPOKE STEERING WHEEL)
- INSTALL STEERING WHEEL COVER LOWER No.3 (3 SPOKE STEERING WHEEL ASSY)
- INSPECT STEERING WHEEL CENTER POINT
- INSPECT SRS WARNING LIGHT
Test yourself
A quick Toyota Camry quiz: every answer comes with an explanation and a link to the manual page.