Inspection procedure
:
- if dtc p0441 (purge flow), p0446 (vsv for ccv or vsv for pressure switching valve), p0451, p0452 or p0453 is output with dtc p0442 or p0456 , first troubleshoot dtc p0441, p0446, p0451, p0452 or p0453. If no malfunction is detected, troubleshoot dtc p0442 or p0456 next.
- Read freeze frame data using the hand–held tester or the obd ii scan tool. Freeze frame data records the engine conditions when a malfunction is detected. When troubleshooting, it is useful for determining whether the vehicle was running or stopped, the engine was warmed up or not, the air–fuel ratio was lean or rich, etc. At the time of the malfunction.
- When the engine run time in the freeze frame data is less than 200 seconds, carefully check the vapor pressure sensor.






- Remove the fuel tank cap.
- visually check the fuel inlet pipe for damage.
- reinstall the fuel tank cap.


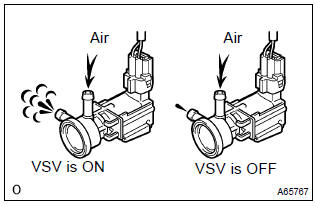
- Select the item ”diagnosis/enhanced obd ii/active test” mode on the hand–held tester.
- disconnect the vacuum hose of the vsv for evap from the charcoal canister.
- start the engine.
- select the item ”evap vsv (alon)/all” in the active test and operate evap vsv (press the right or left button).
- when the vsv for the evap is operated by the hand–held tester, check whether the disconnected hose applies suction to your finger. Result:
vsv is on: disconnected hose sucks.Vsv is off: disconnected hose does not suck.
- reconnect the vacuum hose.


- Check that the vacuum hose is connected correctly.
- check the vacuum hose for looseness and disconnection.
- check the vacuum hose for cracks, hole, damage and blockage.




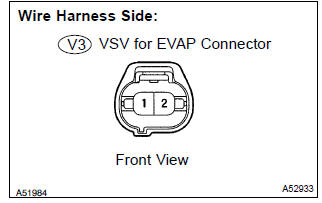
- Check the harness and the connector between the vsv for evap and the ecm.
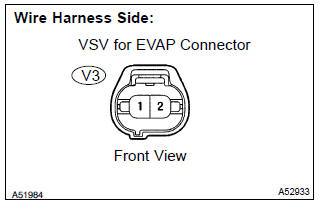
- Disconnect the v3 vsv for evap connector.
- Disconnect the e3 ecm connector.
- Check the resistance between the wire harness side connectors.
Standard (check for open):

Standard (check for short):

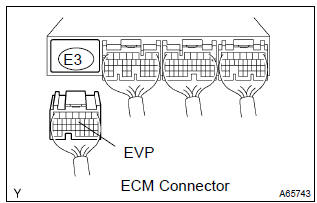
- Reconnect the vsv for evap connector.
- Reconnect the ecm connector.
- check the harness and the connector between the vsv for evap and the efi relay.
- Disconnect the v3 vsv for evap connector.
- Remove the efi relay from the engine room r/b.
- Check the resistance between the wire harness side connectors.
Standard (check for open):

Standard (check for short):

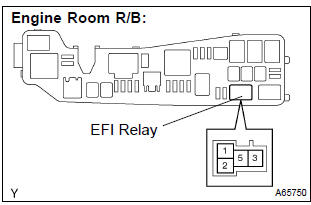
- Reconnect the vsv for evap connector.
- Reinstall the efi relay.


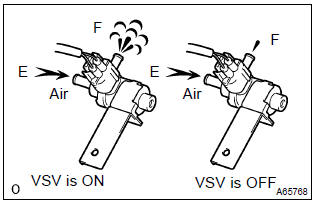
- Disconnect the vacuum hose of the vsv for ccv from the charcoal canister.
- start the engine.
- select the item ”diagnosis/enhanced obd ii/active test” mode on the hand–held tester.
- select the item ”can ctrl vsv/all” in the active test and operate can ctrl vsv (press the right or left button).
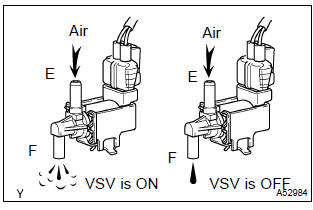
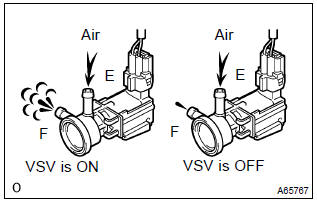
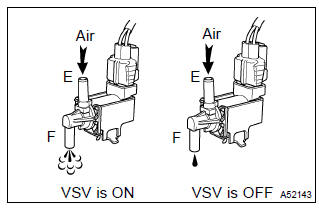
- check the vsv operation when it is operated by the hand–held tester.
vsv is on: air from port e flows out through port f.
Vsv is off: air does not flow from port e to port f.


- Check that the vacuum hose is connected correctly.
- check the vacuum hose for looseness and disconnection.
- check the vacuum hose for cracks, hole, damage and blockage.




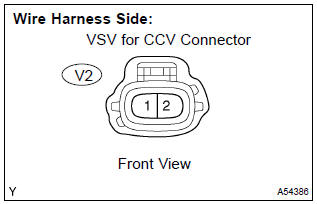
- Check the harness and connector between the vsv for ccv and ecm.
- Disconnect the v2 vsv for ccv connector.
- Disconnect the e5 ecm connector.
- Check the resistance between the wire harness side connectors.
Standard (check for open):
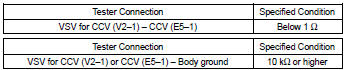
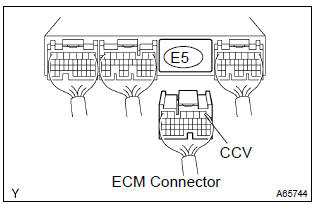
- Reconnect the vsv for ccv connector.
- Reconnect the ecm connector.
- check the harness and the connector between the vsv for ccv and the efi relay.
- Disconnect the v2 vsv for ccv connector.
- Remove the efi relay from the engine room r/b.
- Check the resistance between the wire harness side connectors.
Standard (check for open):

Standard (check for short):

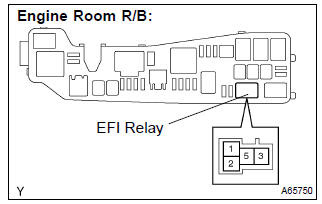
- Reconnect the vsv for ccv connector.
- Reinstall the efi relay.


- Select the item ”diagnosis/enhanced obd ii/active test” mode on the hand–held tester.
- select the item ”tank bypass vsv/all” in the active test and operate tank bypass vsv (press the right or left button).
- check the vsv operation when it is operated by the hand–held tester.
vsv is on: air from port e flows out through port f.
Vsv is off: air does not flow from port e to port f.




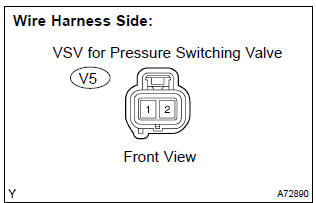
- Check the harness and the connector between the vsv for pressure switching valve and the ecm.
- Disconnect the v5 vsv for pressure switching valve connector.
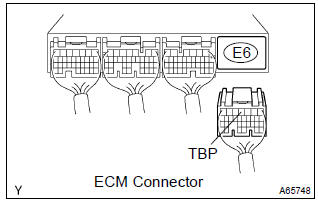
- Disconnect the e6 ecm connector.
- Check the resistance between the wire harness side connectors.
Standard (check for open):

Standard (check for short):

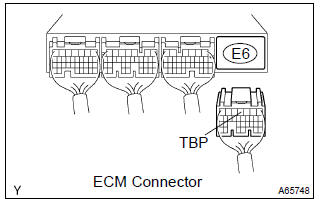
- Reconnect the vsv for pressure switching valve connector.
- Reconnect the ecm connector.
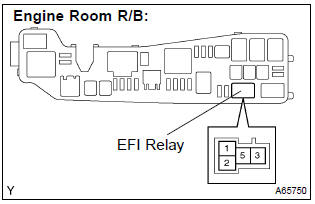
- check the harness and the connector between the vsv for pressure switching valve and the efi relay.
- Disconnect the v5 vsv for pressure switching valve connector.
- Remove the efi relay from the engine room r/b.
- Check the resistance between the wire harness side connectors.
Standard (check for open):

Standard (check for short):

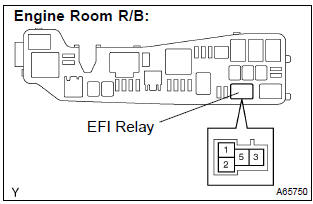
- Reconnect the vsv for pressure switching valve connector.
- Reinstall the efi relay.


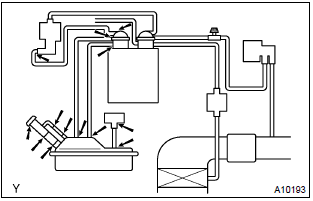
- Check whether hoses close to the fuel tank have been modified, and check if there are signs of any accident near the fuel tank.
- Check the following parts for cracks, deformation or loose connection:
- fuel tank
- fuel tank filler pipe
- hoses and tubes around fuel tank


- Check that the vacuum hose is connected correctly.
- check the vacuum hose for looseness and disconnection.
- check the vacuum hose for cracks, hole and damage.


- Check the connection between the fuel tank and fuel evap pipe, the fuel evap pipe and under–floor fuel tube, the under–floor fuel tube and charcoal canister.
- check the hose and the tube for cracks, hole and damage.

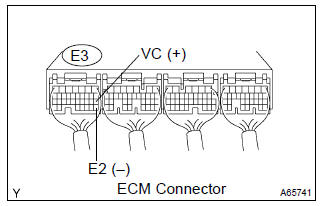
- Turn the ignition switch on.
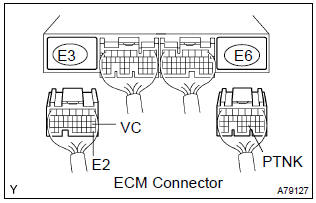
- measure the voltage between the terminals of the e3 ecm connector.
Standard:



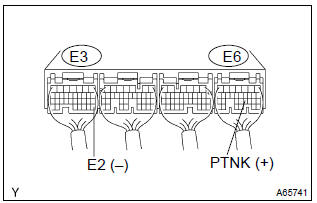
- Turn the ignition switch on.
- measure the voltage between terminals of the e3 and e6 ecm connectors.
- Disconnect the vacuum hose from the vapor pressure sensor.
Standard (1):

: the vacuum applied to the vapor pressure sensor must be less than 66.7 Kpa (500 mmhg, 19.7 In.Hg).
- Using the mityvac (hand–held vacuum pump), apply a vacuum of 4.0 Kpa (30 mmhg, 1.18 In.Hg) to the vapor pressure sensor.
Standard (2):

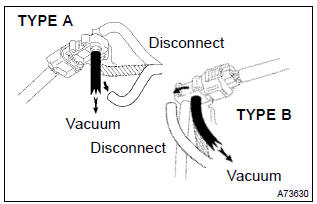
- Reconnect the vacuum hose.


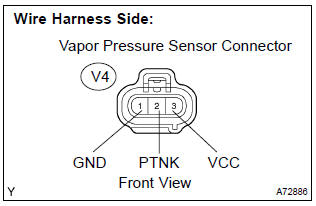
- Disconnect the v4 vapor pressure sensor connector.
- disconnect the e3 and e6 ecm connectors.
- check the resistance between the wire harness side connectors.
Standard (check for open):

Standard (check for short):

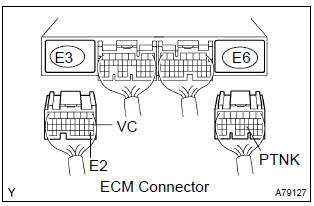
- Reconnect the vapor pressure sensor connector.
- reconnect the ecm connectors.














- Remove the fuel tank cap.
- visually check the fuel inlet pipe for damage.

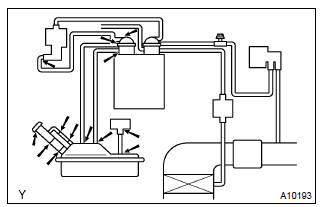
- Check whether hoses close to the fuel tank have been modified, and check if there are signs of any accident near the fuel tank or the charcoal canister.
- Check the following parts for cracks, deformation or loose connection:
- fuel tank
- charcoal canister
- fuel tank filler pipe
- hoses and tubes around fuel tank and charcoal canister


- Check that the vacuum hose is connected correctly.
- check the vacuum hose for looseness and disconnection.
- check the vacuum hose for cracks, hole and damage.


- Check the connection between the fuel tank and fuel evap pipe, the fuel evap pipe and under floor fuel tube , the under floor fuel tube and charcoal canister.
- check the hose and the tube for cracks, hole and damage.


- Check that the vacuum hose is connected correctly.
- check the vacuum hose for looseness and disconnection.
- check the vacuum hose for cracks, hole and damage.






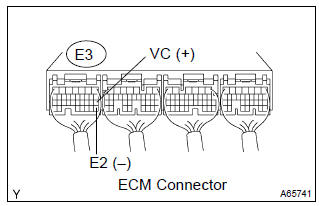
- Turn the ignition switch on.
- measure voltage between the terminals of the e3 ecm connector.
Standard:



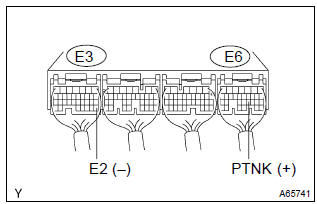
- Turn the ignition switch on.
- measure the voltage between terminals of the e3 and e6 ecm connectors.
- Disconnect the vacuum hose from the vapor pressure sensor.
Standard (1):

: the vacuum applied to the vapor pressure sensor must be less than 66.7 Kpa (500 mmhg, 19.7 In.Hg).
- Using the mityvac (hand–held vacuum pump), apply a vacuum of 4.0 Kpa (30 mmhg, 1.18 In.Hg) to the vapor pressure sensor.
Standard (2):

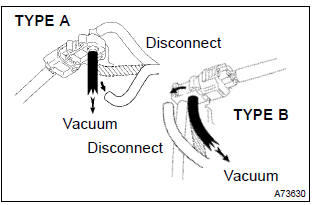
- Reconnect the vacuum hose from the vapor pressure sensor.


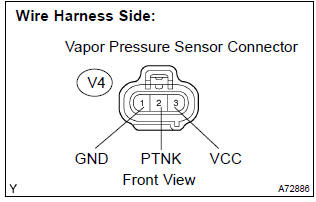
- Disconnect the v4 vapor pressure sensor connector.
- disconnect the e3 and e6 ecm connectors.
- check the resistance between the wire harness side connectors.
Standard (check for open):

Standard (check for short):

- Reconnect the vapor pressure sensor connector.
- reconnect the ecm connectors.


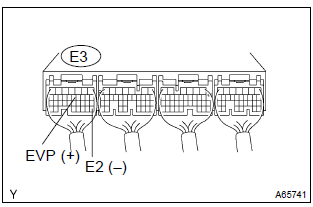
- Turn the ignition switch on.
- check the vsv function.
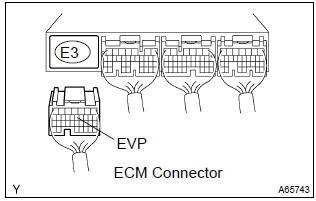
- Connect between terminals evp and e2 of the ecm connector (vsv on).
Vsv is on: air from port e flows out through port f




- Check the harness and between the vsv for evap and the ecm connector.
- Disconnect the v3 vsv for evap connector.
- Disconnect the e3 ecm connector.
- Check the resistance between the wire harness side connectors.
Standard (check for open):

Standard (check for short):

- Reconnect the vsv for evap connector.
- Reconnect the ecm connector.
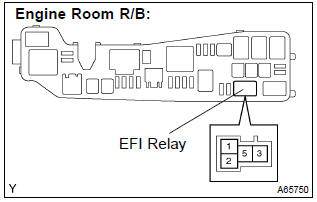
- check the harness and connector between the vsv for evap and the efi relay.
- Disconnect the v3 vsv for evap connector.
- Remove the efi relay from the engine room r/b.
- Check the resistance between the wire harness side connectors.
Standard (check for open):

Standard (check for short):

- Reconnect the vsv for evap connector.
- Reinstall the efi relay.


- Turn the ignition switch on.
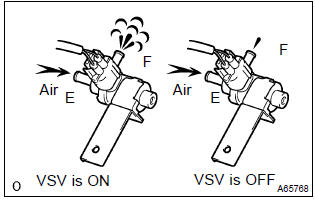
- check the vsv function.
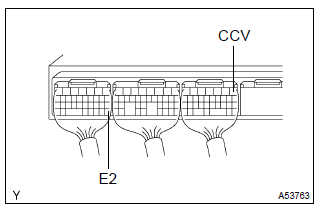
- Connect between terminals ccv and e2 of the ecm connector (vsv on).
Vsv is on: air from port e flows out through port f




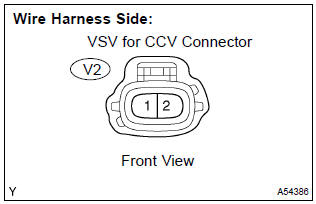
- Check the harness and the connector between the vsv for ccv and the ecm.
- Disconnect the v2 vsv for ccv connector.
- Disconnect the e5 ecm connector.
- Check the resistance between the wire harness side connectors.
Standard (check for open):

Standard (check for short):

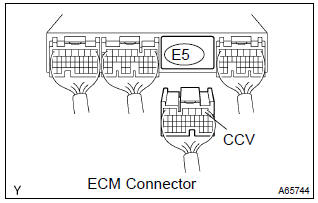
- Reconnect the vsv for ccv connector.
- Reconnect the ecm connector.
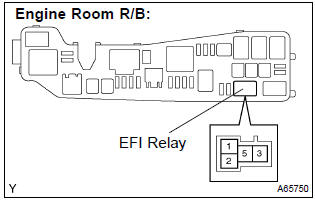
- check the harness and the connector between the vsv for ccv and the efi relay.
- Disconnect the v2 vsv for ccv connector.
- Remove the efi relay from the engine room r/b.
- Check the resistance between the wire harness side connectors.
Standard (check for open):

Standard (check for short):

- Reconnect the vsv for ccv connector.
- Reinstall the efi relay.


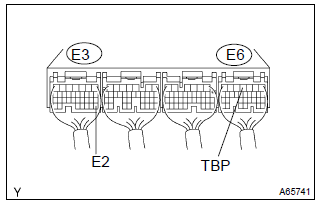
- Turn the ignition switch on.
- check the vsv function.
- Connect between terminals tbp and e2 of the ecm connector (vsv on).
Vsv is on: air from port e flows out through port f
- disconnect between terminals tbp and e2 of the ecm connector (vsv off).
Vsv is off: air does not from flow port e to port f




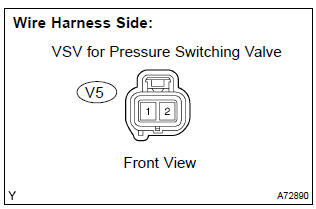
- Check the harness and the connector between the vsv for pressure switching valve and the ecm.
- Disconnect the v5 vsv for pressure switching valve connector.
- Disconnect the e6 ecm connector.
- Check the resistance between the wire harness side connectors.
Standard (check for open):

Standard (check for short):

- Reconnect the vsv for pressure switching valve connector.
- Reconnect the ecm connector.
- check the harness and the connector between the vsv for pressure switching valve and efi relay.
- Disconnect the v5 vsv for pressure switching valve connector.
- Remove the efi relay from the engine room r/b.
- Check the resistance between the wire harness side connectors.
Standard (check for open):

Standard (check for short):

- Reconnect the vsv for pressure switching valve connector.
- Reinstall the efi relay from.






Test yourself
A quick Toyota Corolla quiz: every answer comes with an explanation and a link to the manual page.