Inspection procedure






- Remove the fuel tank cap.
- visually check the fuel inlet pipe for damage.
- reinstall the fuel tank cap.


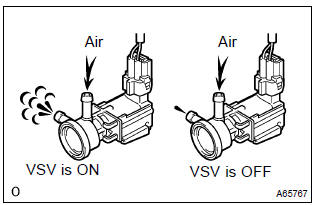
- Select the item ”diagnosis/enhanced obd ii/active test” mode on the hand–held tester.
- disconnect the vacuum hose of the vsv for evap from the charcoal canister.
- start the engine.
- select the item ”evap vsv (alon)/all” in the active test and operate evap vsv (press the right or left button).
- when the vsv for the evap is operated by the hand–held tester, check whether the disconnected hose applies suction to your finger.
Vsv is off: disconnected hose does not suck.


- Check that the vacuum hose is connected correctly.
- check the vacuum hose for looseness and disconnection.
- check the vacuum hose for cracks, hole, damage and blockage.




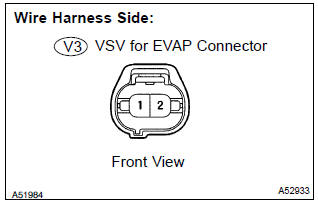
- Check the harness and the connector between the vsv for evap and ecm.
- Disconnect the v3 vsv for evap connector.
- Disconnect the e3 ecm connector.
- Check the resistance between the wire harness side connectors.
Standard (check for open):

Standard (check for short):

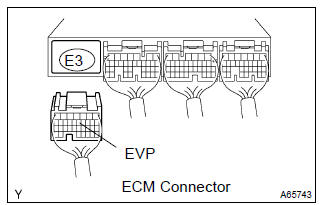
- Reconnect the vsv for evap connector.
- Reconnect the ecm connector.
- check the harness and the connector between the vsv for evap and efi relay.
- Disconnect the v3 vsv for evap connector.
- Remove the efi relay from the engine room r/b.
- Check the resistance between the wire harness side connectors.
Standard (check for open):

Standard (check for short):

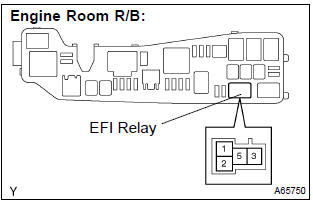
- Reconnect the vsv for evap connector.
- Reinstall the efi relay.


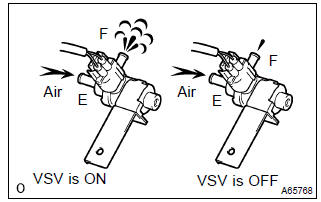
- Disconnect the vacuum hose of the vsv for ccv from the charcoal canister.
- start the engine.
- select the item ”diagnosis/enhanced obd ii/active test” mode on the hand–held tester.
- select the item ”can ctrl vsv/all” in the active test and operate can ctrl vsv (press the right or left button).
- check the vsv operation when it is operated by the hand–held tester.
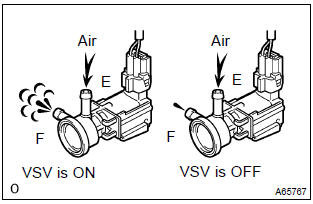
Result: vsv is on: air from port e flows out through port f.
Vsv is off: air does not flow from port e to port f.


- Check that the vacuum hose is connected correctly.
- check the vacuum hose for looseness and disconnection.
- check the vacuum hose for cracks, hole damage and blockage.




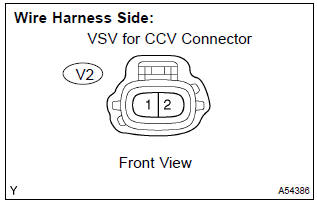
- Check the harness and connector between the vsv for ccv and ecm.
- Disconnect the v2 vsv for ccv connector.
- Disconnect the e5 ecm connector.
- Check the resistance between the wire harness side connectors.
Standard (check for open):
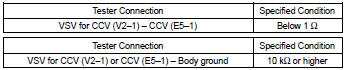
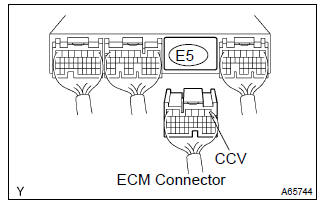
- Reconnect the vsv for ccv connector.
- Reconnect the ecm connector.
- check the harness and the connector between the vsv for ccv and efi relay.
- Disconnect the v2 vsv for ccv connector.
- Remove the efi relay from the engine room r/b.
- Check the resistance between the wire harness side connectors.
Standard (check for open):

Standard (check for short):

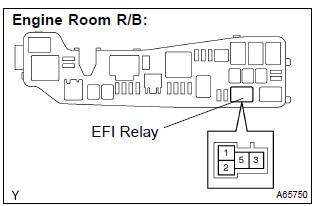
- Reconnect the vsv for ccv connector.
- Reinstall the efi relay.


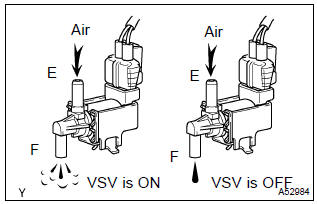
- Select the item ”diagnosis/enhanced obd ii/active test” mode on the hand–held tester.
- select the item ”tank bypass vsv/all” in the active test and operate tank bypass vsv (press the right or left button).
- check the vsv operation when it is operated by the hand–held tester.
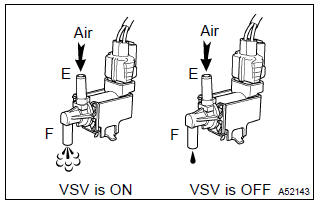
Result: vsv is on: air from port e flows out through port f.
Vsv is off: air does not flow from port e to port f.




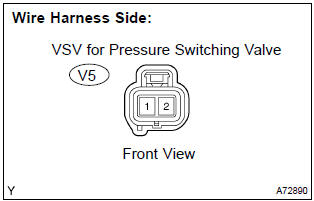
- Check the harness and the connector between the vsv for pressure switching valve and the ecm.
- Disconnect the v5 vsv for pressure switching valve connector.
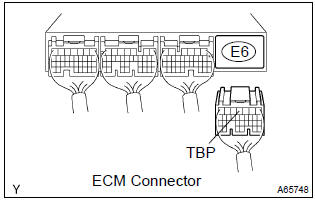
- Disconnect the e6 ecm connector.
- Check the resistance between the wire harness side connectors.
Standard (check for open):

Standard (check for short):

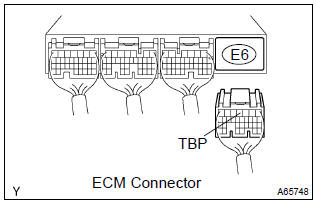
- Reconnect the vsv for pressure switching valve connector.
- Reconnect the ecm connector.
- check the harness and the connector between the vsv for pressure switching valve and efi relay.
- Disconnect the v5 vsv for pressure switching valve connector.
- Remove the efi relay from the engine room r/b.
- Check the resistance between the wire harness side connectors.
Standard (check for open):

Standard (check for short):

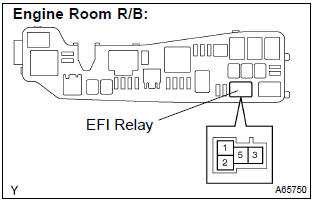
- Reconnect the vsv for pressure switching valve connector.
- Reinstall the efi relay.


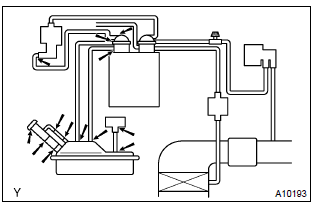
- Check whether hoses close to the fuel tank have been modified, and check if there are signs of any accident near the fuel tank.
- Check the following parts for cracks, deformation or loose connection:
- fuel tank
- fuel tank filler pipe
- hoses and tubes around fuel tank


- Check that the vacuum hose is connected correctly.
- check the vacuum hose for looseness and disconnection.
- check the vacuum hose for cracks, hole and damage.


- Check the connection between the fuel tank and fuel evap pipe, the fuel evap pipe and under floor fuel tube, the under floor fuel tube and charcoal canister.
- check the hose and the tube for cracks, hole and damage.


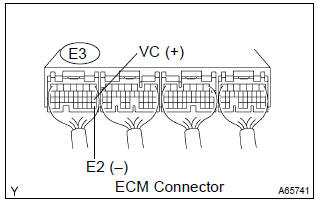
- Turn the ignition switch on.
- measure the voltage between the terminals of the e3 ecm connector.
Standard:



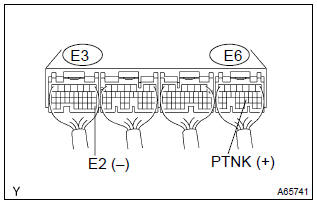
- Turn the ignition switch on.
- measure the voltage between terminals of the e3 and e6 ecm connectors.
- Disconnect the vacuum hose from the vapor pressure sensor.
Standard (1):

: the vacuum applied to the vapor pressure sensor must be less than 66.7 Kpa (500 mmhg, 19.7 In.Hg).
- Using the mityvac (hand–held vacuum pump), apply a vacuum of 4.0 Kpa (30 mmhg, 1.18 In.Hg) to the vapor pressure sensor.
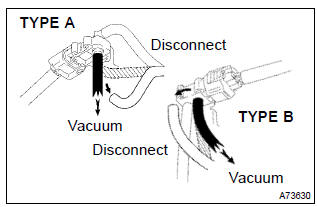
Standard (2):

- Reconnect the vacuum hose.


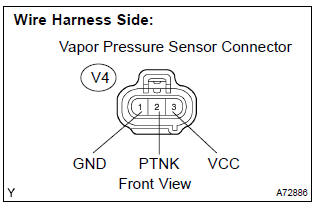
- Disconnect the v4 vapor pressure sensor connector.
- disconnect the e3 and e6 ecm connectors.
- check the resistance between the wire harness side connectors.
Standard (check for open):

Standard (check for short):

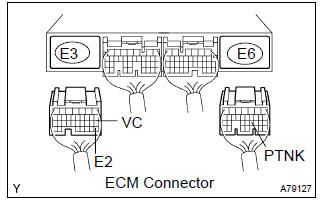
- Reconnect the vapor pressure sensor connector.
- reconnect the ecm connectors.














- Remove the fuel tank cap.
- visually check the fuel inlet pipe for damage.


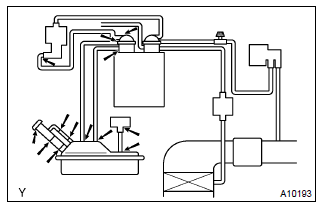
- Check whether hoses close to the fuel tank have been modified, and check if there are signs of any accident near the fuel tank or the charcoal canister.
- Check the following parts for cracks, deformation or loose connection:
- fuel tank
- charcoal canister
- fuel tank filler pipe
- hoses and tubes around fuel tank and charcoal canister


- Check that the vacuum hose is connected correctly.
- check the vacuum hose for looseness and disconnection.
- check the vacuum hose for cracks, hole and damage.


- Check the connection between the fuel tank and fuel evap pipe, the fuel evap pipe and under floor fuel tube, the under floor fuel tube and charcoal canister.
- check the hose and the tube for cracks, hole and damage.


- Check that the vacuum hose is connected correctly.
- check the vacuum hose for looseness and disconnection.
- check the vacuum hose for cracks, hole and damage.






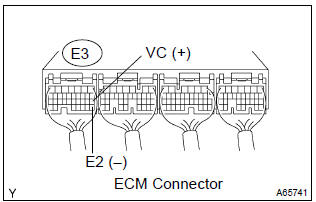
- Turn the ignition switch on.
- measure voltage between the terminals of the e3 ecm connector.
Standard:



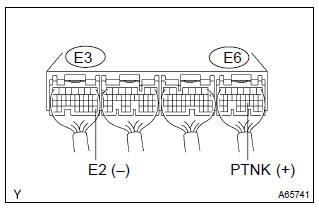
- Turn the ignition switch on.
- measure the voltage betwen terminals of the e3 and e6 ecm connectors.
- Disconnect the vacuum hose from the vapor pressure sensor.
Standard (1):

: the vacuum applied to the vapor pressure sensor must be less than 66.7 Kpa (500 mmhg, 19.7 In.Hg).
- Using the mityvac (hand–held vacuum pump), apply a vacuum of 4.0 Kpa (30 mmhg, 1.18 In.Hg) to the vapor pressure sensor.
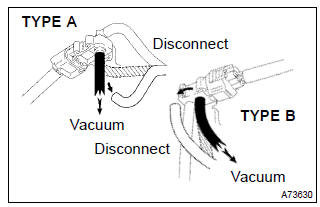
Standard (2):

- Reconnect the vacuum hose from the vapor pressure sensor.


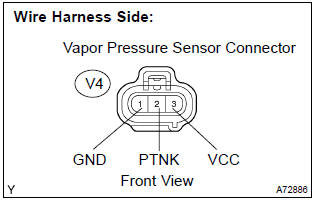
- Disconnect the v4 vapor pressure sensor connector.
- disconnect the e3 and e6 ecm connectors.
- check the resistance between the wire harness side connectors.
Standard (check for open):

Standard (check for short):

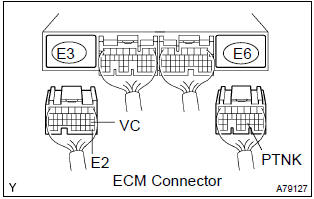
- Reconnect the vapor pressure sensor connector.
- reconnect the ecm connectors.


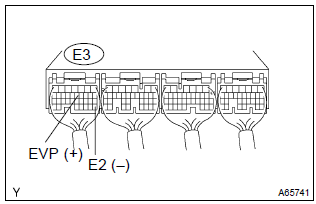
- Turn the ignition switch on.
- check the vsv function.
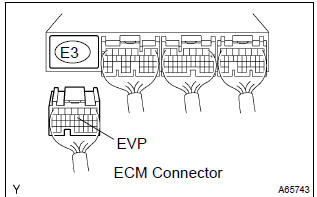
- Connect between terminals evp and e2 of the ecm connector (vsv on).
Vsv is on: air from port e flows out through port f




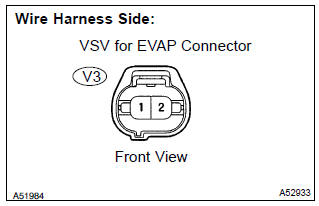
- Check the harness and connector between the vsv for evap and ecm.
- Disconnect the v3 vsv for evap connector.
- Disconnect the e3 ecm connector.
- Check the resistance between the wire harness side connectors.
Standard (check for open):

Standard (check for short):

- Reconnect the vsv for evap connector.
- Reconnect the ecm connector.
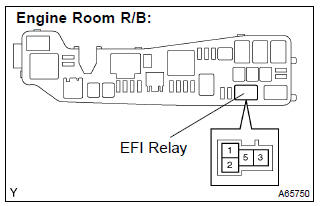
- check the harness and connector between the vsv for evap and efi relay.
- Disconnect the v3 vsv for evap connector.
- Remove the efi relay from the engine room r/b.
- Check the resistance between the wire harness side connectors.
Standard (check for open):

Standard (check for short):

- Reconnect the vsv for evap connector.
- Reinstall the efi relay.


- Turn the ignition switch on.
- check the vsv function.
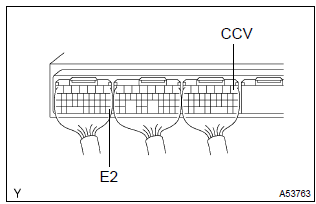
- Connect between terminals ccv and e2 of the ecm connector (vsv on).
Vsv is on: air from port e flows out through port f
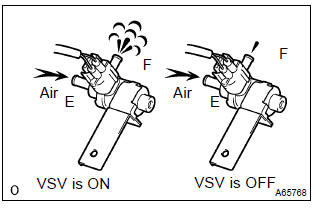




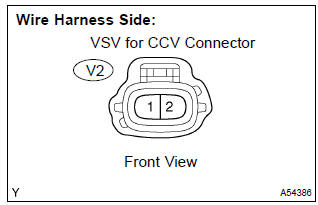
- Check the harness and the connector between the vsv for ccv and ecm.
- Disconnect the v2 vsv for ccv connector.
- Disconnect the e5 ecm connector.
- Check the resistance between the wire harness side connectors.
Standard (check for open):

Standard (check for short):

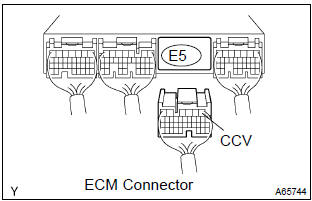
- Reconnect the vsv for ccv connector.
- Reconnect the ecm connector.
- check the harness and the connector between the vsv for ccv and efi relay.
- Disconnect the v2 vsv for ccv connector.
- Remove the efi relay from the engine room r/b.
- Check the resistance between the wire harness side connectors.
Standard (check for open):

Standard (check for short):

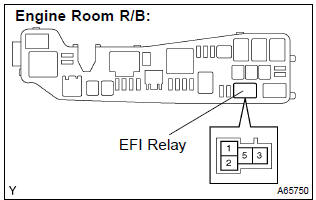
- Reconnect the vsv for ccv connector.
- Reinstall the efi relay.


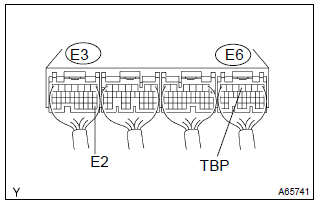
- Turn the ignition switch on.
- check the vsv function.
- Connect between terminals tbp and e2 of the ecm connector (vsv on).
Vsv is on: air from port e flows out through port f
- disconnect between terminals tbp and e2 of the ecm connector (vsv off).
Vsv is off: air does not from flow port e to port f




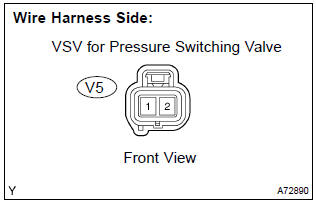
- Check the harness and the connector between the vsv for pressure switching valve and ecm.
- Disconnect the v5 vsv for pressure switching valve connector.
- Disconnect the e6 ecm connector.
- Check the resistance between the wire harness side connectors.
Standard (check for open):

Standard (check for short):

- Reconnect the vsv for pressure switching valve connector.
- Reconnect the ecm connector.
- check the harness and the connector between the vsv for pressure switching valve and efi relay.
- Disconnect the v5 vsv for pressure switching valve connector.
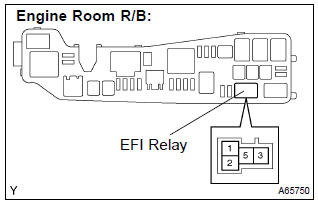
- Remove the efi relay from the engine room r/b.
- Check the resistance between the wire harness side connectors.
Standard (check for open):

Standard (check for short):

- Reconnect the vsv for pressure switching valve connector.
- Reinstall the efi relay from.






Test yourself
A quick Toyota Corolla quiz: every answer comes with an explanation and a link to the manual page.