On–vehicle inspection
- check the operation.
- Using a speedometer tester, inspect the speedometer fro allowable indication error and check the operation of the odometer.
Reference:
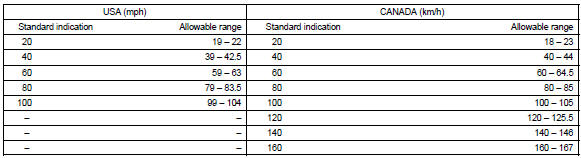
: tire wear and tire over or under inflation will increase the indication error.
- Check the deflection width of the speed meter indicator.
Reference: below 0,5 km/h / 0,3 mph
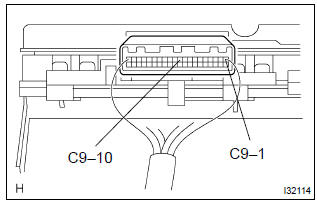
- Check for standard signal.
- While driving the vehicle at the speed of 10 km/h, check the voltage between the terminals c9–10 and c9–1 of the combination meter assy.
Standard: fluctuation between 10 to 14 v or less is repeated 7 times within 1 sec.
Notice: check it with the ignition switch on and the connector connected.
3. Inspect tachometer- check the operation
- connect a tune–up test tachometer, and start the engine.
:
- reversing the connection of the tachometer will damage the transistors and diodes inside.
- When removing or installing the tachometer, be careful not to drop or subject it to heavy shocks.
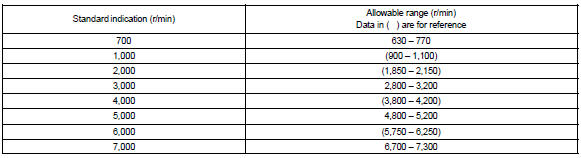
- Compare the test and tachometer indications.
Dc 13.5 V, 25 c at (77 f)
- Inspect the circuit.
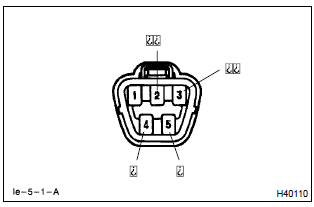
- Disconnect the connector from the sender gauge.
- Turn the ignition switch on, then check the position of the receiver gauge needle.
Needle position: empty
- connect terminals 2 and 3 on the wire harness side connector and turn the ignition switch on, then check the position of the receiver gauge needle.
Needle position: full
- inspect the circuit.
- Disconnect the connector from the sender gauge.
- Turn the ignition switch on, check the fuel level needle indicates empty and fuel level warning lights light on.
- inspect the circuit.
- Disconnect the connector from the sender gauge.
- Turn the ignition switch on, check the position of the water temperature receiver gauge needle.
Needle position: cool
- connect between terminals on the wire harness side connector, then check the position of the water temperature receiver gauge needle.
Needle position: hot
t
- inspect the circuit.
- Disconnect the connector from the low oil pressure switch.
- Turn the ignition switch on.
- Connect the terminal of wire harness side connector and ground, then check the warning low oil pressure warning light.
Low oil pressure warning light: light on
8. Inspect low oil pressure switch- check the continuity.
- Disconnect the connector from the low oil pressure switch.
- Check that continuity exists between terminal and ground.
Engine stopped: continuity engine running: no continuity
- inspect the parking brake warning light.
- Disconnect the connector from the parking brake switch and ground terminal on the wire harness side connector.
- Turn the ignition switch on and check that the warning light lights up.
- inspect the brake fluid level warning light.
- Disconnect the connector from the brake fluid level warning switch and connect terminals on the wire harness side connector.
- Turn the ignition switch on and check that the warning light lights up.
- inspect the continuity.
- Remove the reservoir tank cap and strainer.
- Disconnect the connector.
- Check that the continuity exists between the terminals.
Float up (switch off): no continuity
- use syphon, etc., To take fluid out of the reservoir tank.
- Check that the continuity exists between the terminals.
Float down (switch on): continuity
- pour the fluid back in the reservoir tank.
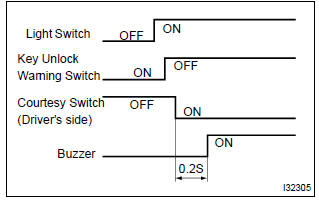
- Check the operation.
: when the key unlock warning and light auto turn off warning is output simultaneously, the key unlock warning precedes the other.
- Remove the ignition key with the tail light switch on and the driver side door open and check for the buzzer.
Buzzer sound: continuous
- while the buzzer is sounding, perform any of the following and check that the buzzer sound is stopped.
- Turn the tail light switch off.
- Close the driver side door.
- Insert the ignition key into the key cylinder.
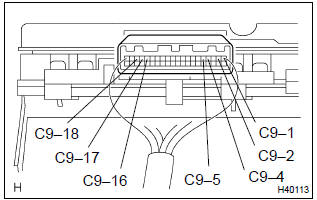
- Check the function.
- Remove the combination meter.
- Connect the position (+) lead from battery to terminal c9–5 and negative (–) lead to terminal c9–1 and c9–2.
- Connect the position (+) lead from battery to terminal c9–18 and negative (–) lead to terminal c9–16 and c9–17, check that the buzzer sound.
Buzzer sound: continuous
- while the buzzer is sounding, connect the battery positive terminal to terminal c9–4 and check that the buzzer sound is stopped.
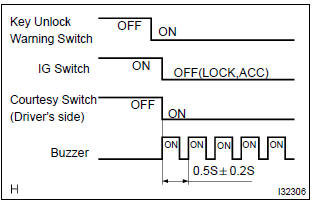
- Check the operation.
: when the key unlock warning and light auto turn off warning is output simultaneously, the key unlock warning precedes the other.
- While the driver side door is open, insert the ignition key, set the ignition switch to off (lock or acc) and check for the buzzer sound.
Buzzer sound: intermittent
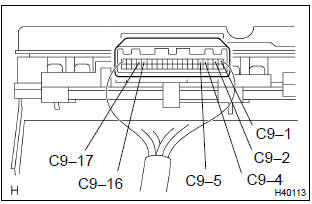
- Check the function.
- Remove the combination meter.
- Connect the position (+) lead from battery to terminal c9–5 and negative (–) lead to terminal c9–1 and c9–2.
- Connect the negative (–) lead to terminal c9–16 and c9–17, check that the buzzer sound.
Buzzer sound: intermittent
- While the buzzer is sounding, connect the battery positive terminal to terminal c9–4 and check that the buzzer sound is stopped.
Test yourself
A quick Toyota Corolla quiz: every answer comes with an explanation and a link to the manual page.