Rear axle hub and bearing


On-vehicle inspection
- Remove rear wheel
- Disconnect rear drive shaft assembly lh (for 4wd)
- Disconnect the drive shaft (see page ds-69).
- Remove rear disc brake cylinder assembly lh (see page br-55)
- Remove rear disc (see page br-57)
- Check bearing backlash and axle hub deviation
- Using a dial indicator, measure the backlash near the center of the axle hub.
If the backlash is greater than the maximum, replace the axle hub.
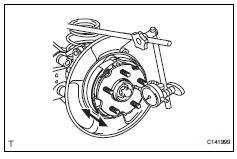
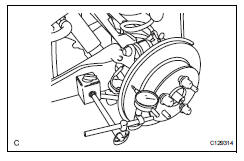
- Using a dial indicator, measure the disc runout 10 mm (0.39 In.) Inside the outer edge of the disc.
If the runout exceeds the maximum, change the installation positions of the rear disc and axle hub so that the runout will be as low as possible. If the runout exceeds the maximum even when the installation positions are changed, shave the rear disc. If the rear disc needs to be shaved to less than the minimum, replace the rear disc. If the rear disc is replaced, perform the runout inspection again. If the runout still exceeds the maximum, replace the hub and bearing with a new one.
Removal- Remove rear wheel
- Disconnect cable from negative battery terminal
- Remove rear axle shaft nut (for 4wd)
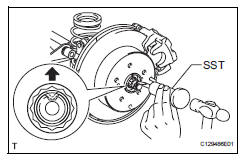
- Using sst and hammer, unstake the staked part of the nut.
Loosen the staked part of the nut completely, otherwise the screw of the drive shaft may be damaged.
- While applying the brake, remove the lock axle hub nut.
- Remove rear disc brake cylinder assembly lh (see page br-55)
- Remove rear disc (see page br-57)
- Remove skid control sensor wire (for 2wd) (see page bc-198)
- Remove rear speed sensor lh (for 4wd) (see page bc-205)
- Remove rear suspension no. 1 Arm assembly lh (see page sp-42)
- Disconnect rear shock absorber assembly lh
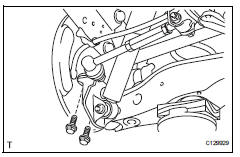
- Remove the 2 bolts and disconnect the shock absorber with bracket from the axle carrier.
- Remove rear axle hub and bearing assembly lh

- Fro 2wd:
- Remove the 4 bolts, and axle hub and the bearing from the axle carrier.
Do not place the hub and bearing's magnet rotor side so that it is facing downward, and do not allow the magnet rotor side to become damaged or contact foreign matter.
- For 4wd:

- Put matchmarks on the drive shaft and the axle hub and bearing.
- Remove the 4 bolts, and the axle hub and bearing from the axle carrier.
Do not place the hub and bearing's magnet rotor side so that it is facing downward, and do not allow the magnet rotor side to become damaged or contact foreign matter.
Installation- Install rear axle hub and bearing assembly lh
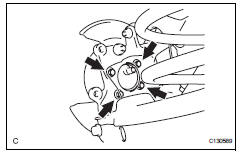
- For 2wd:
- Install the axle hub and bearing to the axle carrier with the 4 bolts.
Do not place the hub and bearing's magnet rotor side so that it is facing downward, and do not allow the magnet rotor side to become damaged or contact foreign matter.
- Fro 4wd:
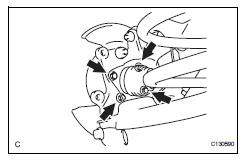
- Align the shaft splines and drive in the drive shaft to the axle hub and bearing.
- Install the axle hub and bearing assembly to the axle carrier with the 4 bolts.
Do not place the hub and bearing's magnet rotor side so that it is facing downward, and do not allow the magnet rotor side to become damaged or contact foreign matter.
- Connect rear shock absorber assembly lh
- Install the shock absorber to the axle carrier with bracket with the 2 bolts.
- Temporarily install rear suspension no. 1 Arm assembly lh (see page sp-43)
- Install skid control sensor wire (for 2wd) (see page bc-201)
- Install rear speed sensor lh (for 4wd) (see page bc-206)
- Install rear disc (see page br-58)
- Install rear brake cylinder assembly lh (see page br-61)
- Install rear axle shaft nut (for 4wd)
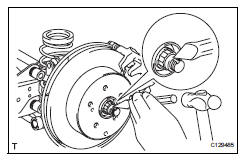
- Install a new hub nut.
- Install rear wheel
- Stabilize suspension (see page sp-37)
- Tighten front shock absorber assembly lh (see page sp-37)
- Tighten rear suspension no. 1 Arm assembly lh (see page sp-43)
- Inspect rear wheel alignment
- Inspect the rear wheel alignment (see page sp-7).
- Connect cable to negative battery terminal
- Check speed sensor signal
- Check the speed sensor signal (see page bc-44).
Test yourself
A quick Toyota RAV4 quiz: every answer comes with an explanation and a link to the manual page.