Crawl Switch
 Inspection INSPECTION PROCEDURE
1. INSPECT CRAWL CONTROL SWITCH (DRIVE MONITOR SWITCH)
(a) Check the resistance.
(1) Measure the resistance according to the value(s) in the table below.
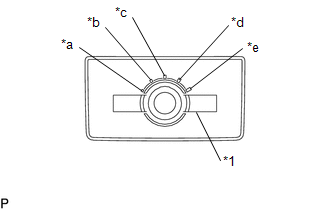 Text in Illustration
*1 |
Crawl Control Switch |
*a |
Low |
*b |
Between Low and Medium |
*c |
Medium |
*d |
Between Medium and High |
*e |
High |
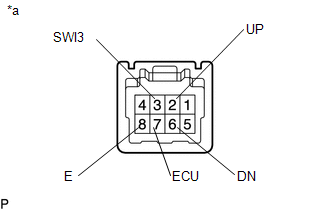
Standard Resistance:
Tester Connection | Switch Condition | Specified Condition |
|---|---|---|
7 (ECU) - 8 (E) |
Low |
Below 1 Ω |
2 (UP) - 8 (E) |
||
6 (DN) - 8 (E) |
10 kΩ or higher |
|
7 (ECU) - 8 (E) |
Between Low and Medium |
Below 1 Ω |
2 (UP) - 8 (E) |
||
6 (DN) - 8 (E) |
10 kΩ or higher |
|
7 (ECU) - 8 (E) |
Medium |
Below 1 Ω |
2 (UP) - 8 (E) |
||
6 (DN) - 8 (E) |
10 kΩ or higher |
|
7 (ECU) - 8 (E) |
Between Medium and High |
Below 1 Ω |
2 (UP) - 8 (E) |
||
6 (DN) - 8 (E) |
10 kΩ or higher |
|
7 (ECU) - 8 (E) |
High |
Below 1 Ω |
2 (UP) - 8 (E) |
||
6 (DN) - 8 (E) |
10 kΩ or higher |
|
3 (SWl3) - 8 (E) |
ON/OFF: Pressed |
Below 1 Ω |
ON/OFF: Not pressed |
10 kΩ or higher |
*a |
Component without harness connected (Crawl Control Switch (Drive Monitor Switch)) |
If the result is not as specified, replace the crawl control switch (drive monitor switch).
Removal REMOVAL PROCEDURE1. REMOVE CRAWL CONTROL SWITCH (DRIVE MONITOR SWITCH)
(a) Disengage the 2 claws to remove the crawl control switch (drive monitor switch). |
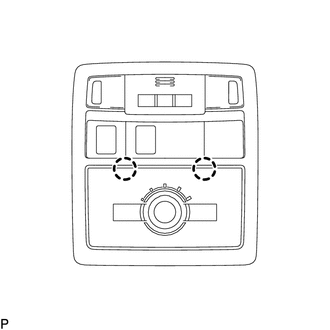 |
1. INSTALL CRAWL CONTROL SWITCH (DRIVE MONITOR SWITCH)
(a) Engage the 2 claws to install the crawl control switch (drive monitor switch).
Test yourself
A quick Toyota Tacoma quiz: every answer comes with an explanation and a link to the manual page.