Removal
1. PRECAUTION
NOTICE:
After turning the ignition switch off, waiting time may be required before disconnecting the cable from the negative (-) battery terminal. Therefore, make sure to read the disconnecting the cable from the negative (-) battery terminal notices before proceeding with work.
Clock here 
2. DISCHARGE FUEL SYSTEM PRESSURE
Click here
3. DISCONNECT CABLE FROM NEGATIVE BATTERY TERMINAL
NOTICE:
When disconnecting the cable, some systems need to be initialized after the cable is reconnected.
Click here
4. REMOVE NO. 2 ENGINE UNDER COVER SUB-ASSEMBLY (w/ Off Road Package)
5. REMOVE NO. 1 ENGINE UNDER COVER SUB-ASSEMBLY
6. DRAIN ENGINE COOLANT
Click here
7. REMOVE V-BANK COVER SUB-ASSEMBLY
(a) Raise the front of the V-bank cover to disengage the 2 pins. Text in Illustration
|
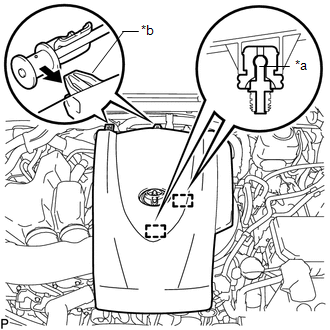 |
(b) Disengage the 2 guides to remove the V-bank cover sub-assembly.
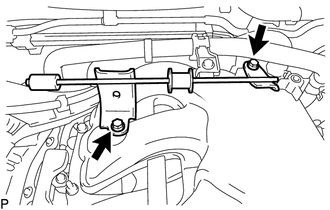
8. REMOVE NO. 1 V-BANK COVER BRACKET
(a) Remove the 2 bolts and No. 1 V-bank cover bracket from the intake air surge tank assembly. |
 |
9. REMOVE AIR CLEANER CAP SUB-ASSEMBLY WITH NO. 1 AIR CLEANER HOSE
Click here
10. REMOVE NO. 2 SURGE TANK STAY
(a) Remove the 2 bolts and No. 2 surge tank stay from the cylinder head LH and intake air surge tank assembly. |
 |
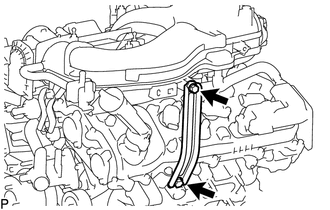
11. REMOVE NO. 1 SURGE TANK STAY
(a) Remove the 2 bolts and No. 1 surge tank stay from the cylinder head LH and intake air surge tank assembly. |
 |
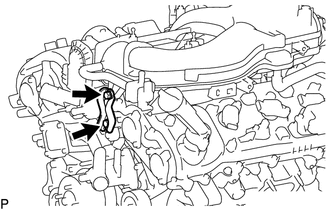
12. REMOVE THROTTLE BODY BRACKET
(a) Remove the 2 bolts and throttle body bracket from the timing chain cover assembly and intake air surge tank assembly. |
 |
13. REMOVE INTAKE AIR SURGE TANK ASSEMBLY
(a) Disconnect the throttle body with motor connector from the throttle body with motor assembly. |
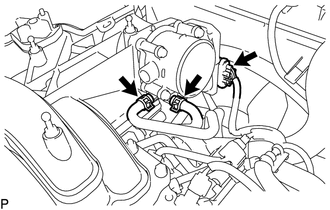 |
(b) Slide the 2 clips and disconnect the No. 4 water by-pass hose and No. 5 water by-pass hose from the throttle body with motor assembly.
(c) Slide the clip and disconnect the fuel vapor feed hose from the purge VSV. |
 |
(d) Disengage the clamp to separate the fuel vapor feed hose from the intake air surge tank assembly.
(e) Disconnect the purge VSV connector from the purge VSV.
(f) Disengage the 2 clamps to separate the wire harness from the intake air surge tank assembly.
(g) Disengage the clamp to disconnect the No. 1 fuel pipe sub-assembly and No. 2 fuel pipe sub-assembly from the intake air surge tank assembly. |
 |
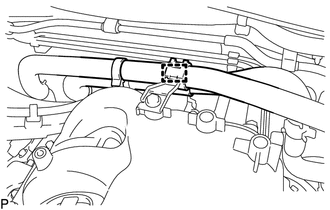
(h) Disengage the clamp to disconnect the heater hose from the intake air surge tank assembly. |
 |
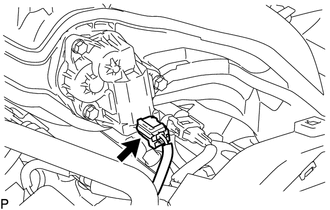
(i) Disconnect the intake air control valve actuator connector from the intake air control valve actuator. |
 |
(j) Slide the clip and disconnect the PCV hose from the intake air surge tank assembly. |
 |
(k) Remove the 2 nuts, 5 bolts and intake air surge tank assembly from the intake manifold.
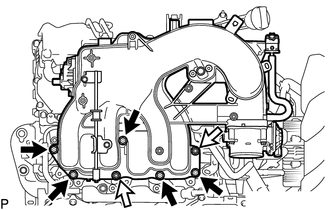 Text in Illustration
 |
Bolt |
 |
Nut |
(l) Remove the surge tank to intake manifold gasket from the intake air surge tank assembly.
14. DISCONNECT NO. 2 FUEL TUBE SUB-ASSEMBLY
Click here
15. DISCONNECT ENGINE WIRE
Click here
16. REMOVE FUEL DELIVERY PIPE SUB-ASSEMBLY
Click here
17. REMOVE INTAKE MANIFOLD
(a) Remove the 4 nuts, 4 bolts and intake manifold from the cylinder head sub-assembly and cylinder head LH.
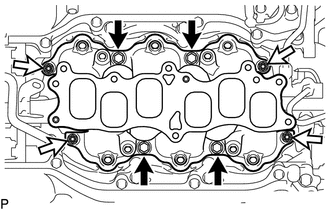 Text in Illustration
|
Bolt |
|
Nut |
(b) Remove the 2 No. 1 intake manifold to head gaskets from the cylinder head sub-assembly and cylinder head LH. |
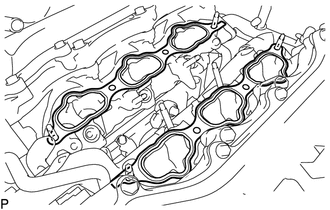 |
Test yourself
A quick Toyota Tacoma quiz: every answer comes with an explanation and a link to the manual page.