DESCRIPTION
When the theft deterrent system operates by itself, it could be due to something such as a short circuit in the courtesy light switch of any of the doors or the hood causing a signal to be sent in error.
HINT:
Preconditions for Arming Preparation:
- The ignition switch is off and all the doors and the hood are closed and all doors are locked by wireless operation or key linked power door lock operation.
WIRING DIAGRAM 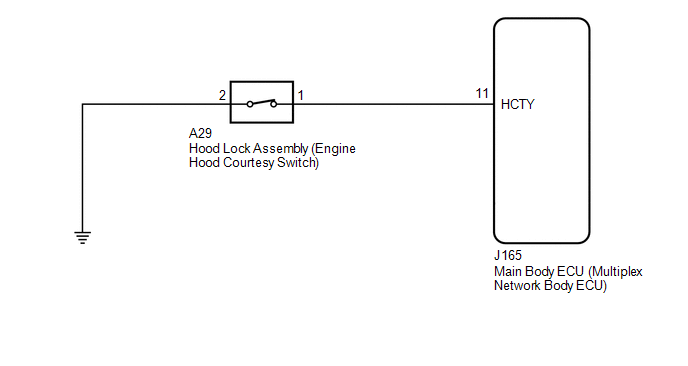
NOTICE:
- If the vehicle or vehicle controls are operated (for example, during initial inspection when the vehicle is brought in for repair) before operation history has been read out and saved, the operation history information could be lost.
- The function "Read operation history" uses the current system time setting inside the Techstream and the time counter inside the controlling ECU to calculate the timings shown in the operation history. For this reason, before reading out the operation history, first make sure that the Techstream system clock is accurately set to the current time.
PROCEDURE
CUSTOMER PROBLEM ANALYSIS AND SYMPTOM CONFIRMATION
HINT:
- In troubleshooting, confirm that the problem symptoms have been accurately identified. Preconceptions should be discarded in order to make an accurate judgment. To clearly understand what the problem symptoms are, it is extremely important to ask the customer about the problem and the conditions at the time the malfunction occurred.
- Gather as much information as possible for reference. Past problems that seem unrelated may also help in some cases.
- The following 5 items are important points in the problem analysis:
What? |
Vehicle model, system name |
When? |
Date, time, occurrence frequency, whether the problem occurred recently or has been occurring for a long time |
Where? |
Whether the problem occurs at a specific location |
Under what conditions? |
Whether the doors were locked or unlocked, whether the ignition switch was on, whether the engine was starting |
How did it happen? |
Problem symptoms* |
- *: Be sure to ask the customer in detail about the following points concerning the vehicle operating conditions, environment and problem, and then check for DTCs.
| NEXT |
 |
|
CHECK THEFT DETERRENT SYSTEM OPERATION HISTORY
(a) Use the Techstream to check the theft deterrent system operation history around the time that the malfunction reported by the customer occurred, based on the contents of the customer interview and the last recorded theft deterrent system operation history around the time that the problem is reported to have occurred.
(1) On the Techstream screen, enter the following menus: Body / Main Body / Utility / Operation History Analysis. According to the display on the Techstream, read the operation history.
Click here 
(2) Check that there is theft deterrent system operation history as reported by the customer.
Click here
HINT:
Based on the displayed operation history, perform vehicle-side inspection, and perform repairs if a problem is found. If the vehicle has no malfunction, interview the customer about possible causes such as "the driver" and "environmental / other than the driver".
Result | Proceed to |
There is operational history around the time that the customer reported the malfunction to have occurred, but the malfunction could not be identified even by following the instructions to inspect the relevant areas |
A |
There is operational history around the time that the customer reported the malfunction to have occurred, and by following the instructions to inspect the relevant areas, the malfunction was identified |
B |
There is no operational history around the time that the customer reported the malfunction to have occurred. |
C |
| B |
 |
GO TO STEP 10 |
| C |
|
END |
| A |
|
|
CHECK SECURITY INDICATOR LIGHT OPERATION
(a) When the theft deterrent system is in arming preparation state, check that the security indicator light is illuminated.
Click here
(b) When the theft deterrent system is in armed state, check that the security indicator light blinks.
Click here
State of Theft Deterrent System | Contents | Security Indicator Light Condition |
Disarmed state (1), (2) |
Theft deterrent system is unset. |
- Off (Immobiliser function unset)
- Blinking (Immobiliser function set)
|
Arming preparation state |
Standby period after theft deterrent system set conditions are met but before theft deterrent system is actually set (approximately 30 seconds).
(Theft detection not performed) |
On |
Armed state |
Theft deterrent system is unset.
(Theft detection is possible) |
Blinking (Immobiliser function set) |
Alarm sounding state |
Theft attempt is detected, and alarm is sounded using turn signal light, security horn assembly and vehicle horn.
(Alarm sounds for 57 seconds) |
On |
| NG |
|
GO TO OTHER PROBLEM |
| OK |
|
|
READ VALUE USING TECHSTREAM (ACC SW, IG SW)
(a) Connect the Techstream to the DLC3.
(b) Turn the ignition switch to ON.
(c) Turn the Techstream on.
(d) Enter the following menus: Body Electrical / Main Body / Data List.
(e) Read the Data List according to the display on the Techstream. Main Body
Tester Display | Measurement Item/Range | Normal Condition | Diagnostic Note |
ACC SW |
Ignition switch/ON or OFF |
ON: Ignition switch ACC
OFF: Ignition switch off |
"ON" is also displayed for this item when the ignition switch is ON. |
IG SW |
Ignition switch/ON or OFF |
ON: Ignition switch ON
OFF: Ignition switch off |
"OFF" is also displayed for this item when the ignition switch is ACC. |
OK:
Normal conditions listed above are displayed.
| NG |
|
GO TO LIGHTING SYSTEM |
| OK |
|
|
READ VALUE USING TECHSTREAM (FR Door Lock Pos, FL Door Lock Pos, RR-Door Lock Pos SW, RL-Door Lock Pos SW)
(a) Connect the Techstream to the DLC3.
(b) Turn the ignition switch to ON.
(c) Turn the Techstream on.
(d) Enter the following menus: Body Electrical / Main Body / Data List.
(e) Read the Data List according to the display on the Techstream. Main Body
Tester Display | Measurement Item/Range | Normal Condition | Diagnostic Note |
FL Door Lock Pos |
Front door LH unlock detection switch/LOCK or UNLOCK |
LOCK: Front door LH locked
UNLOCK: Front door LH unlocked |
- |
FR Door Lock Pos |
Front door RH unlock detection switch/LOCK or UNLOCK |
LOCK: Front door RH locked
UNLOCK: Front door RH unlocked |
- |
RR-Door Lock Pos SW |
Rear door RH unlock detection switch/ON or OFF |
ON: Either of rear door LH or rear door RH unlocked
OFF: Both of rear door LH and rear door RH locked |
- |
RL-Door Lock Pos SW |
Rear door LH unlock detection switch/ON or OFF |
ON: Either of rear door LH or rear door RH unlocked
OFF: Both of rear door LH and rear door RH locked |
- |
OK:
Normal conditions listed above are displayed.
| NG |
|
GO TO LIGHTING SYSTEM |
| OK |
|
|
READ VALUE USING TECHSTREAM (FR Door Courtesy SW, FL Door Courtesy SW, RR Door Courtesy SW, RL Door Courtesy SW)
(a) Connect the Techstream to the DLC3.
(b) Turn the ignition switch to ON.
(c) Turn the Techstream on.
(d) Enter the following menus: Body Electrical / Main Body / Data List.
(e) Read the Data List according to the display on the Techstream. Main Body
Tester Display | Measurement Item/Range | Normal Condition | Diagnostic Note |
FL Door Courtesy SW |
Front courtesy light switch LH/ON or OFF |
ON: Front door LH open
OFF: Front door LH closed |
- |
FR Door Courtesy SW |
Front courtesy light switch RH/ON or OFF |
ON: Front door RH open
OFF: Front door RH closed |
- |
RR Door Courtesy SW |
Rear courtesy light switch RH/ON or OFF |
ON: Rear door RH open
OFF: Rear door RH closed |
- |
RL Door Courtesy SW |
Rear courtesy light switch LH/ON or OFF |
ON: Rear door LH open
OFF: Rear door LH closed |
- |
OK:
Normal conditions listed above are displayed.
| NG |
|
GO TO LIGHTING SYSTEM |
| OK |
|
|
READ VALUE USING TECHSTREAM (Hood Courtesy SW)
(a) Connect the Techstream to the DLC3.
(b) Turn the ignition switch to ON.
(c) Turn the Techstream on.
(d) Enter the following menus: Body Electrical / Main Body / Data List.
(e) Read the Data List according to the display on the Techstream. Main Body
Tester Display | Measurement Item/Range | Normal Condition | Diagnostic Note |
Hood Courtesy SW |
Engine hood courtesy switch/ON or OFF |
ON: Engine hood open
OFF: Engine hood closed |
- |
OK:
The Techstream display changes correctly in response to the hood lock assembly (engine hood courtesy switch) status.
| OK |
|
CHECK INTERMITTENT PROBLEMS |
| NG |
|
|
INSPECT HOOD LOCK ASSEMBLY (ENGINE HOOD COURTESY SWITCH)
(a) Remove the hood lock assembly (engine hood courtesy switch).
Click here
(b) Inspect the hood lock assembly (engine hood courtesy switch).
Click here
| NG |
|
REPLACE HOOD LOCK ASSEMBLY (ENGINE HOOD COURTESY SWITCH) |
| OK |
|
|
CHECK HARNESS AND CONNECTOR (HOOD LOCK ASSEMBLY (ENGINE HOOD COURTESY SWITCH) - MAIN BODY ECU (MULTIPLEX NETWORK BODY ECU) AND BODY GROUND)
(a) Disconnect the A29 hood lock assembly (engine hood courtesy switch) connector.
(b) Disconnect the J165 main body ECU (multiplex network body ECU) connector.
(c) Measure the resistance according to the value(s) in the table below.
Standard Resistance:
Tester Connection | Condition | Specified Condition |
J165-11 (HCTY) - A29-1 |
Always |
Below 1 Ω |
J165-11 (HCTY) or A29-1 - Other terminals and body ground |
Always |
10 kΩ or higher |
A29-2 - Body ground |
Always |
Below 1 Ω |
| OK |
|
REPLACE MAIN BODY ECU (MULTIPLEX NETWORK BODY ECU) |
| NG |
|
REPAIR OR REPLACE HARNESS OR CONNECTOR |
INTERVIEW THE CUSTOMER
(a) If the phenomenon could not be confirmed or reproduced, after explaining this to the customer, also explain the history of input signals from the electrical key transmitter sub-assembly (electronic key) for the relevant date/time in the operation history.
Click here
Standard:
Cause was identified
| OK |
|
END |
| NG |
|
CHECK INTERMITTENT PROBLEMS |
|