Installation
HINT:
When installing new name plates and emblem, heat the vehicle body, name plates and emblem using a heat light.
Heating TemperatureItem | Temperature |
|---|---|
Vehicle Body |
40 to 60 °C |
Emblem, Name Plate |
20 to 30 °C |
NOTICE:
Do not heat the vehicle body, name plates or emblem excessively.
PROCEDURE1. INSTALL NO. 1 BACK DOOR EMBLEM
(a) Install the No. 1 back door emblem with the guide and 2 claws. Text in Illustration
NOTICE: Be careful not to damage the vehicle body. |
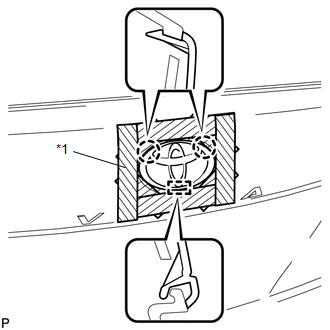 |
2. INSTALL NO. 2 BACK DOOR NAME PLATE
(a) Clean the vehicle body surface.
(1) Using a heat light, heat the vehicle body surface.
(2) Remove any double-sided tape from the vehicle body.
(3) Wipe off any tape adhesive residue with cleaner.
(b) Clean the name plate (if reusing the name plate).
(1) Using a heat light, heat the name plate.
(2) Remove the double-sided tape from the name plate.
(3) Wipe off any tape adhesive residue with cleaner.
(4) Apply new double-sided tape to the name plate.
(c) Install the No. 2 back door name plate.
(1) Using a heat light, heat the vehicle body and the No. 2 back door name plate.
(2) Remove the release paper from the No. 2 back door name plate.
HINT:
After removing the release paper, keep the exposed adhesive free from foreign matter.
(3) Install the No. 2 back door name plate as shown in the illustration.
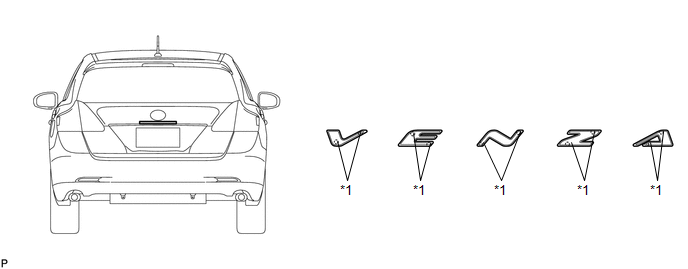 Text in Illustration
*1 |
Location Pin |
- |
- |
3. INSTALL NO. 3 BACK DOOR NAME PLATE (for AWD)
(a) Clean the vehicle body surface.
(1) Using a heat light, heat the vehicle body surface.
(2) Remove any double-sided tape from the vehicle body.
(3) Wipe off any tape adhesive residue with cleaner.
(b) Clean the name plate (if reusing the name plate).
(1) Using a heat light, heat the name plate.
(2) Remove the double-sided tape from the name plate.
(3) Wipe off any tape adhesive residue with cleaner.
(4) Apply new double-sided tape to the name plate.
(c) Install the No. 3 back door name plate.
(1) Using a heat light, heat the vehicle body and the new No. 3 back door name plate.
(2) Remove the release paper from the No. 3 back door name plate.
HINT:
After removing the release paper, keep the exposed adhesive free from foreign matter.
(3) Install the No. 3 back door name plate as shown in the illustration.
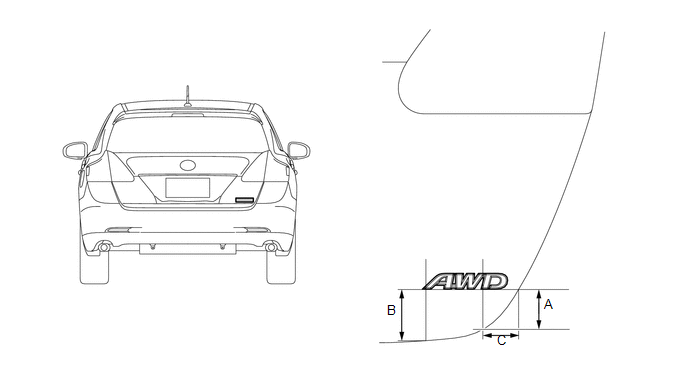 Standard Measurement
Dimension | Measurement |
|---|---|
A |
41.6 mm (1.6378 in.) |
B |
52.3 mm (2.0591 in.) |
C |
37.6 mm (1.4803 in.) |
4. INSTALL NO. 4 LUGGAGE COMPARTMENT DOOR PLATE (w/ Grade Mark)
(a) Clean the vehicle body surface.
(1) Using a heat light, heat the vehicle body surface.
(2) Remove any double-sided tape from the vehicle body.
(3) Wipe off any tape adhesive residue with cleaner.
(b) Clean the name plate (if reusing the name plate).
(1) Using a heat light, heat the door plate.
(2) Remove the double-sided tape from the door plate.
(3) Wipe off any tape adhesive residue with cleaner.
(4) Apply new double-sided tape to the door plate.
(c) Install the No. 4 luggage compartment door plate.
(1) Using a heat light, heat the vehicle body and the new No. 4 luggage compartment door plate.
(2) Remove the release paper from the No. 4 luggage compartment door plate.
HINT:
After removing the release paper, keep the exposed adhesive free from foreign matter.
(3) Install the No. 4 luggage compartment door plate as shown in the illustration.
for LE:
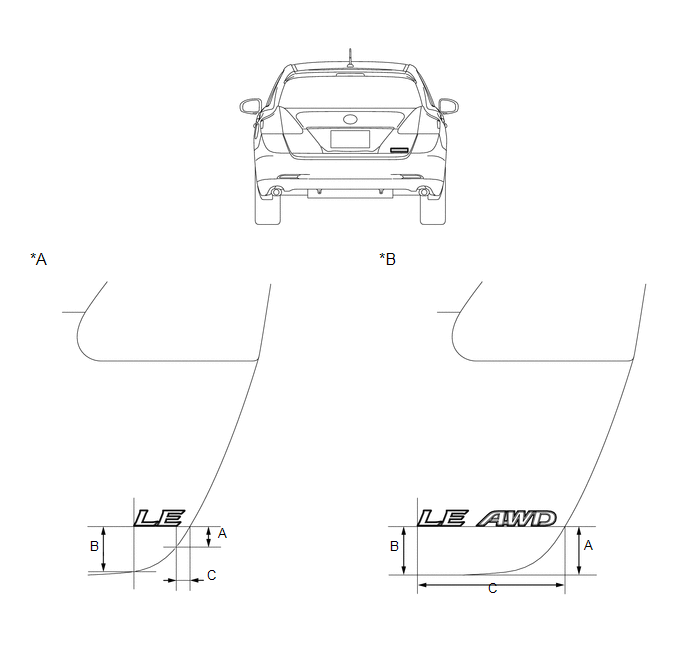 Standard Measurement
Dimension | Measurement |
|
|---|---|---|
for 2WD | for AWD |
|
A |
32.1 mm (1.2638 in.) |
52.6 mm (2.0709 in.) |
B |
51.5 mm (2.0276 in.) |
53.0 mm (2.0866 in.) |
C |
23.4 mm (0.9213 in.) |
169.9 mm (6.6890 in.) |
*A |
for 2WD |
*B |
for AWD |
for XLE:
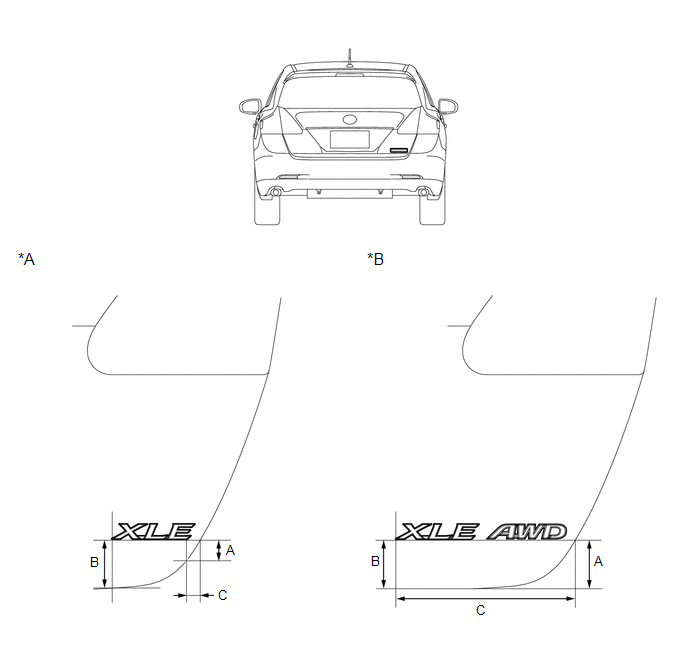 Standard Measurement
Dimension | Measurement |
|
|---|---|---|
for 2WD | for AWD |
|
A |
30.5 mm (1.2008 in.) |
52.6 mm (2.0709 in.) |
B |
53.0 mm (2.0866 in.) |
52.8 mm (2.0787 in.) |
C |
21.6 mm (0.8504 in.) |
193.2 mm (7.6063 in.) |
*A |
for 2WD |
*B |
for AWD |
for LIMITED:
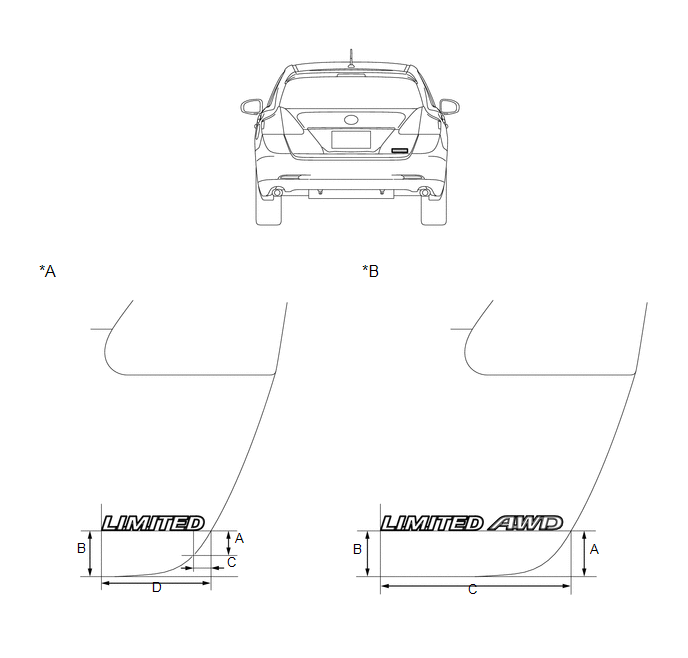 Standard Measurement
Dimension | Measurement |
|
|---|---|---|
for 2WD | for AWD |
|
A |
32.5 mm (1.2795 in.) |
52.9 mm (2.0827 in.) |
B |
52.9 mm (2.0827 in.) |
52.6 mm (2.0709 in.) |
C |
24.0 mm (0.9449 in.) |
221.7 mm (8.7283 in.) |
D |
124.5 mm (4.9016 in.) |
- |
*A |
for 2WD |
*B |
for AWD |
5. INSTALL HOOD EMBLEM
(a) Clean the vehicle body surface.
(1) Using a heat light, heat the vehicle body surface.
(2) Remove any double-sided tape from the vehicle body.
(3) Wipe off any tape adhesive residue with cleaner.
(b) Clean the name plate (if reusing the name plate).
(1) Using a heat light, heat the name plate.
(2) Remove the double-sided tape from the name plate.
(3) Wipe off any tape adhesive residue with cleaner.
(4) Apply new double-sided tape to the name plate.
(c) Install the hood emblem.
(1) Using a heat light, heat the vehicle body and the hood emblem.
(2) Remove the release paper from the hood emblem.
HINT:
After removing the release paper, keep the exposed adhesive free from foreign matter.
(3) Install the hood emblem as shown in the illustration.
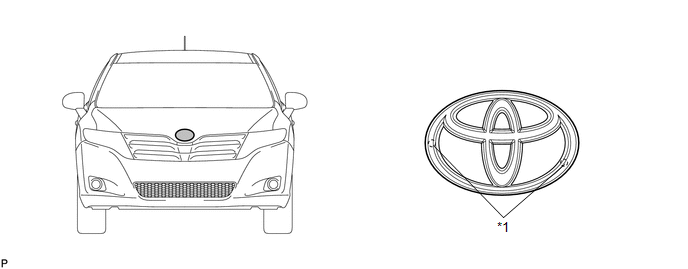 Text in Illustration
*1 |
Location Pin |
- |
- |
Test yourself
A quick Toyota Venza quiz: every answer comes with an explanation and a link to the manual page.