Installation
1. INSTALL ECM
(a) Install the bracket to the ECM with the 5 screws. |
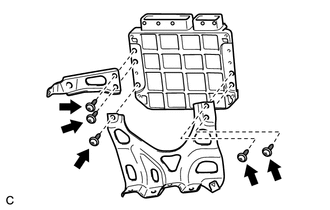 |
(b) Install the ECM with the 3 bolts. Torque: 8 N·m {82 kgf·cm, 71 in·lbf} |
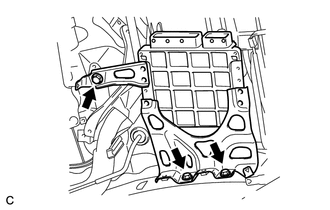 |
(c) Connect the 2 ECM connectors and lower the 2 levers. NOTICE:
|
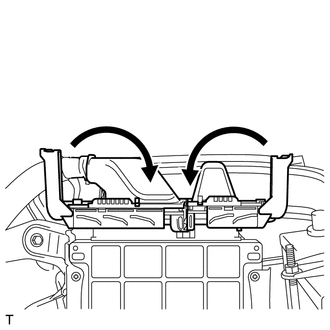 |
(d) Install the 3 wire harness clamps. |
 |
2. INSTALL AIR CLEANER BRACKET
(a) Install the air cleaner bracket with the 2 bolts. Torque: 7,8 N·m {80 kgf·cm, 69 in·lbf} |
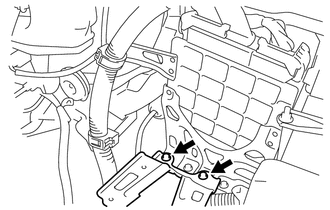 |
3. INSTALL AIR CLEANER CASE SUB-ASSEMBLY

4. INSTALL AIR CLEANER FILTER ELEMENT SUB-ASSEMBLY
5. INSTALL AIR CLEANER CAP SUB-ASSEMBLY
6. INSTALL NO. 1 VACUUM SWITCHING VALVE ASSEMBLY
7. INSTALL NO. 1 ENGINE COVER SUB-ASSEMBLY
8. INSTALL OUTER COWL TOP PANEL SUB-ASSEMBLY
9. INSTALL WINDSHIELD WIPER MOTOR AND LINK
(a) Install the windshield wiper motor and link (See page ).
10. INSTALL COOL AIR INTAKE DUCT SEAL
11. CONNECT CABLE TO NEGATIVE BATTERY TERMINAL
CAUTION:
When disconnecting the cable, some systems need to be initialized after the cable is reconnected (See page ).
12. PERFORM REGISTRATION
(a) The Vehicle Identification Number (VIN) must be input into a replacement ECM (See page ).
Test yourself
A quick Toyota Venza quiz: every answer comes with an explanation and a link to the manual page.