Assembly overview - heater and air conditioning unit, Climatronic
In this manual: Heating, air conditioning
~4min read
Tightening torque found on this page
Note There are different designs and makes of heater and air conditioning unit. The individual components of the various heaters and air conditioning units are similar but not identical. The combined fitting of different makes of component is therefore not permissible → Electronic Parts Catalogue. The following illustrations show a “Valeo” heater/air conditioning unit, distinguishing features with respect to other makes → Chapter. Note
The illustration shows a left-hand drive vehicle.
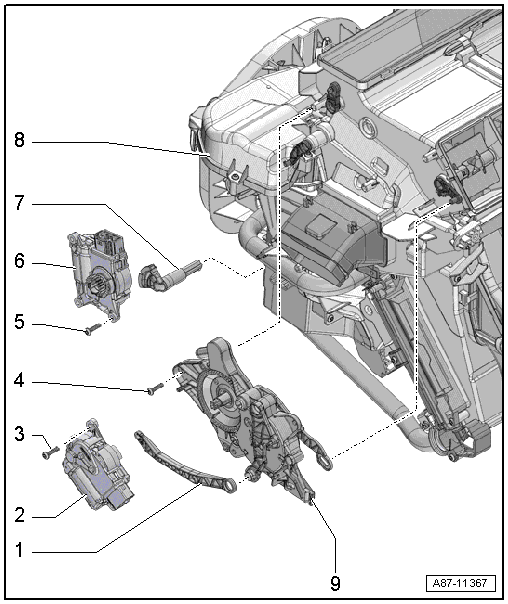
Assembly overview - heater and air conditioning unit, flap control (left side)
1 -
Actuating lever
For actuation of defroster and air distributor flap
2 -
Air distribution flap control motor
Checking: Use vehicle diagnostic tester in “Guided fault finding” mode and → Current flow diagrams, Electrical fault finding and Fitting locations
Heater and air conditioning system with electric/manual controls:
Air distribution flap control motor -V428- with potentiometer for air distribution flap control motor -G645-
Removing and installing → Chapter.
Climatronic:
Front air distribution flap control motor -V426- with potentiometer for front air distribution flap control motor -G642-
Removing and installing → Chapter.
3 -
Bolt
Qty. 2.
1 N·m
4 -
Bolt
Qty. 3.
1 N·m
5 -
Bolt
Qty. 2.
1 N·m
6 -
Temperature flap control motor
Checking: Use vehicle diagnostic tester in “Guided fault finding” mode and → Current flow diagrams, Electrical fault finding and Fitting locations
Heater and air conditioning system with electric/manual controls:
Temperature flap control motor -V68- with potentiometer for temperature flap control motor -G92-
Removing and installing → Chapter.
Climatronic:
Left temperature flap control motor -V158- with potentiometer for left temperature flap control motor -G220-
Removing and installing → Chapter.
7 -
Actuating lever
For warm air flap
8 -
Heater and air conditioning unit
Many components of the heater and heater/air conditioning unit are identical
Different versions → Chapter.
The combined fitting of different makes of component is not permissible
The following illustrations show the heater unit from “Valeo”.
Removing and installing → Chapter.
9 -
Defroster and air distribution flap actuation unit
Fitted only on vehicles with heater or air conditioning system with electric/manual controls.
Removing and installing → Chapter.
Note
The illustration shows a left-hand drive vehicle.
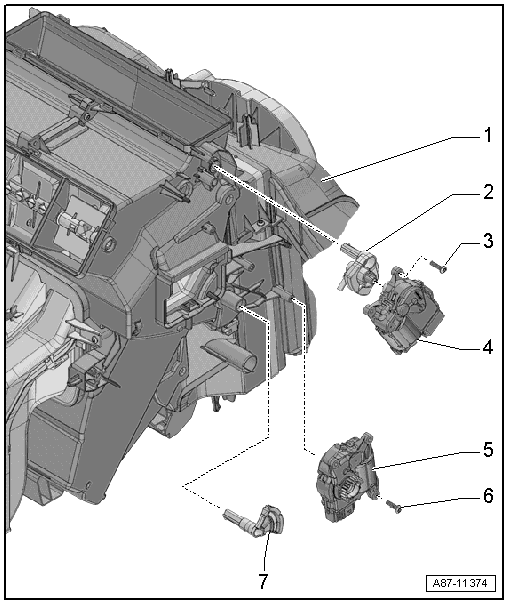
Assembly overview - heater and air conditioning unit, flap control (right side)
1 -
Heater and air conditioning unit
Removing and installing → Chapter.
2 -
Actuating lever
For defroster flap
3 -
Bolt
Qty. 2.
1 N·m
4 -
Defroster flap control motor -V107-
With potentiometer for defroster flap control motor -G135-.
Only with Climatronic.
Checking: Use vehicle diagnostic tester in “Guided fault finding” mode and → Current flow diagrams, Electrical fault finding and Fitting locations
Removing and installing → Chapter.
5 -
Right temperature flap control motor -V159-
With potentiometer for right temperature flap control motor -G221-
Only with Climatronic.
Checking: Use vehicle diagnostic tester in “Guided fault finding” mode and → Current flow diagrams, Electrical fault finding and Fitting locations
Removing and installing → Chapter.
6 -
Bolt
Qty. 2.
1 N·m
7 -
Actuating lever
For warm air flap
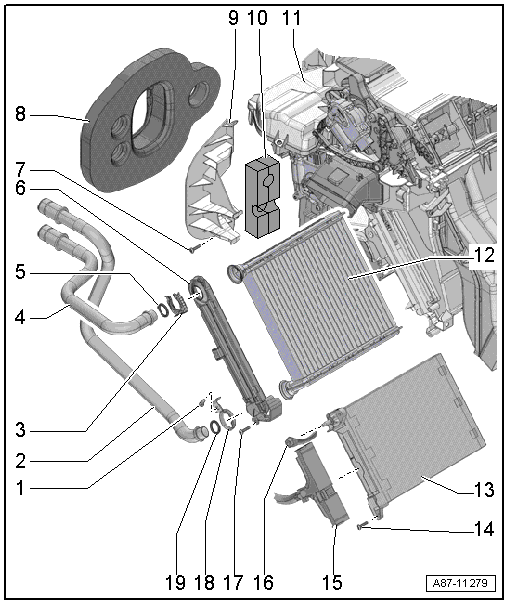
Assembly overview - heater and air conditioning unit, heat exchanger, auxiliary air heater element
The illustration shows a Valeo heater unit in a left-hand drive vehicle.
1 -
Bolt
6 N·m
2 -
Coolant pipe with heat exchanger
Different versions. Refer to → Electronic Parts Catalogue.
Coolant supply from the engine
Removing and installing → Chapter.
3 -
Clip
4 -
Coolant pipe with heat exchanger
Different versions. Refer to → Electronic Parts Catalogue.
Coolant return to the engine
Removing and installing → Chapter.
5 -
Sealing ring
Different versions. Refer to → Electronic Parts Catalogue.
Renew.
6 -
Cover
For heat exchanger.
7 -
Bolt
2 N·m
8 -
Foam spacer
For sealing and insulation.
Note fitting position.
9 -
Bracket
For coolant pipes.
10 -
Foam
For insulation
Note fitting position.
11 -
Heater and air conditioning unit
On vehicles without auxiliary air heater element -Z35- with auxiliary air heater control unit -J604- the opening for the auxiliary air heater element -Z35- is closed.
Removing and installing → Chapter.
Dismantling and assembling → Chapter.
12 -
Heat exchanger
Different versions. Refer to → Electronic Parts Catalogue.
Removing and installing → Chapter.
13 -
Auxiliary air heater element -Z35- with auxiliary air heater control unit -J604-
Checking activation → Chapter.
Removing and installing → Chapter.
14 -
Bolt
Qty. 2.
2 N·m
15 -
Electrical wiring
For auxiliary air heater element -Z35- with auxiliary air heater control unit -J604-.
16 -
Earth cable
For auxiliary heater.
Nut 9 ± 1 N·m
17 -
Bolt
Qty. 3.
2 N·m
18 -
Screw-type clip
19 -
Sealing ring
Different versions. Refer to → Electronic Parts Catalogue.
?
Test yourself
A quick Volkswagen Golf quiz: every answer comes with an explanation and a link to the manual page.
 Note There are different designs and makes of heater and air conditioning unit. The individual components of the various heaters and air conditioning units are similar but not identical. The combined fitting of different makes of component is therefore not permissible → Electronic Parts Catalogue. The following illustrations show a “Valeo” heater/air conditioning unit, distinguishing features with respect to other makes → Chapter.