Electrical system
Removing and installing rear interior light/reading light
Removing
 Caution Danger of damage to component surfaces. When using leverage tools, mask visible areas of the component with commercially available adhesive tape. |
 Note The buttons are an integral part of the rear interior light -WX2- and cannot be removed individually. The rear interior light -WX2- is secured by a two-stage locking mechanism. |
|
|
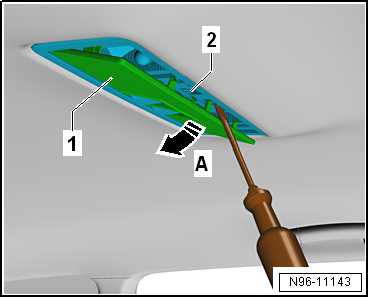
- Lever out lens -1- in direction of arrow -A- using, for example, a narrow screwdriver.
- Remove lens -1- from rear interior light -WX2--2-.
|
|
 |
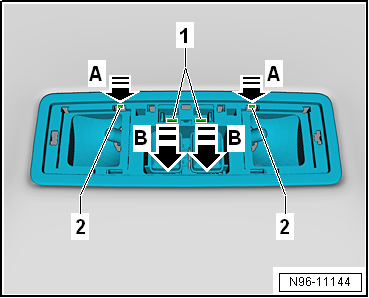
- Release catches -2- in direction of arrow -A- using, for example, a narrow screwdriver.
- Press locking mechanism -1- in direction of arrow -C-.
|
|
 |
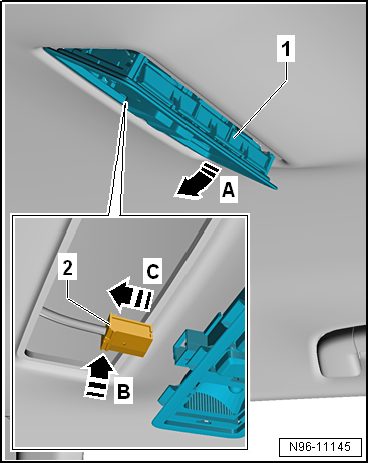
- Remove rear interior light -WX2--1- from roof aperture in direction of arrow -A-.
- Press connector lock in direction of arrow -B- and disconnect electrical connector -C-.
Installing
Install in the reverse order of removal, observing the following: Note
Electrical connector must face direction of travel. |
|
 |
- Press locking mechanism -1- in direction of arrow -C-. Catches -2- must engage audibly.
- Test functionality.
|
|
|
?
Test yourself
A quick Volkswagen Golf quiz: every answer comes with an explanation and a link to the manual page.
Was this page helpful?