Securing child seats using lower anchoring points (ISOFIX, LATCH)
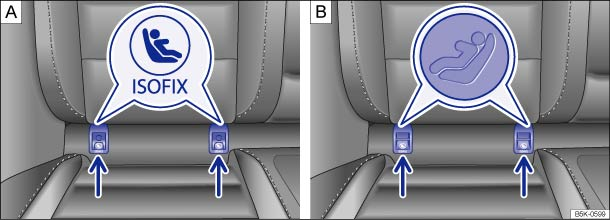
Fig. 78 On vehicle seat: different markings identifying the lower anchoring points for child seats
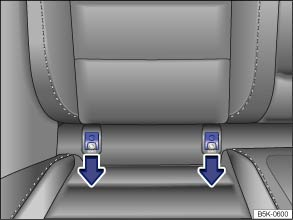
Fig. 79 On the vehicle seat: protective caps for the inner anchoring point
 First read and observe the introductory information and safety warnings
Two retaining rings, also known as lower anchoring points, may be fitted to each outer rear seat.
Overview of installation with ISOFIX
The following table lists where and how ISOFIX child seats can be fastened at the lower anchoring points on the individual seats in the vehicle according to European Directive ECE-R 16.
The body weight permissible for the child seat and the size class A to G are indicated on the label attached to child seats with universal or semi-universal certification.
| Group (weight class) | ||||||||||
|---|---|---|---|---|---|---|---|---|---|---|
| Group 0: up to 10 kg | Group 0: up to 10 kg | Group 1: 9 to 18 kg | ||||||||
| Group 0+: up to 13 kg | ||||||||||
| Direction of installation | Rear-facing (opposite to driving direction) |
Rear-facing (opposite to driving direction) |
Rear-facing (opposite to driving direction) |
Forward-facing (in driving direction) |
||||||
| Size class | F | G | C | D | E | C | D | A | B | B1 |
| Installation on the front passenger seat | Seat without anchoring points, not attached with ISOFIX/LATCH | |||||||||
| Installation on outer seats on the rear bench seat | IL-SU | IL-SU | IL-SU | IUF/IL-SU | ||||||
| Installation on middle seat on the rear bench seat | Seat without anchoring points, not attached with ISOFIX/LATCH | |||||||||
X: seat not suitable for securing an ISOFIX child seat from this group.
IL-SU: seat suitable for installing an ISOFIX child seat with semi-universal approval, refer to vehicle list from child seat manufacturer.
IUF: seat suitable for installing an ISOFIX child seat with universal approval and securing with top tether.
Child seats with fixed attachments
Insert guides can be used to install a child seat with rigid attachments. Insert guides facilitate installation and protect the seat covers. The insert guides in some cases are part of the scope of supply for the child seat or can be obtained from your Volkswagen dealership. If necessary, the insert guides are latched onto the two anchoring points in the vehicle .
- Observe the child seat manufacturer's instructions when fitting or removing the child seat .
- Pull the protective caps for the lower anchoring points in the direction of the arrows .
- Insert the child seat into the retaining rings in the direction of the arrow. The child seat must click securely into place.
- Pull on both sides of the child seat.
Child seats with adjustable attachment belts
- Observe the child seat manufacturer's instructions when fitting or removing the child seat .
- Position the child seat on the seat cushion and attach the hooks from the attachment belts onto the retaining rings .
- Pull the attachment belts to ensure that they are equally taut. The child seat must fit snugly to the vehicle seat.
- Pull on both sides of the child seat.
 The lower anchoring points for the child seats are not fastening rings. Fit child seats to the lower anchoring points only.

 NOTICE
- In order to avoid permanent marks on the seats, the insert guides should be removed from the anchoring points when there is no child seat fitted to them.
- In order to avoid damage to the seat covers, the seats or the insert guides, the insert guides must always be removed from the anchoring points before folding the rear seats forwards.

The protective caps should always be attached to the lower anchoring points when no child seat is fitted to the vehicle's anchoring points.
Test yourself
A quick Volkswagen Golf quiz: every answer comes with an explanation and a link to the manual page.