Front Panel
Assembly Overview - Front Panel

Note
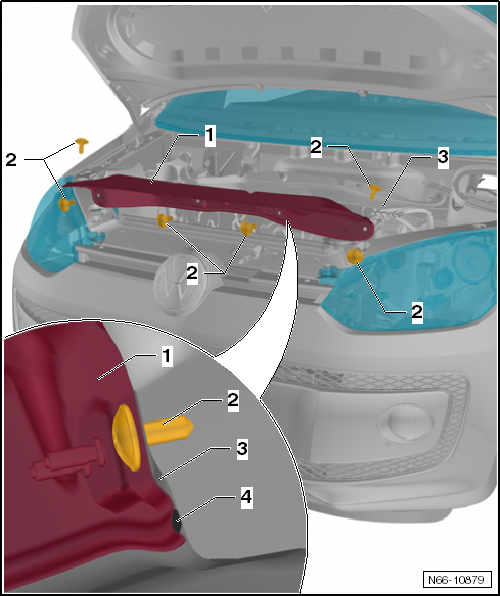
The front panel -1- is bolted and additionally sealed with butyl sealing compound -4-.
- Front Panel
- Removing:
- After removing bolts -3-, cut the bead of adhesive -4- with workshop tools.
- Removing:
- Bolt
- 6 pcs
- Tightening torque: 25 N·m
- Body flange
- Butyl sealing compound
- Make as required from D 450 273 A2.
Assembly Overview - Cowl Cover
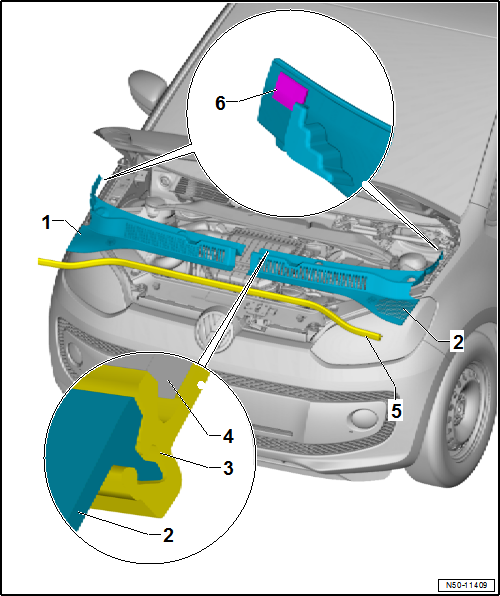
- Cowl Cover
- right side
- Remove and install
- Cowl Cover
- left side
- Remove and install
- Surround moulding
- Part of the windshield
- Windshield
- Gasket
- Adhesive tape
Removing and Installing Cowl Cover
Removing

Note
Depending on the model variant, slight differences must be taken into account when removing and installing the cowl covers.
Carry out the following work:
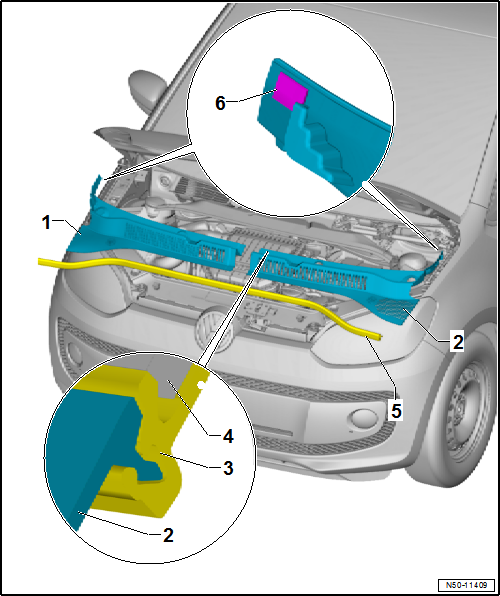
- Remove wiper arms → Electrical System.
- Pull seal -5- off the entire length of cowl covers -1 and 2-.

Caution!
The windshield -4- can be destroyed. Do not pry off cowl cover -1- with a lever tool (screwdriver, wedge). This will damage windshield -4- and it may crack later.
- First pull cowl covers -2- out of surround moulding -3- upward, starting from the center.
- Pull cowl covers -2- forward out of the fender and remove.
- Then pull cowl covers -1- out of surround moulding -3- upward, starting from the center.
- Heat the area at adhesive tape -6- with hot air blower -V.A.G 1416- and pull off cowl covers -1/2-.
- Pull cowl covers -1- forward out of the fender and remove.
Installing

Caution!
The windshield -4- can be destroyed.
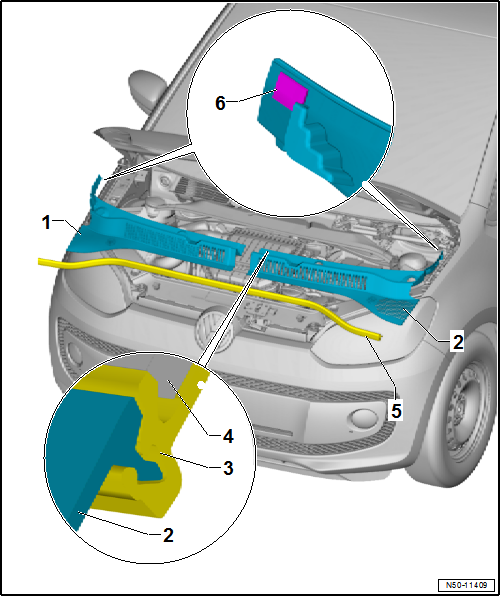
Striking cowl cover -1- into surround moulding -3- of windshield -4- can cause the windshield to crack.

Note
- New windshields have an insert fitted in the surround moulding. Remove this insert before installing the cowl cover.
- Press the cowl cover into the surround moulding by hand with light pressure only. Never strike it or press it in using a tool.
Carry out the following work:
- Spray surround moulding -3- with soap solution so that cowl covers -1 and 2- can be pressed in more easily.
- First insert cowl covers -1- into the fender.
- Place cowl covers -1- on surround moulding -3-. Starting from the outside, press into surround moulding -3- with light pressure.
- Then insert cowl covers -2- into the fender.
- Place cowl covers -2- on surround moulding -3-. Starting from the outside, press into surround moulding -3- with light pressure.
- In the area of adhesive tape -6-, press cowl covers -1 and 2- onto the fender.
- Slide seal -5- onto cowl covers -1 and 2-.
- Install wiper arms → Electrical System.