Sunroof
Sunroof
Component overview - Panoramic tilt/slide sunroof
Assembly Overview
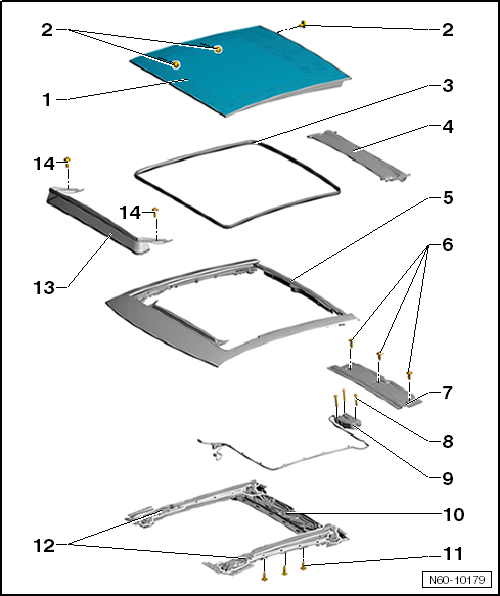
- Glass panel for panoramic tilt/slide sunroof (single-pane safety glass)
- Remove glass panel for panoramic tilt/slide sunroof
- Remove glass panel with faulty drive
- Install glass panel for panoramic tilt/slide sunroof
- Adjust glass panel for panoramic tilt/slide sunroof
- Bolt
- Bolts are micro-encapsulated and must always be replaced after loosening
- 6 pcs.
- 5,5 N·m
- Sunroof seal
- Remove and install
- Sunroof sunshade
- Remove and install
- Sunroof frame
- Remove and install sunroof frame
- if necessary, the guide channels must only be greased with special grease G 060 751 A2, otherwise proper function is not guaranteed
- Bolt
- for the cover
- 3 pcs.
- 2,5 N·m
- Cover
- Remove and install
- Bolt
- for the sunroof motor
- 3 pcs.
- 4 N·m
- Electric drive
- Remove and install
- Initialize drive
- Mounting bracket
- for sunshade and drive
- forms one part together with the link guide
- Remove and install
- Bolt
- Bolts are micro-encapsulated and must always be replaced after loosening
- 13 pcs.
- 3 N·m
- Link guide
- with tilt mechanism and cables
- forms one part together with the mounting bracket
- Remove and install
- Wind deflector
- Remove and install
- Bolt
- for the wind deflector
- 2 pieces
- 2 N·m
Function

The movement functions of the panoramic tilt/slide sunroof can be performed with the ignition switched on.
After switching off the ignition, the movement functions can still be performed until the driver or front passenger door is opened.
The panoramic tilt/slide sunroof is tilted up by turning the switch to position 3.
The panoramic tilt/slide sunroof is opened by turning the switch to position 4 or 5 and closed by turning the switch to position 2.
The glass panel drive is equipped with anti-trap protection. If the glass panel meets an obstacle during closing, it reverses direction.
In addition, there is an emergency close function. In case of closing problems, the glass panel can be forced closed by pulling the switch.
During the emergency close function, the anti-trap protection is switched off.
The glass panel drive is protected against overheating by a run-time limit. The safety mechanism responds after approx. 2 minutes of continuous operation. It can only be operated again after a cool-down phase.
In case of a power failure, the glass panel can be moved at the drive using a commercially available 4 mm hex key.
Component overview - Sunroof sunshade
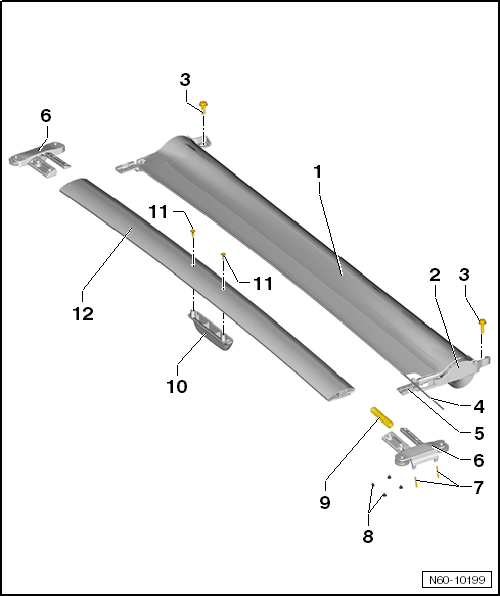
- Sunroof sunshade
- Remove and install
- Socket
- for the sunroof sunshade fabric
- Bolt
- for the sunroof sunshade
- 2 pieces
- Tightening torque 2.5 N·m
- Tensioning wire
- for attaching the fabric to the pull bar
- Driver
- Roller slider
- Locking pins
- 2 pcs. per roller slider
- Rubber buffers
- 4 pcs. per roller slider
- Tension spring
- for the roller slider
- Handle
- Bolt
- for the handle
- 2 pieces
- Tightening torque 1 N·m
- Pull bar
- Remove and install
Component overview - Sunroof frame

Note
- To remove sunroof frame -5-, front trim panel -1- must be removed first.
- The front trim panel will be damaged during removal and cannot be reused.
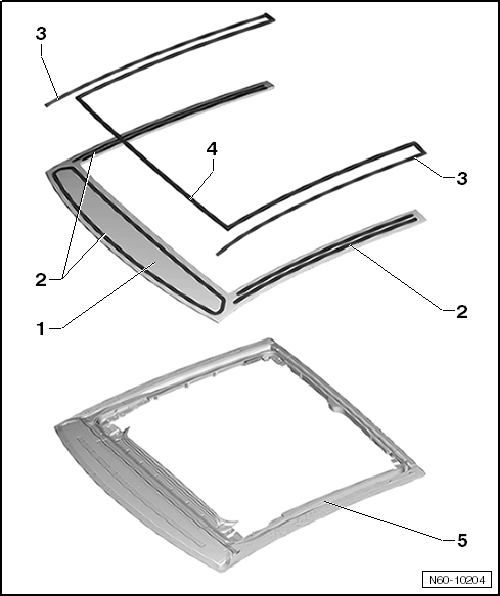
- Front trim panel
- Remove and install
- Adhesive
- Sunroof seal, outer
- bonded to the trim panel
- cannot be replaced individually
- Sunroof seal, inner
- bonded to the trim panel
- cannot be replaced individually
- Sunroof frame
- Remove and install
Component overview - Front trim panel

Note
- To remove sunroof frame -5-, front trim panel -1- must be removed first.
- The front trim panel will be damaged during removal and cannot be reused.
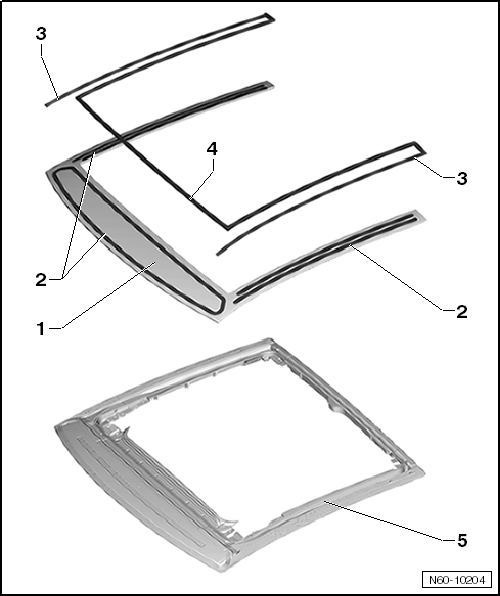
- Front trim panel
- remove
- Adhesive
- Sunroof seal, outer
- bonded to the trim panel
- cannot be replaced individually
- Sunroof seal, inner
- bonded to the trim panel
- cannot be replaced individually
- Sunroof frame
- Remove and install
Remove glass panel for panoramic tilt/slide sunroof
Remove glass panel

Note
- The headliner is not shown in the illustration for better visibility only.
- The headliner is not removed.
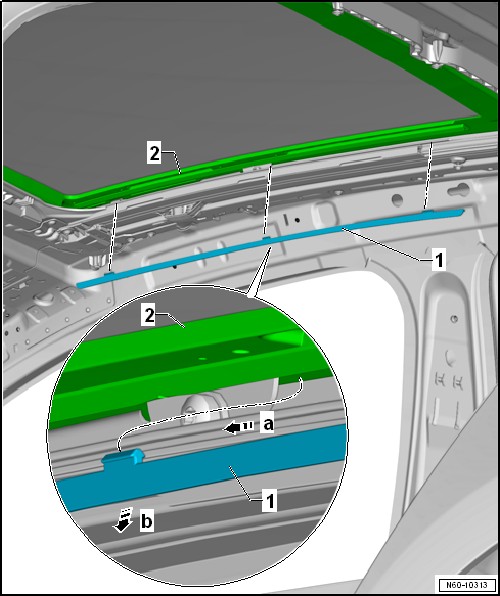
- Fully open sunroof sunshade.
- Slide trim panel -1- slightly forward -arrow a-.
- Remove trim panel -1- from sunroof frame -2- -arrow b-.

- Open the glass cover of the panoramic tilt/slide roof by 150 mm, dimension a.
- Unscrew the rear mounting screws -2-.
- Loosen the front mounting screws -4- on the left and right, do not unscrew them.
- Unscrew the rear mounting screws -3- on the left and right.
- Remove glass cover -1- upward.

Note
To avoid damage during further work, close the mechanism using the switch.
Remove glass panel with faulty drive
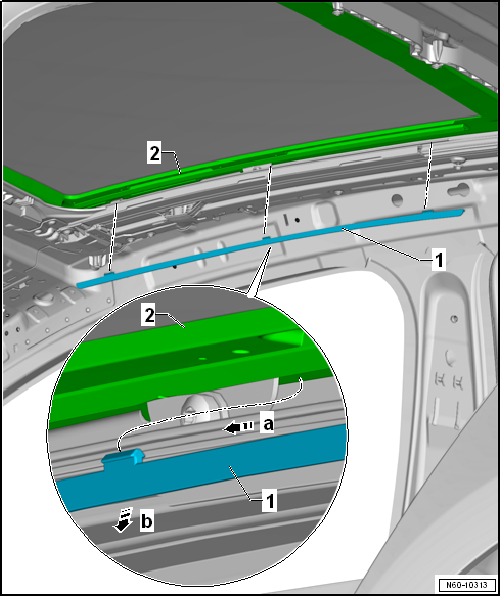
- Fully open sunroof sunshade.
- Slide trim panel -1- slightly forward -arrow a-.
- Remove trim panel -1- from sunroof frame -2- -arrow b-.
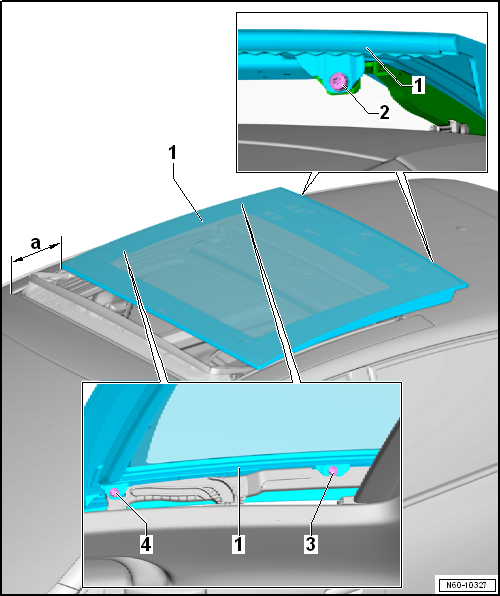
Carry out the following work:
- Fully open sunroof sunshade.
- Remove the headliner → Body; Interior Assembly Work.
- Unscrew the rear mounting screws -2-.
- Unscrew the front mounting screws -4- on the left and right.
- Loosen the rear mounting screws -3- on the left and right, do not unscrew them.
- Remove glass cover -1- upward.

Note
To avoid damage during further work, close the mechanism using the switch.
Install glass cover
Required Special Tools, Test and Measuring Equipment and Auxiliary Items
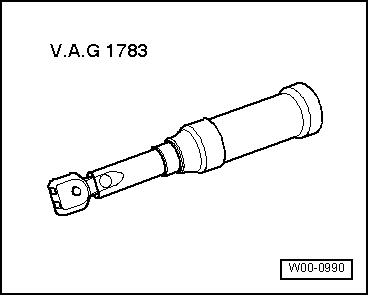
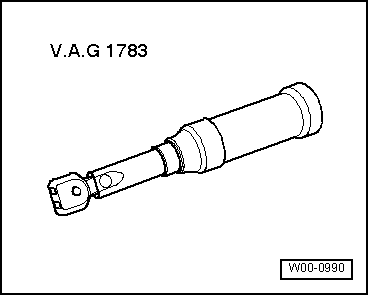
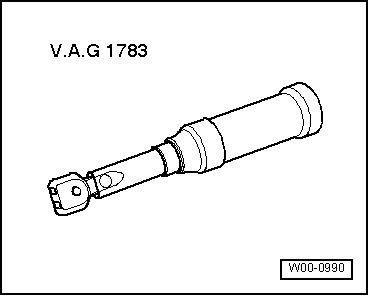
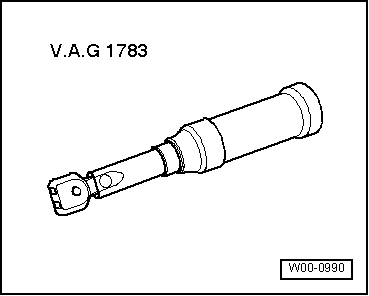
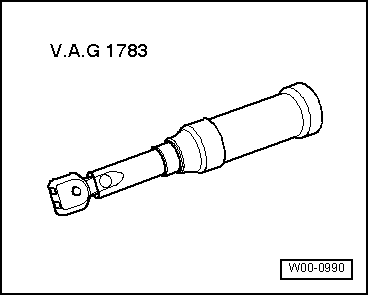
- Torque wrench 210 N·m -V.A.G 1783-

Note
Screws are micro-encapsulated and must always be replaced after loosening.

Carry out the following work:
- Open the mechanism by 150 mm, dimension a, using the switch.
- Place glass cover -1- onto the tilt mechanism.
- Tighten mounting screws -2, 3 and 4- on the left and right only lightly.
- Adjust the glass cover of the panoramic tilt/slide roof (height adjustment):

Note
Tighten mounting screws -5- after the cover height adjustment (5.5 N·m).

Note
- The headliner is not shown in the illustration for better visibility only.
- The headliner is not removed.
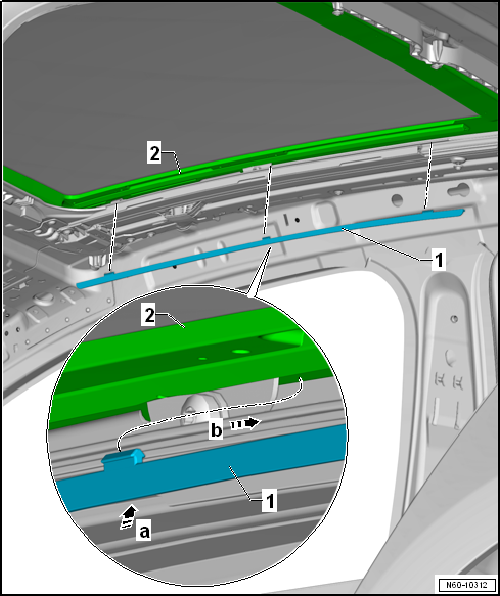
- Insert trim panel -1- into the sunroof frame -2-, arrow a.
- Push trim panel -1- slightly to the rear, arrow b.
Adjust glass cover
Required Special Tools, Test and Measuring Equipment and Auxiliary Items
- Torque wrench 210 N·m -V.A.G 1783-
Height adjustment for glass cover
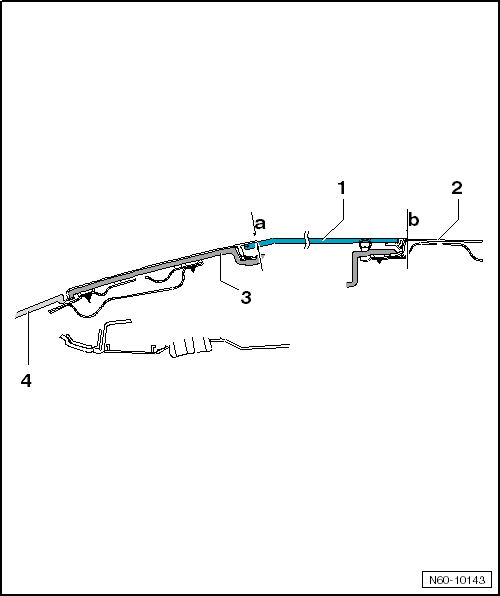
Carry out the following work:
- Loosen the mounting screws for the glass cover.
- Move the glass cover of the panoramic tilt/slide roof to the "open" position.
- Move the glass cover of the panoramic tilt/slide roof to the "closed" position.
- Make the height adjustment for the glass cover at the front and rear on both sides as follows:
Cover adjustment at front:
- Dimension a = 1 mm lower than mounting frame -3-.
- Press the inner seal to the side.
- Tighten the front inner screws (5.5 N·m).
Cover adjustment at rear:
- Dimension b = 1 mm higher than roof brace -2-.
- Tighten the rear inner screws (5.5 N·m).
- Open the cover and tighten the rear screws (5.5 N·m).

Note
- For the best possible exterior appearance, make sure the adjustment is even (symmetrical) on the left and right.
- The glass cover must not sit higher than the roof at the front or lower than the roof at the rear at any point.
Remove and install drive for panoramic tilt/slide roof glass cover
Removing

WARNING!
Remove and install the drive for the panoramic tilt/slide roof glass cover only with the roof closed (zero position).
Conditions for removing and installing the drive: engine and ignition off, remove key and open door.
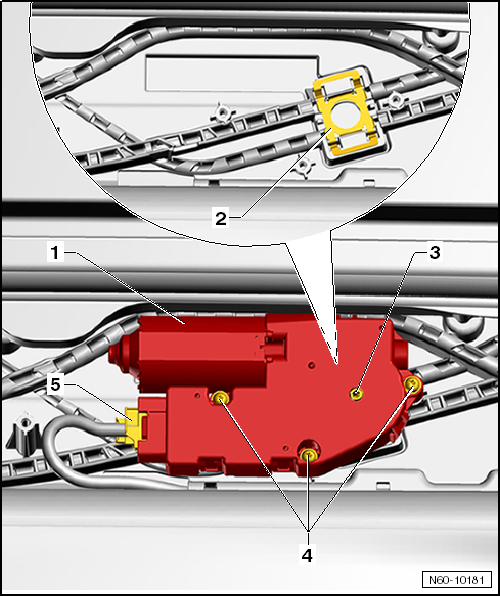
Carry out the following work:
- Remove glass cover.
- Remove glass cover if the drive is defective
- Remove cover.
- Switch off engine and ignition, remove key and open door.
- This condition must be maintained until the drive is installed.
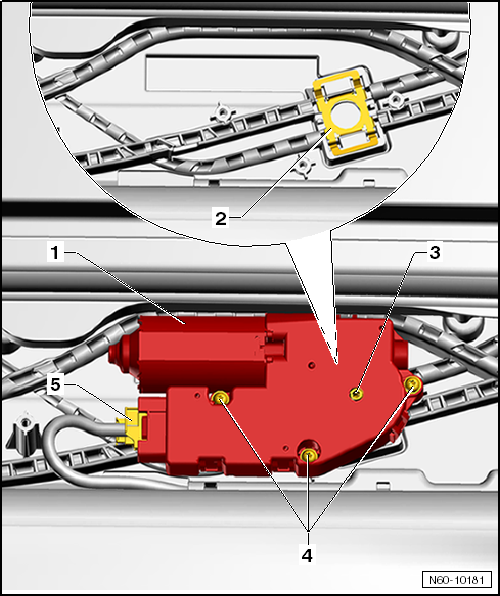
- Unscrew screws -4- and pull off the panoramic tilt/slide roof drive -1-.
- Disconnect plug connection -5- for the drive.
Installing
Required Special Tools, Test and Measuring Equipment and Auxiliary Items
- Torque wrench 210 N·m -V.A.G 1783-

Note
The screws for the drive are micro-encapsulated and must always be replaced.
Carry out the following work:
- Connect plug connection -5- to drive -1-.
- Check that clip -2- is seated correctly.
- Push on drive -1- and tighten screws -4-. Tightening torque: 4 N·m.
- After installation, the key can be inserted back into the lock cylinder of the ignition switch.
- Then perform a function check.
Manual operation without power

Note
- In the event of a power failure, the sliding/tilt roof with glass cover can be moved at the drive using a commercially available hex key.
- Turning requires increased effort, as the drive is not decoupled from the gearbox.
Carry out the following work:
- Remove glass cover.
- Remove cover.
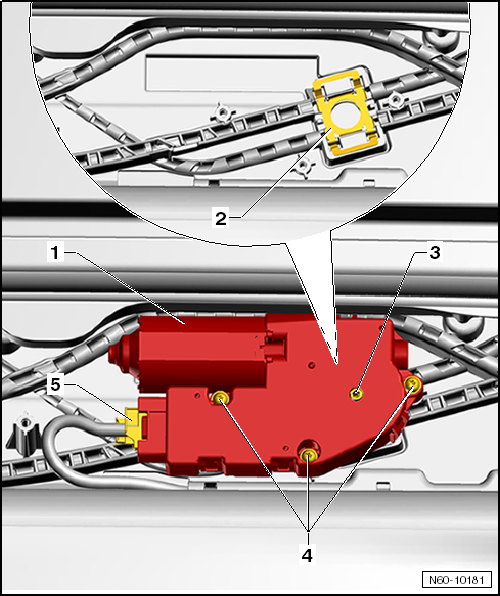
- Insert hex key into screw -3- of drive -1-.
- Close the glass cover by turning screw -3-.
Remove and install preselection automatic for panoramic tilt/slide roof glass cover
Carry out the following work:
Removing
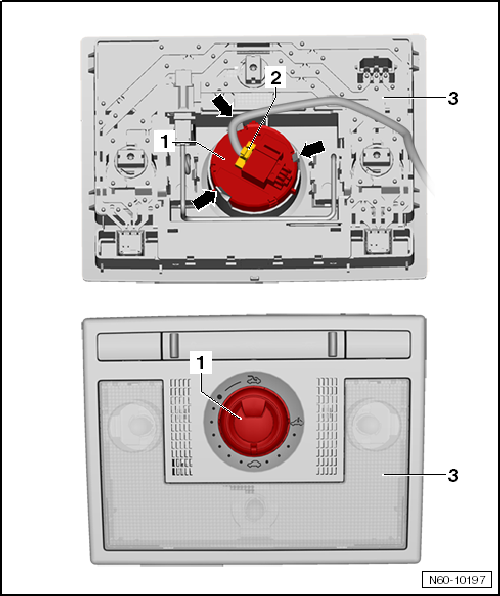
- Remove interior light → Vehicle Electrical System; Electrical Equipment.
- Disconnect plug connection -3- for the switch.
- Release switch -1- from the snap hooks -arrows- and pull it out of interior light -3-.
Installing
- Installation is performed in the reverse order.
Teach-in run for panoramic sunroof drive

Note
- After a glass cover, motor or tilt mechanism has been replaced, a normalization run must be performed.
- During the normalization run, the anti-trap (closing force limitation) function is switched off.
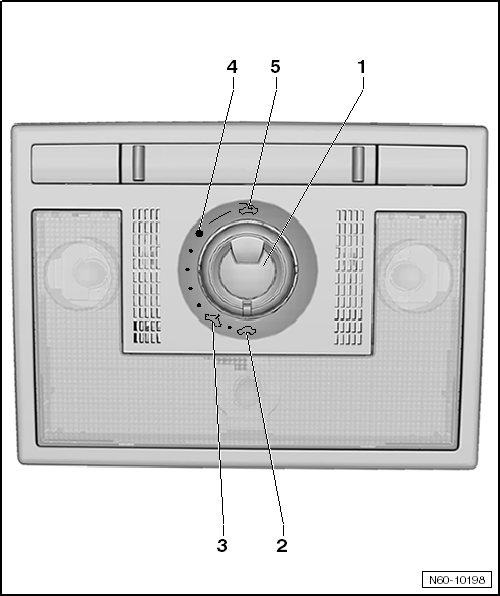
Normalization run for sunroof motor
Ignition is switched on.
The rotary knob must be in position -2-, "sunroof closed".
- Pull rotary knob -1- down and hold it in this position for the entire normalization procedure (approx. 20 sec).
- During the normalization run, the glass cover closes first and then moves approx. 200 mm to the rear.
- Once the cover has closed again, the normalization run is complete and the rotary knob can be released.
Remove and install glass cover seal
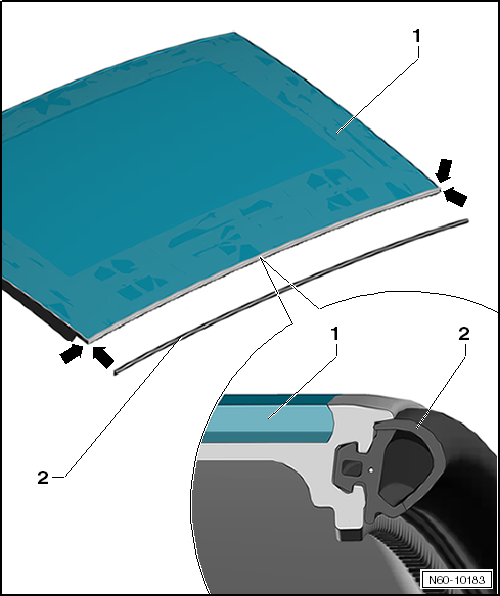
Removing:
- Open glass cover.
- Pull seal -2- off glass cover -1-.
Installing:
- Align seal -2- with the outer edges of glass cover -1-, arrows.
- Press seal -2- into the holder on glass cover -1-.
Remove and install cover
Required Special Tools, Test and Measuring Equipment and Auxiliary Items
- Torque wrench 210 N·m -V.A.G 1783-
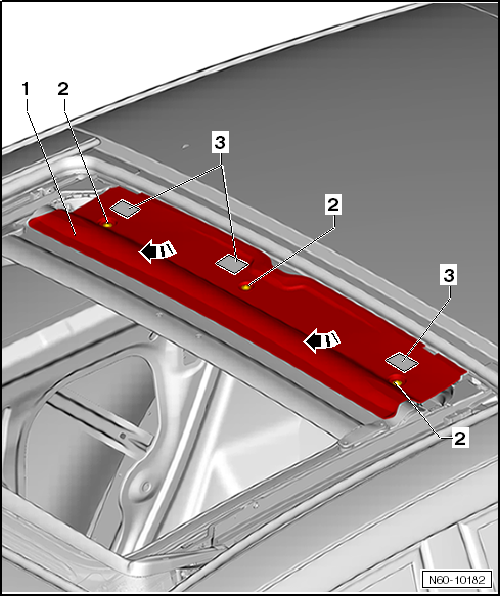
Removing:
- Remove glass cover.
- Pull off self-adhesive dampers -3-.
- Unscrew bolts -2-.
- Pull cover out diagonally upward, arrows.
Installing:
- Slide cover onto the mounting frame.
- Tighten screws -2-. Tightening torque: 2.5 N·m.
- Apply self-adhesive dampers -3-.
Removing and installing wind deflector
Required Special Tools, Test and Measuring Equipment and Auxiliary Items
- Torque wrench 210 N·m -V.A.G 1783-
Removing
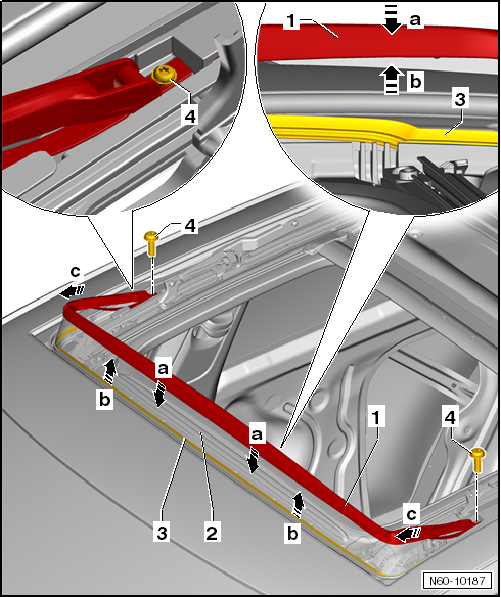
Carry out the following work:
- Fully open the glass panel.
- Relax wind deflector mesh -2- -arrows a- and hold down.
- Pull edge binding -3- out of the mounting frame -arrows b-.
- Unscrew bolts -4- on left and right.
- Pull wind deflector off the mounting frame -arrow c-.
Installing

Carry out the following work:
- Slide wind deflector into the mounting frame.
- Tighten bolts -4- on left and right, tightening torque 1.5 N·m.
- Relax wind deflector mesh -2- -arrows a- and hold down.
- Press edge binding -3- into the mounting frame.
Removing and installing sunroof blind
Required Special Tools, Test and Measuring Equipment and Auxiliary Items
- Torque wrench 210 N·m -V.A.G 1783-
Removing:
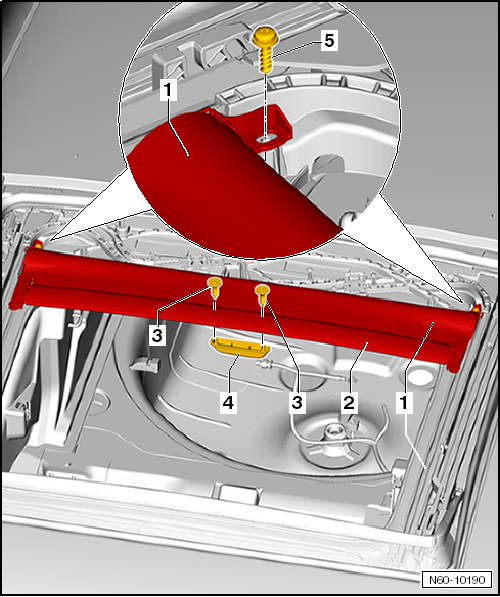
Carry out the following work:
- Remove glass cover.
- Remove cover.
- Unscrew bolts -3- and remove handle -4-.
- Unscrew bolts -5-.

Note
- If the sunshade blind is reused, the steel strips must not be kinked.
- If the steel strips are kinked, a new sunshade blind must be installed.
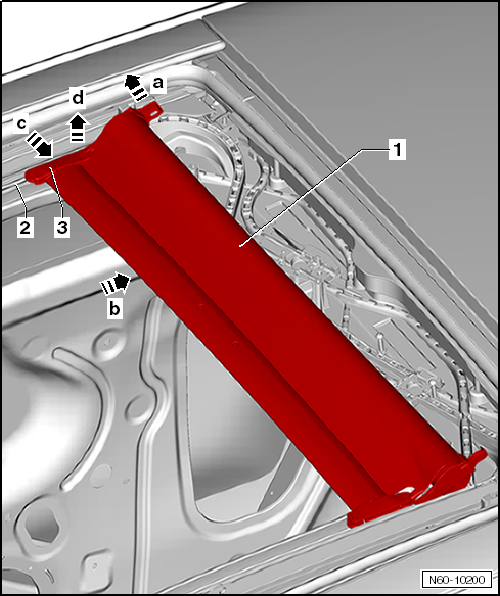
- Lift sunshade blind -1- at rear left and right -arrow a- and push evenly to the rear -arrow b- to pull it out of guide rails -2-.
- Press roller slider -3- into the spreader -arrow c- and remove from the guide -arrow d-.
- Remove sunshade blind -1- from the mounting frame.
Installing:

Note
- When installing the steel strips, they must not be kinked.
- If the steel strips are kinked, a new sunshade blind must be installed.
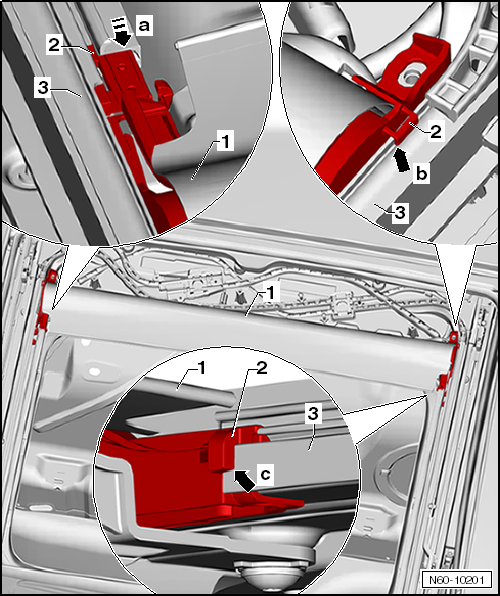
Carry out the following work:
- Insert drivers on right and left -2- into guide rails -3- -arrow a-.
- Make sure the driver is correctly positioned at the top -arrow b- and bottom -arrow c- of the guide rail.

- Press out centering pins -4- -arrows a-.
- Hook drivers -6- into roller sliders -2-.
- Insert roller sliders -2- into guides -8-.
- Make sure the rollers -7- are correctly positioned relative to the guide rails.
- Press in centering pins -4- -arrows b-.
Only for a new pull spreader:
- Pull out locking pin -5-.
- Perform a function check of sunshade blind -1-.
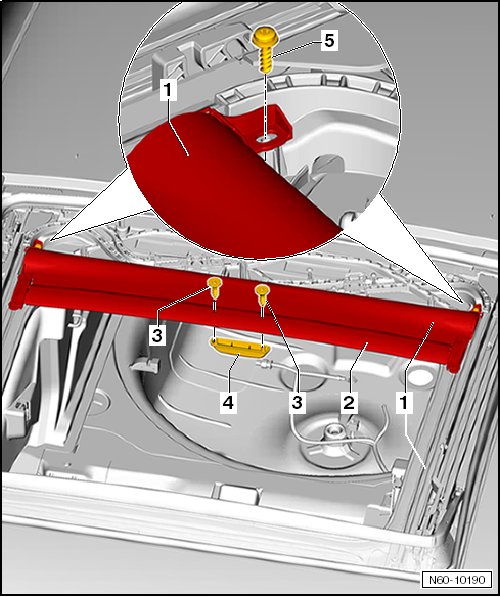
- Tighten bolts -5-. Tightening torque: 2.5 N·m.
- Fit handle -4- and tighten bolts -3-. Tightening torque: 1 N·m.
Removing and installing pull spreader
Removing:
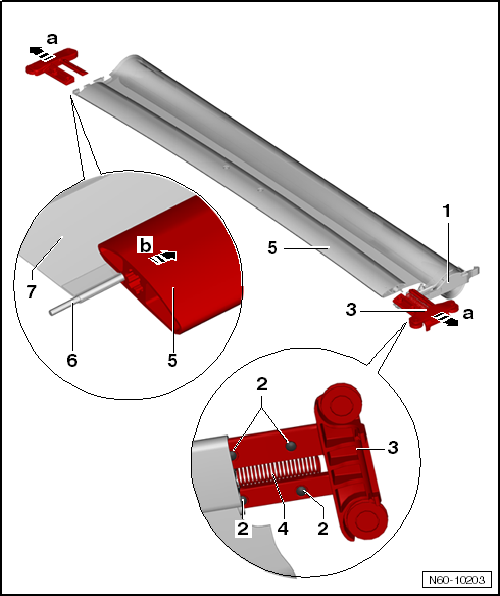
Carry out the following work:
- Remove glass cover.
- Remove cover.
- Remove sunroof blind.
- Pull roller sliders -3- out of pull spreader -5- on left and right -arrows a-.
- Pull pull spreader out of the sunroof blind fabric -7- -arrow b-.
Installing:

Note
- On a new pull spreader, the roller slider is held by a locking wire in the pull spreader via compression spring -3-.
- This wire must be pulled out during installation.
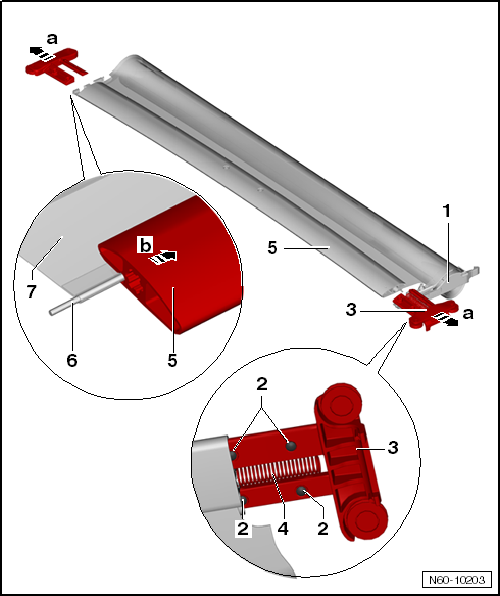
Carry out the following work:
- Insert tensioning wire -6- into the blind fabric -7-.
- Slide pull spreader -5- onto the blind fabric.
- Check all rubber buffers -2- on roller sliders -3- for damage and replace if necessary.
- Insert roller sliders -3- with tension spring -4- into the pull spreader.
Installation is carried out in reverse order.
Removing and installing sliding guide assembly
Required Special Tools, Test and Measuring Equipment and Auxiliary Items
- Torque wrench 210 N·m -V.A.G 1783-
Removing

Note
- The guide rails and the mounting bracket form one part.
- The cables and the tilt mechanism are integrated in this component and cannot be replaced individually.
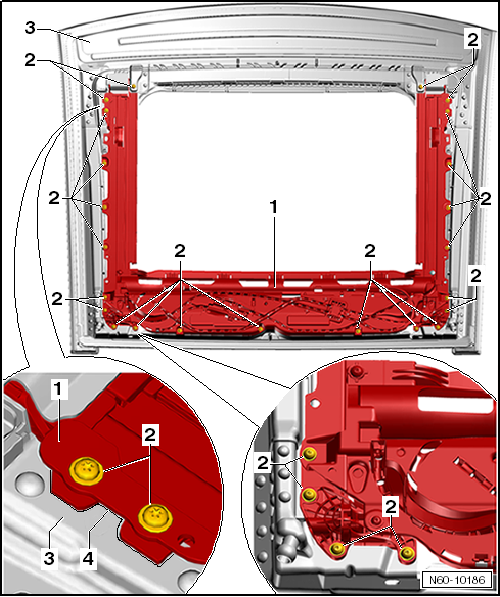
Carry out the following work:
- Remove headliner: → Body Assembly Work Interior.
- Remove glass cover.
- Mark the position -4- of guide rails -1- on mounting frame -3-.
- Unscrew bolts -2-.

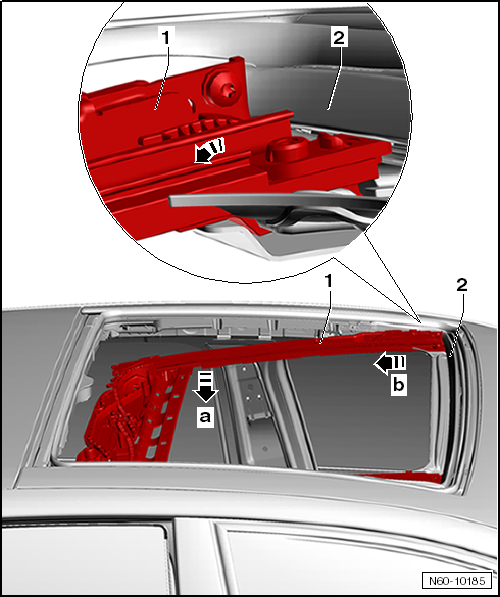
- Lower guide rails -1- at the rear -arrow a-.
- Pull guide rails -1- off the assembly carrier -2- in parallel -arrow b-.

Note
Do not twist or bend the guide rails and mounting bracket, as no brace is installed in the front area.
Installing
Carry out the following work:
- Slide guide rails -1- into the assembly carrier -2- in parallel.
- Guide guide rails -1- to the mounting frame at the rear.
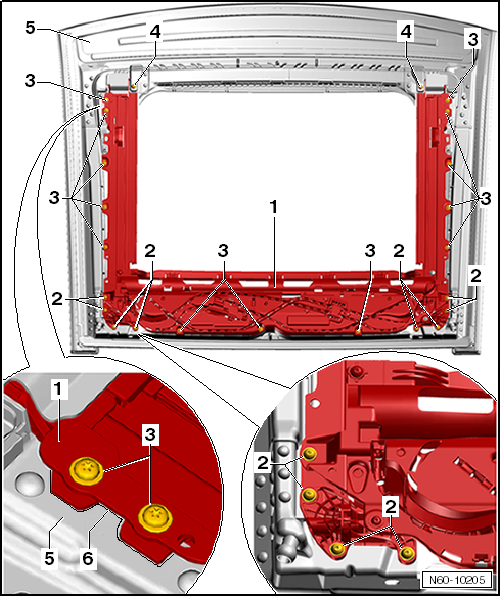
- Insert all bolts -2, 3 and 4- and tighten lightly.
- Align guide rails -1- with the applied marking -6-.
- Tighten bolts.
- Tightening torque bolt -2-: 2 N·m.
- Tightening torque bolt -3-: 3 N·m.
- Tightening torque of bolt -4-: 3.5 N·m.
- Install in reverse order.
Removing and installing sunroof seal
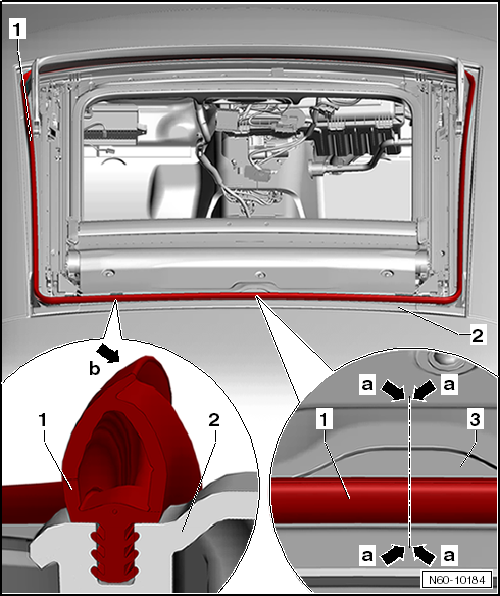
Removing:
- Remove glass cover.
- Pull seal -1- out of the mounting frame -2-.
Installing:
- Align inner seal -1- with the vulcanized joint toward the arc on the mounting frame -3- -arrows a-.
- Sealing lip -arrow b- must point outward.
Press inner seal -1- evenly into the holder of the mounting frame -2-.
Remove and install sunroof frame
Required Special Tools, Test and Measuring Equipment and Auxiliary Items
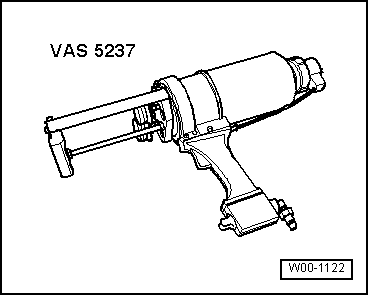
- Double cartridge gun -VAS 5237-
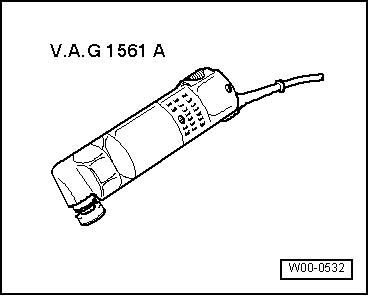
- Electric knife -V.A.G 1561A-
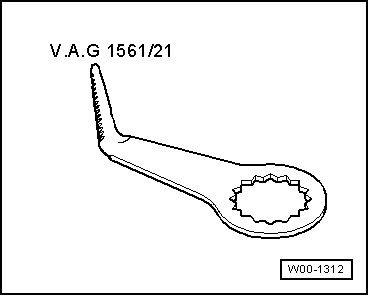
- Cutting blade, L-shape, 19 mm -V.A.G 1561/21-
Materials
- 2K windscreen adhesive
- → Note1 → Note2 → Note3
- Activator
- → Note1
- Glass primer/paint primer
- → Note1
- Cleaning solution
- → Note1
- Applicator
- → Note1
- Adhesive remover
- → Note1
- Cutting thread
1) Observe the manufacturer's processing instructions in the packaging insert.
2) Observe the minimum curing time.
3) You must use the double cartridge gun -VAS 5237- to process this material.
Removing
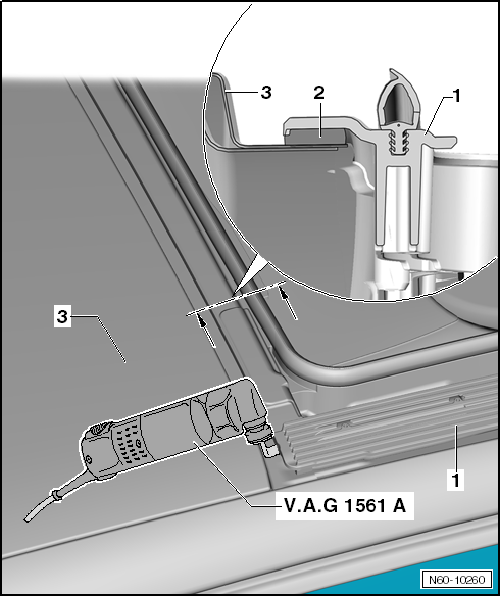
Carry out the following work:
- Remove glass cover.
- Remove headliner: → Body Assembly Work Interior.
- Remove trim panel.
- Mask roof pillar and roof edge -3- to protect the paint from damage.
- Insert electric knife -V.A.G 1561A- with cutting blade, L-shape, 19 mm -V.A.G 1561/21- into the rear adhesive bead -2- and cut through.

Note
There is a plastic centering pin in the center at the rear.

Note
For cutting out, the following may be used: cutting wire -VAS 6888/1-, round cutting wire -VAS 6452/1- and cutting wire -357 853 999-.
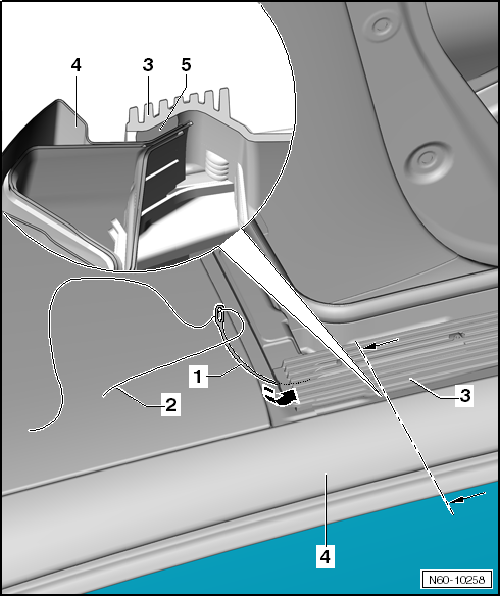
- Guide the wire -2- under the mounting frame -3-.
The needle -1- from the windshield removal set -V.A.G 1755- can be used for this.
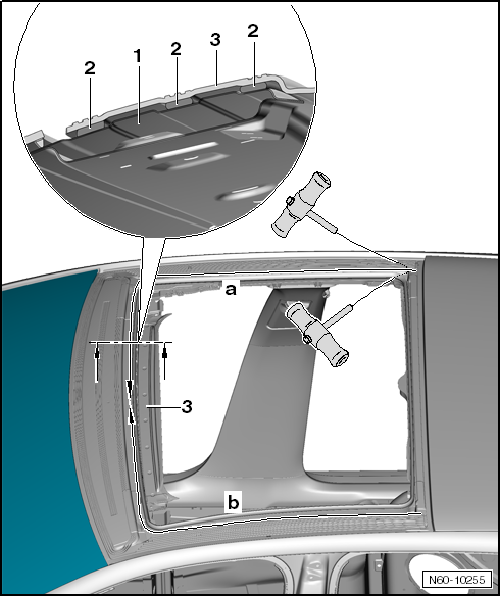
- Attach one handle from the windshield removal set -V.A.G 1755- to each end of the wire.
Cutting through the adhesive bead -2- requires a second technician.
- One person pulls from the outside and the other person pulls from the inside.

Note
- There are 3 adhesive beads on the front roof cross member. Increased force is required.
- Guide the wire close to the mounting frame so that it is not cut by the surrounding edges.
- Cut through the adhesive bead -2- starting from the rear, in direction -arrow a-, up to the middle of the front roof cross member -3-.
- Move the wire to the other side.
- Cut through the adhesive bead again, starting from the rear, in direction -arrow b-, up to the front roof cross member.
- Remove mounting frame -3-.

Note
- Transfer the exact position of the adhesive beads from the removed mounting frame to the new one.
- Also note the position of the adhesive beads on the sheet metal flange when a new roof is installed.
Installing
Minimum curing time

WARNING!
Special requirements must be observed when replacing bonded mounting frames. These include, for example, that a newly bonded mounting frame must meet the operational safety requirements, including in the event of an accident, after a specified minimum curing time.
For the 2K adhesive, the minimum curing time is 2 hours.
The minimum curing time is the time from bonding until the vehicle is put back into use. During this time, the vehicle must stand at room temperature (at least 15 °C) on a level surface.

WARNING!
The vehicle is not operationally safe until the minimum curing time has elapsed.
Preparing the body flange for bonding
- Trim the residual material on the body flange with the U-shaped cutting blade -V.A.G 1561/3-. Do not remove it completely under any circumstances.

Note
The residual material serves as an adhesion base for the new adhesive sealing material to be applied. Keep bonding surfaces free of dirt and grease.

WARNING!
Activator must not come into contact with the paint, otherwise paint damage will occur.
Exception: If bonding does not take place immediately after trimming, the remaining residual material must be activated with activator.
- If the body flange has been machined or partially replaced, the affected area must be cleaned and primed again after painting.
Installation notes
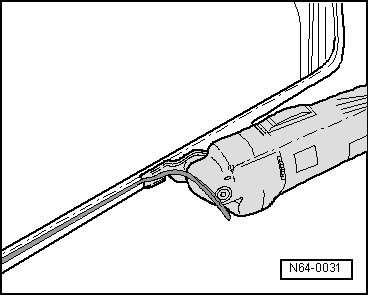
- Apply adhesive sealing material all around, at a right angle to the frame.

WARNING!
The frame must be installed within 10 minutes, otherwise the adhesion of the windshield adhesive will be impaired.
Do not apply the adhesive bead too thick, and do not press the frame too hard onto the body flange.
- Insert the frame into the cutout, center it and press it down until it reaches the spacer web.
Repairing paint damage
For paint damage, restore the paint structure according to the specifications in the "Paint" repair guide.
Cleaning when soiled by adhesive sealing material
- Adhesive remover D 002 000 10 is recommended as the cleaning agent. Observe the safety regulations when using it.

WARNING!
When cleaning from the vehicle interior, the mounting frame that was installed immediately before must not be pressed outward.
- First roughly clean the paint surface with a dry cloth. Remove remaining dirt with the adhesive remover.
- Cleaning plastic trim: Allow the adhesive sealing material to cure (approx. 1 hour), then peel it off.
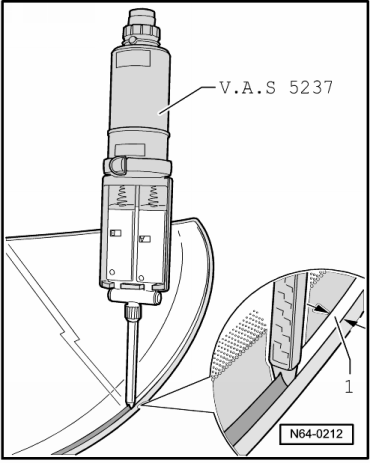

Note
- On a new mounting frame, the trim is already bonded in place.
- For a frame that is to be re-bonded, the residual material serves as an adhesion base for the new adhesive sealing material to be applied.
- Shortly before re-bonding, trim the adhesive sealing material back to 1 mm, taking care not to damage the primer layer.
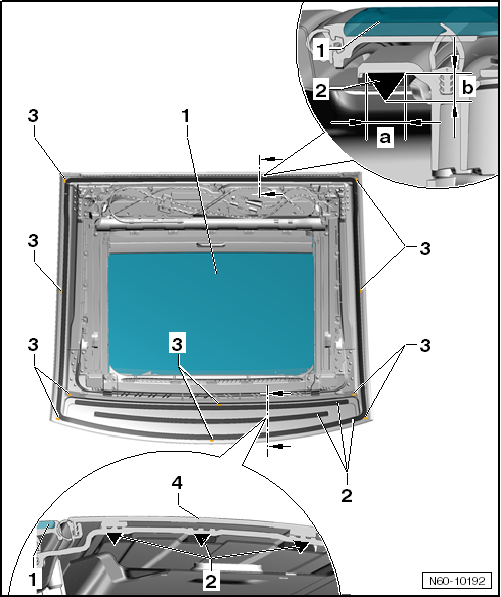

WARNING!
Do not prime the bonding surface and do not treat it with cleaning solution. Keep the bonding surface free of dirt and grease.
Exception: If bonding does not take place immediately after trimming, the remaining residual material must be activated with activator D 181 801 A1.
Carry out the following work when installing a new frame:
- Clean the bonding surface -2- all around with the cleaning solution.
- Apply the glass/paint primer evenly in one pass with the applicator.
- The flash-off time for the glass/paint primer is 10 minutes.
Carry out the following work on all frames:
- Install the glass cover into the frame.
- Check the number of height stops -3-.
- Apply 2K windshield adhesive. Dimensions for the adhesive bead -2-: width 12 mm -dimension a-, height 10 mm -dimension b-.

WARNING!
The frame must be installed within 10 minutes after applying the adhesive, otherwise the adhesion of the adhesive sealing material will be impaired.

Note
The glass cover -1- must be installed before the mounting frame is installed.
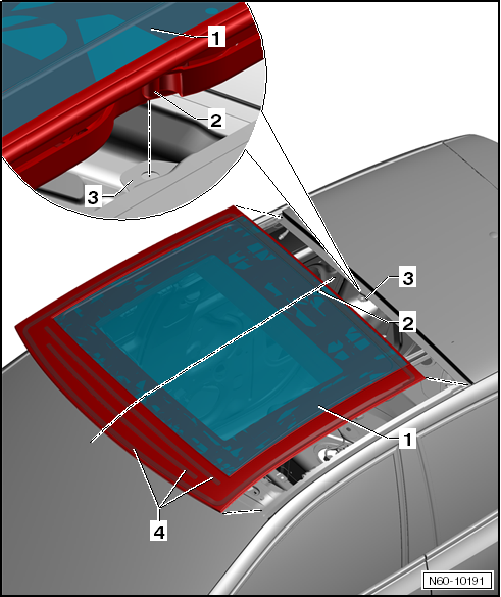
- Insert the frame with glass cover into the roof cutout.
New frame
- The centering pin -3- centers the frame in the cutout.
- Press the frame down onto the stops and check the height adjustment to the roof.
Existing frame
- Since the centering pin is no longer present, center the frame in the roof cutout -2-.
- Press the frame down onto the stops and check the height adjustment to the roof.
- Observe the minimum curing time.
Removing and installing the front trim
Required Special Tools, Test and Measuring Equipment and Auxiliary Items
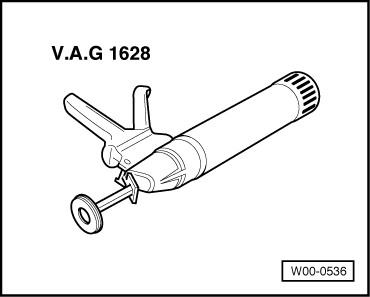
- Manual cartridge gun -V.A.G 1628-
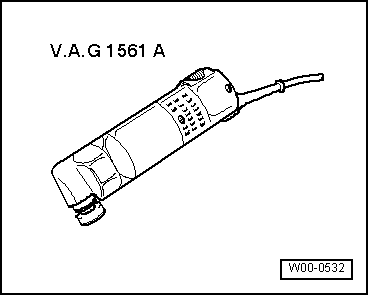
- Electric knife -V.A.G 1561A-
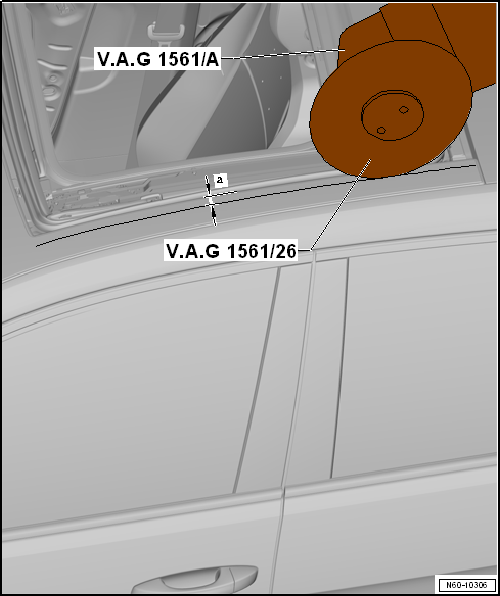
- Saw blade, Ø 80 mm -V.A.G 1561/26-
Materials
- 1K assembly adhesive
- → Note1 → Note2
- Glass primer/paint primer
- → Note1
- Cleaning solution
- → Note1
- Applicator
- → Note1
- Adhesive remover
- → Note1
- Cutting thread
1) Observe the manufacturer's processing instructions in the packaging insert.
2) Observe the minimum curing time.
Removing

Note
- The trim is destroyed during removal and cannot be reinstalled.
- Mask off the roof rail and roof edge to protect the paint from damage.
- Remove glass cover.
- Mask off the roof rail and roof edge to protect the paint from damage.
- Stick the windshield seal firmly to the windshield.
- Starting at a distance of -a- = 10 mm from the inner edge, make a mark along the entire length of the trim.

Caution!
Due to the small clearance between the front trim and the frame, attach a depth stop and set it to a depth of 5 mm.
- Using the electric knife -V.A.G 1561A- and the saw blade, Ø 80 mm -V.A.G 1561/26-, cut off the trim panel along the marks from rear to front.

- Make marks at distance -b- = 10 mm from the front edge and distance -c- = 10 mm from the rear edge.

Caution!
Due to the limited clearance between the front trim panel and the frame, only plunge the saw blade to a depth of 5 mm.
- Using the electric knife -V.A.G 1561A- and the saw blade, Ø 80 mm -V.A.G 1561/26-, cut off a strip across the trim panel at the marks on the front and rear edges.
- Removing the edges of the trim panel has now exposed the adhesive beads for the trim panel.

Note
For cutting out, the following may be used: cutting wire -VAS 6888/1-, round cutting wire -VAS 6452/1- and cutting wire -357 853 999-.

Carry out the following work:
- Attach one handle -2- from glass removal set -V.A.G 1755- to each end of cord -3-.
Cutting the adhesive bead requires a second technician.

Note
- There are 3 adhesive beads on the front roof cross member. Increased force is required.
- Guide the wire close to the mounting frame so that it is not cut by the surrounding edges.
- Cut the adhesive bead starting at the rear, -arrow a-, up to the front roof cross member.
- Remove the cut-off part -arrows c-.
- Now cut the adhesive beads -4- on the front roof cross member up to the center.
- Move the wire to the other side.
- Cut the adhesive bead starting at the rear, -arrow b-, up to the front roof cross member.
- Remove the cut-off part -arrows c-.
- Now cut the adhesive beads -4- on the front roof cross member up to the center.
- Remove trim panel -5- from mounting frame -1-.

Note
Transfer the exact positions of the adhesive beads from the cut-out trim panel to the new one.
Installing
Minimum curing time

WARNING!
Special requirements apply when replacing bonded front trim panels. These include, for example, that a newly bonded front trim panel must meet operational safety requirements, including in the event of an accident, after a specified minimum curing time.
For the 1K assembly adhesive, the minimum curing time is 3 hours.
The minimum curing time is the time from bonding until the vehicle is put back into use. During this time, the vehicle must stand at room temperature (at least 15 °C) on a level surface.

WARNING!
The vehicle is not operationally safe until the minimum curing time has elapsed.
Installation notes
- Apply sealing adhesive all around at a right angle to the front trim panel.

WARNING!
The front trim panel must be installed within 10 minutes, otherwise the adhesion of the assembly adhesive will be impaired.
Do not apply the adhesive bead too thick and do not press the front trim panel too firmly onto the frame.
- Insert the front trim panel into the cutout and center it.
Repairing paint damage
For paint damage, restore the paint structure according to the specifications in the "Paint" repair guide.
Cleaning when soiled by adhesive sealing material
- Adhesive remover D 002 000 10 is recommended as the cleaning agent. Observe the safety regulations when using it.

WARNING!
When cleaning from the vehicle interior, the mounting frame that was installed immediately before must not be pressed outward.
- Clean the paint surface roughly first with a dry cloth. Remove remaining dirt with adhesive remover D 002 000 10.
- Cleaning plastic trim: Allow the adhesive sealing material to cure (approx. 1 hour), then peel it off.

WARNING!
Only use the specified adhesive, as it is matched to the elasticity of the trim panel.
The minimum curing time until the vehicle is operationally safe is 3 hours.
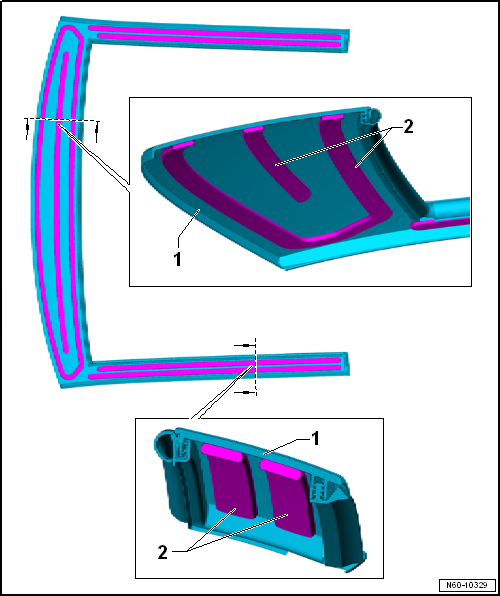
- The glass cover is installed in the frame.
Carry out the following work:
- Lightly roughen the bonding surface with fine sandpaper.
- Thoroughly clean bonding surface -2- all around with cleaning solution.
- Apply the glass/paint primer evenly in one pass with the applicator.
- The flash-off time for the glass/paint primer is 10 minutes.
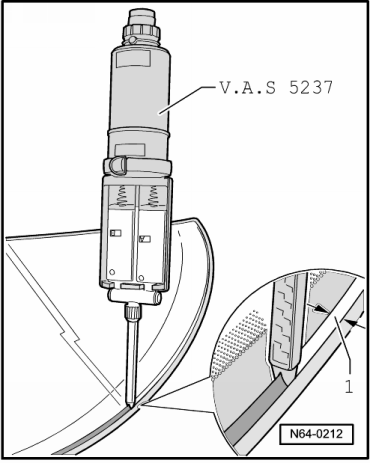
- Apply 1K assembly adhesive.
Width of adhesive bead: 8 mm.
Height of adhesive bead: 12 mm.
- Insert trim panel -1- into the roof cutout and center it. Secure with adhesive tape.
- Observe minimum curing time
Drain hoses
Assembly overview - Drain hoses

- Rear drain hose
- Mounting frame
- Drain spout
- Clip
Cleaning drain hoses
Required Special Tools, Test and Measuring Equipment and Auxiliary Items
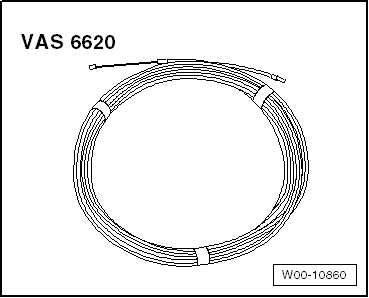
- Cleaning and feeding tool -VAS 6620-

Note
- On this sliding/tilting sunroof there are only rear drain hoses.
- When replacing a drain hose, cut the replacement part to length at the drain spout that is not needed.
- Positions of stickers and protective films must be transferred from the old part.
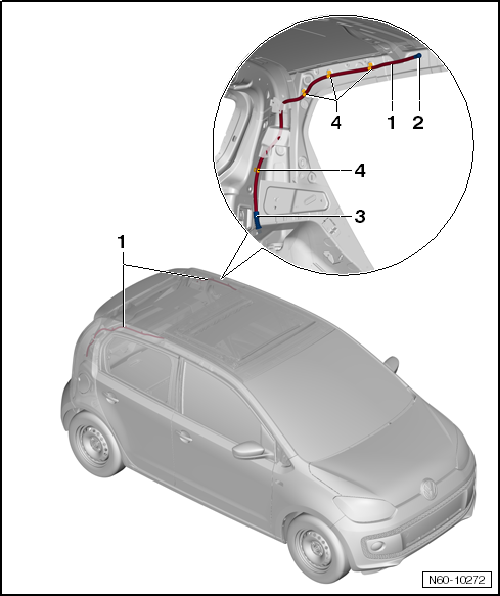
The rear drain hoses run in the C-pillars and end in the rear outer floor panels.
- Remove the rear bumper of the corresponding model.
- Clean from below using the cleaning and feeding tool -VAS 6620-.