Removal and Installation of Heater Control Cables
REMOVAL
PROCEDURE
1. Remove the heater control.
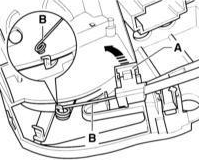
2. Disconnect the cable support (A).
3. Disconnect the cables (B) from the heater control.
4. Remove the footwell outlet, refer to Removal and Installation of Footwell Outlet.
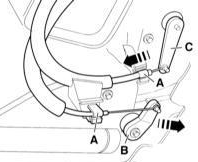
5. Using a screwdriver, pry off the clips (A) of the heater control support on the heater housing.
6. Carefully remove the cables from levers (B) and (C). INSTALLATION
7. Before installation, check the heater cables for free movement. If there is binding or damage, replace the cables.
CAUTION
When installing the heater cables, secure them with clips and clamps so that they do not contact moving parts.Connecting Cables to Heater Control Panel
8. Connect cables (B) so that the sheath faces down.

9. Connect the green cable (A) of the defrost/footwell flap to the heater control lever. Secure the support.
10. Connect the yellow cable (B) of the defrost flap to the heater control lever. Secure the support.
11. Connect the brown cable (C) of the defrost flap to the heater control lever. Secure the support.
12. Install the heater control. Connecting Cables to Heater Housing
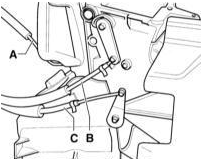
13. Connect the green cable (A) to the lever of the defrost/footwell flap. Do not secure the support yet.
14. Connect the yellow cable (B) to the center flap lever.
15. Connect the brown cable (C) to the temperature flap lever. Adjusting Heater Cables
16. Turn the temperature control knob fully to the “cold” position.
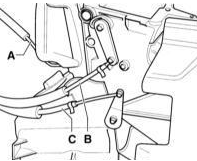
17. Lightly press lever (B) on the heater box in the direction of the arrow. In this position, secure the cable to the support with clamp (A).
18. Turn the air distribution knob fully to the windshield position.
19. Lightly press lever (C) of the center flap in the direction of the arrow, refer to illustration in step
17. In this position, secure the cable to the support with clamp (A).
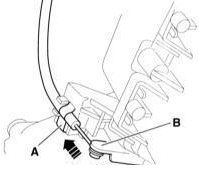
20. Press lever (B) of the defrost/footwell flap in the direction of the arrow and secure the cable to the support with clamp (A).
21. Turn both knobs between the end stops in opposite directions. They must touch both stops.
22. Remove the footwell outlet, refer to Removal and Installation of Footwell Outlet.
Test yourself
A quick Audi A3 quiz: every answer comes with an explanation and a link to the manual page.