Removal, Installation and Inspection of Clutch
REMOVAL
1. Remove the transmission. Refer to Removal and Installation of Manual and AT Transmission.
2. Lock the flywheel by the ring gear using a screwdriver and drift or special tool (1). Loosen the clutch cover bolts one by one, by 1 - 1 1/2 turns each, to relieve the tension.
* If all bolts are loosened at once, the pressure springs and pins may be damaged.
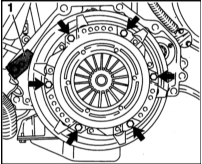
3. Remove all bolts completely.
4. Remove the clutch cover and the driven disc.
* Do not drop the cover or the driven disc. This may cause slipping and difficult disengagement after installation.
5. Clean the flywheel.
INSPECTION
1. Check the pressure plate for hot spots and scoring.
2. Check the pressure springs (arrows in the illustration).

3. Check the elastic connection between the pressure plate and the cover for scoring. Check the riveted connections for tightness. A clutch with damaged or loose rivets must be replaced.
4. Check the contact surface of the pressure plate for cracks, hot spots and wear. A pressure plate with inward deflection of up to 0.3 mm may be reinstalled. Check using a straightedge and a feeler gauge.
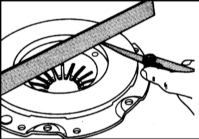
5. Check the flywheel for signs of overheating and scoring. Replace if necessary. Always install new micro-encapsulated bolts after each removal. If the old flywheel is reinstalled, replace the mounting bolts if oil is leaking. Tighten the flywheel bolts in a crisscross sequence to a torque of 105 N·m.
6. Clean the pressure plate and flywheel with fine sandpaper.
7. Replace the clutch disc if it is oily or has mechanical damage.
8. Carefully clamp the clutch facing in a vise and measure its thickness with a vernier caliper. The minimum thickness must be not less than the value given in the Specifications. Otherwise, replace the clutch disc. The same action is required if cracks are found.
9. In automotive workshops, the clutch disc is checked for runout. The axial runout of the disc must not exceed 0.5 mm.
* This check is necessary only when the old disc is reinstalled and there were difficulties disengaging the clutch.
10. Remove the clutch release bearing from the transmission input shaft sleeve and inspect it. Refer to Clutch Release Mechanism Removal and Installation.
11. Check the roller bearing in the crankshaft for smooth operation. If necessary, remove the bearing with a puller and replace it with a new one.
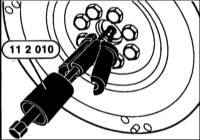
Installation
* Before installing a new clutch, remove the protective coating from the friction surface of the pressure plate and, if necessary, the flywheel using a solvent.
INSTALLATION
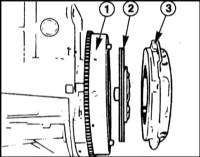
1. Install the clutch disc (2) and the clutch cover with pressure plate (3) onto the flywheel (1).
* The flat side of the clutch disc must face the pressure plate. The clutch disc is marked “Getriebeseite” (transmission side). The marking must be visible when installed. Install the clutch cover onto the corresponding locating pins.
2. When installing, center the clutch disc using a suitable alignment tool (1) (for example, HAZET No. 2174) or the old transmission input shaft.
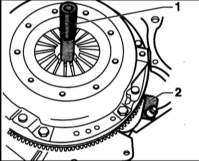
3. Tighten the clutch cover bolts evenly in sequence, 1 to 1 1/2 turns, so that the pressure plate is clamped. Make sure the cover is pressed evenly against the flywheel while tightening the bolts. The tightening torque depends on the bolt strength class stamped on the head: M8 bolts marked “8.8” are tightened to a torque of 25 N·m, class “10.9” bolts are tightened to a torque of 35 N·m.
4. Remove the centering tool.
5. If a flywheel locking tool was installed, remove it.
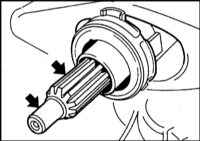
6. Lightly lubricate the splines of the transmission input shaft with “Microlube GL 261” grease. Do not apply too much grease, otherwise it may get onto the clutch friction surfaces and impair clutch operation.
7. Install the transmission. Refer to Manual and Automatic Transmission Removal and Installation.
Test yourself
A quick BMW 1 quiz: every answer comes with an explanation and a link to the manual page.