Rear Shock Absorber Removal and Installation

Rear Strut Assembly
1 — shock absorber
2 — bolt
3 — lower spring seat
4 — dust boot
5 — compression bump stop
6 — coil spring
7 — protective cup
8 — upper spring seat
9 — mount
10 — nut
11 — spring plate
12 — nut
13 — cap
14 — adapter (for severe road conditions in Eastern Europe only)
15 — ring (for severe road conditions in Eastern Europe only)
Refer to the end of this Section for the shock absorber and coil spring removal procedures.
On vehicles with air shock absorbers, remove fuse No. 6 of the air supply unit. This prevents accidental adjustment of the system.
REMOVAL
1. Remove the parcel shelf. Refer to Parcel Shelf Removal and Installation.
2. Remove the two bolts securing the speaker and remove the speaker. Disconnect the connector and remove the speaker.
3. Mark the position of the front wheels relative to the hub with paint. This ensures the balanced wheel returns to its original position. Loosen the wheel bolts with the vehicle on the ground. Raise and support the vehicle on stands. Remove the front wheels.
4. Remove the wheel arch liner.
5. Lift the carpet next to the seat belt pretensioner. Remove the strut tower cover and remove the three bolts.
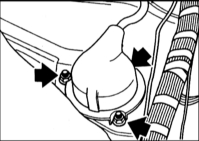
6. On vehicles with EDC, disconnect the electrical connector.
7. Place a floor jack under the wheel bracket. Place a wooden block between the jack and the bracket.
* If this is not observed, the strut will drop after release. This may damage the axle and brake hose.
8. Disconnect the strut from the wheel bracket.
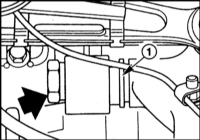
9. Lower the bracket slightly and remove the strut assembly.
* Make sure the brake hose is not stretched.
* Store the shock absorber only in an upright position. Otherwise, noise may occur when the vehicle is driven. Remedy: Extend the piston rod and keep the shock absorber upright at room temperature (+20°C) for 24 hours.
INSTALLATION
1. Inspect the shock absorber. Refer to Inspection.
2. Install the strut assembly and tighten the new self-locking nut at the top slightly.
3. Insert the bushing (1) of the lower shock absorber mount into the wheel bracket. Install the bolt without tightening it.
4. Tighten the upper strut mounting to the specified torque of 20 N·m.
5. Remove the floor jack and lower the vehicle onto its wheels.
6. Install the wheel arch liner.
7. Install the front wheels. Do not apply oil to the wheel bolts. Install the wheels so the previously made marks align. Lower the vehicle onto its wheels. Tighten the wheel bolts in a crisscross pattern to the specified torque of 100 N·m.
8. Set the vehicle to normal ride height. Refer to Vehicle Ride Height Check.
9. Tighten the lower shock absorber bolt to the torque specified in the Specifications.
10. Connect the electrical wires on vehicles with EDC.
11. Install the protective cap.
12. Install the speaker. Connect the connector and secure the speaker.
13. Install the parcel shelf. Refer to Parcel Shelf Removal and Installation.
Test yourself
A quick BMW 1 quiz: every answer comes with an explanation and a link to the manual page.