Tire Changing
Removing the Spare Tire and Tools
To access the spare tire:
- Open the liftgate.
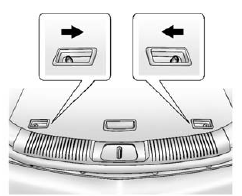
- Push the levers on the load floor.
- Lift the load floor and hang the hook to the tailgate opening.
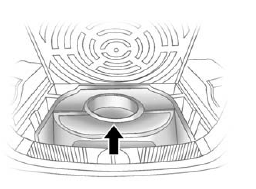
- Remove the tire protector foam.
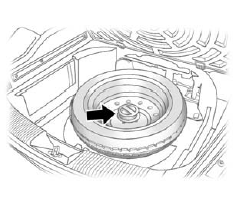
- Remove the wheel retainer bolt holding down the spare tire by turning it counterclockwise.
- Remove the compact spare tire.
See Compact Spare Tire on page 10-65 for more information.
The tools are located between the compact spare tire and the liftgate.
To access the tools:
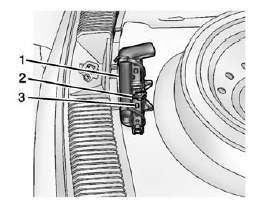
- Tool Bag
- Wing-bolt
- Jack
- Remove the wing-bolt (2) from the jack.
- Remove the jack (3) and tool bag (1).
- Remove the straps holding the bag containing the wheel wrench and extension jack handle, if the vehicle has one.
Remove the wheel wrench and extension jack handle, if the vehicle has one, from the bag.
Removing the Flat Tire and Installing the Spare Tire
- Do a safety check before proceeding. See If a Tire Goes Flat on page 10-57 for more information.
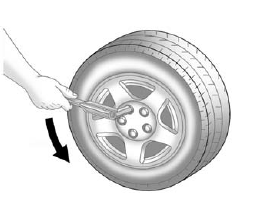
- Use the wheel wrench to loosen all the wheel nuts. Do not remove them yet.
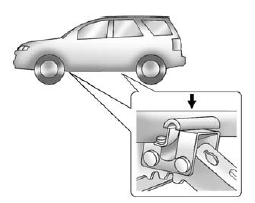
- Position the lift head at the jack location nearest the flat tire.
Make sure all of the jack lift head is touching the jacking flange under the body. Do not place the jack under a body panel. The lower body panel has an arrow to aid in locating the jacking location.
- Getting under a vehicle when it is lifted on a jack is dangerous.
If the vehicle slips off the jack, you could be badly injured or killed. Never get under a vehicle when it is supported only by a jack.
- Raising the vehicle with the jack improperly positioned can damage the vehicle and even make the vehicle fall. To help avoid personal injury and vehicle damage, be sure to fit the jack lift head into the proper location before raising the vehicle.
- Lifting a vehicle and getting under it to do maintenance or repairs is dangerous without the appropriate safety equipment and training. If a jack is provided with the vehicle, it is designed only for changing a flat tire. If it is used for anything else, you or others could be badly injured or killed if the vehicle slips off the jack. If a jack is provided with the vehicle, only use it for changing a flat tire.
Make sure that the jack lift head is in the correct position or you may damage your vehicle. The repairs would not be covered by your warranty.
- If you have a coin/pierce jack, attach the jack handle extension to the jack by sliding the hook through the end of the jack and insert the other end of the jack handle into the wrench.
If you have a hex-head jack, attach the jack lift-assist tool by placing the hex of the jack lift-assist tool over the hex head of the jack.
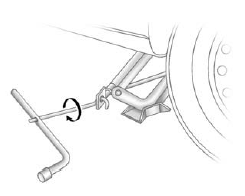
Coin/Pierce Jack and Wrench
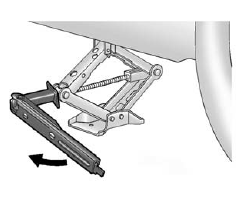
Hex Head Jack and Wrench
- Raise the vehicle by turning the jack handle clockwise. Raise the vehicle far enough off the ground so there is enough room for the road tire to be removed.
- Remove all of the wheel nuts.
- Remove the flat tire.
- Remove any rust or dirt from the wheel bolts, mounting surfaces and spare wheel.
- Place the compact spare tire on the wheel-mounting surface.
- Reinstall the wheel nuts.
Tighten each nut by hand until the wheel is held against the hub.
- Lower the vehicle by turning the jack handle counterclockwise.
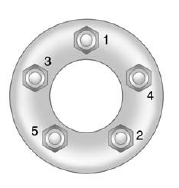
- Tighten the wheel nuts firmly in a crisscross sequence, as shown.
Improperly tightened wheel nuts can lead to brake pulsation and rotor damage. To avoid expensive brake repairs, evenly tighten the wheel nuts in the proper sequence and to the proper torque specification. See Capacities and Specifications for the wheel nut torque specification.
- Lower the jack all the way and remove the jack from under the vehicle.
- Tighten the bolts firmly with the wheel wrench.
When reinstalling full plastic covers or center caps, tighten all the plastic caps hand snug, then tighten with the wheel wrench an additional one-quarter of a turn.
Wheel covers will not fit on the vehicle's compact spare. If you try to put a wheel cover on the compact spare, the cover or the spare could be damaged.
Storing a Flat or Spare Tire and Tools
To store the flat or spare tire and tools:
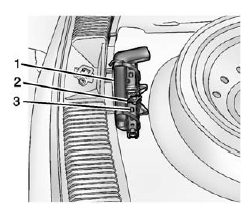
- Tool Bag
- Wing-bolt
- Jack
- Place the wheel wrench and extension, if the vehicle has one, into the tool bag (1) and use the straps to secure the tool bag (1) to the fully collapsed jack (3)
- Install the jack (3) between the back of the trunk and the compact spare tire and secure with the wing bolt (2).
- Reverse Steps 1-3 under "Removing the Spare Tire and Tools" to replace the floor and lock in place.
- Place the flat, or damaged tire, face down, on the bottom of the spare tire compartment.
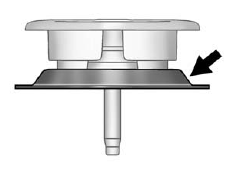
Before
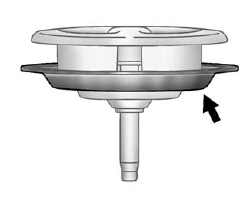
After
- Remove the disk from the retainer bolt. Turn the disk over and place it back on the retainer bolt.
Return the disk back to its original position after removing the flat tire from the spare tire compartment and before storing the spare tire.
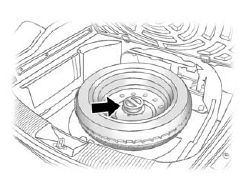
- Place the wheel retainer bolt onto the wheel stow rod and tighten by turning it clockwise.
The compact spare is for temporary use only. Replace the compact spare tire with a full-size tire as soon as possible.
Changing a tire on a Chevrolet Captiva manufactured between 2006 and 2018 involves several key steps to ensure safety and effectiveness. Begin by parking the vehicle on a flat, stable surface and engaging the parking brake to prevent any accidental movement. It's also important to turn off the engine and engage the hazard lights to alert other drivers of your presence. Retrieve the necessary tools from their storage locations in the vehicle. These typically include a spare tire, a jack, and a lug wrench. The spare tire is usually stored in the trunk or under the rear of the vehicle. Position the jack under the jacking point nearest to the flat tire, which is often indicated by a notch or a reinforced area on the vehicle's frame. Before lifting the vehicle with the jack, it's advisable to loosen the lug nuts on the flat tire slightly. This initial loosening is easier to accomplish while the tire is still on the ground. Use the lug wrench to loosen each lug nut just enough to break their initial tightness. Next, insert the jack handle into the jack and slowly raise the vehicle until the flat tire is off the ground. Make sure the jack is positioned securely and that the vehicle is stable before proceeding. Safety should always be the top priority during tire changing procedures. Once the flat tire is elevated, remove the loosened lug nuts completely and set them aside in a safe place where they won't get lost. Carefully pull the flat tire off the hub and place it aside, ensuring it won't roll away or cause any obstruction. Retrieve the spare tire and align its holes with the wheel studs on the hub. Carefully push the spare tire onto the hub, making sure it is seated properly. Hand-thread the lug nuts back onto the wheel studs to hold the spare tire in place while you tighten them. Use the lug wrench to tighten the lug nuts in a crisscross pattern. This pattern helps ensure even pressure on the wheel and prevents uneven tightening. Start by tightening one lug nut, then move to the opposite lug nut, continuing in a diagonal fashion until all lug nuts are securely tightened. Once all lug nuts are tightened, lower the vehicle slowly using the jack until the spare tire is resting firmly on the ground. Check the lug nuts one more time to ensure they are tightened properly and securely.After completing the tire change on your Chevrolet Captiva sport (C100, C140), store the flat tire, jack, and lug wrench back in their designated locations within the vehicle. It's crucial to have the flat tire repaired or replaced as soon as possible to maintain optimal safety and performance on the road. Always refer to the vehicle's owner's manual for specific instructions and safety precautions related to tire changing, as different vehicle models may have variations in their tire changing procedures.
Test yourself
A quick Chevrolet Captiva quiz: every answer comes with an explanation and a link to the manual page.