Valve clearance adjustment - OHV and HCS engines (Every 12 000 miles or 12 months)
Valve No Cylinder No
1 Exhaust 1
2 Inlet 1
3 Exhaust 2
4 Inlet 2
5 Exhaust 3
6 Inlet 3
7 Exhaust 4
8 Inlet 4
4 Adjust the valve clearances by following the sequence given in the following table. Turn the crankshaft pulley 180є (half a turn) after adjusting each pair:
Valves rocking Valves to adjust 7 and 8 1 (Exhaust), 2 (Inlet) 5 and 6 3 (Exhaust), 4 (Inlet) 1 and 2 7 (Exhaust), 8 (Inlet) 3 and 4 5 (Exhaust), 6 (Inlet) 5 The clearances for the inlet and exhaust valves are different (see Specifications). Use a feeler blade of the appropriate thickness to check each clearance between the end of the valve stem and the rocker arm. The gauge should be a stiff sliding fit. If it is not, turn the adjuster bolt with a ring spanner. These bolts are of stiff thread type and require no locking nut. Turn the bolt clockwise to reduce the clearance and anti-clockwise to increase it (see illustration).
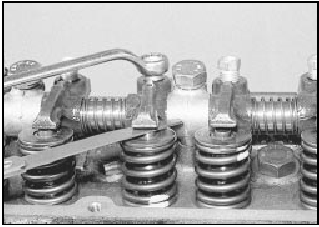
21.5 Valve clearance adjustment 6 Refit the air cleaner and rocker cover on completion of adjustment. HCS engines
7 The procedure is as described previously for OHV engines, but note that the valve arrangement has been altered and is now as shown below. Take care not to overtighten the rocker cover bolts on refitting, as this can result in leaks.
Valve No Cylinder No
1 Exhaust 1
2 Inlet 1
3 Exhaust 2
4 Inlet 2
5 Inlet 3
6 Exhaust 3
7 Inlet 4
8 Exhaust 4
Test yourself
A quick Ford Escort quiz: every answer comes with an explanation and a link to the manual page.