The diagnosis in this manual assumes a certain level of skill and knowledge of Ford-approved diagnostic procedures. REFER TO: Diagnostic Methods (100-00 General Information, Description and Operation).
Verify the customer concern by operating the starting system.
Before diagnosing or repairing the starting system, check the following:
Check the battery for loose, damaged or corroded connections.
Check the alternator for loose, damaged or corroded connections.
Fusible links
Check the engine and battery ground connections for loose, damaged or corroded connections.
High-current BJB for loose or corroded connections
Wiring, Terminals or Connectors
Check the battery condition and state of charge. Refer to: Battery (414-01 Battery, Mounting and Cables, Diagnosis and Testing).
Check for abnormal current draw with the ignition off. Refer to: Battery Drain Test (414-01 Battery, Mounting and Cables, General Procedures).
Remove the accessory drive belt. Refer to: Accessory Drive Belt (303-05B Accessory Drive – 1.6 L EcoBoost (132 kW/180 L hp) – Sigma, Removal and Installation). Make sure the crankshaft and each of the components driven by the accessory drive belt rotate freely and are not seized or damaged.
If any aftermarket accessories have been added to the vehicle, make sure they are correctly connected.
If an obvious cause for an observed or reported concern is found, correct it (if possible) before proceeding.
Diagnostic Trouble Code Charts
The diagnosis described in this manual assumes a certain level of skill and knowledge of diagnostic methods specific to Ford. Refer to: Diagnostic Methods (100-00 General Information, Description and Operation) for information on these practices.
PCM Diagnostic Trouble Code Chart
Trouble Code
Description
Action
PCM Diagnostic Trouble Codes
PCM Diagnostic Trouble Codes (DTCs) not listed in this table
Refer to: Electronic Engine Controls (303-14B Electronic Engine Controls - 1.6 L EcoBoost (132 kW/180 L hp) - Sigma, Diagnosis and Testing).
P06E9
Engine Starter Motor Performance
If the engine starts, refer to the Powertrain section. Emissions Control/Diagnostic (PC/ED) Manual. If the engine does not crank, GO to Diagnostic Test A.
P0830
Clutch Pedal Circuit "A"
GO to Pinpoint Test A
P0833
Clutch Pedal Circuit "B"
Refer to: Cruise Control (419-03 Cruise Control, Diagnosis and Testing).
P162F
Starter Disabled - Engine Cranking Time Too Long
Refer to the Powertrain Control/Emissions Diagnosis (PC/ED) manual.
BCM Diagnostic Trouble Code Chart
Trouble Code
Description
Action
BCM Diagnostic Trouble Codes
BCM Diagnostic Trouble Codes (DTCs) Not Listed in This Chart
REFER TO: Body Control Module (BCM) (419-10 Multifunction Electronic Modules, Diagnosis and Testing).
B10E5:11
PCM Wake-Up Signal: Short to Ground
GO to Pinpoint Test C
RFA Trouble Code Chart
Trouble Code
Description
Action
RFA Trouble Codes
All RFA Diagnostic Trouble Codes (DTCs).
Refer to: Remote Function Actuator (RFA) Module (419-10 Multifunction Electronic Modules, Diagnosis and Testing).
Symptom Chart
Symptom Chart: Starting System
The diagnosis described in this manual assumes a certain level of skill and knowledge of diagnostic methods specific to Ford. Refer to: Diagnostic Methods (100-00 General Information, Description and Operation) for information on these practices.
Symptom Chart
Condition
Possible Sources
Action
Engine Does Not Crank
Refer to Pinpoint Test.
GO to Pinpoint Test A
Engine Cranks Slowly
Refer to Pinpoint Test.
PERFORM the starter motor circuit component test. Refer to Starter Motor Positive Circuit Check in this section.
Engine Cranks But Does Not Start
Ignition Fault
Refer to the Powertrain Control/Emissions Diagnosis (PC/ED) manual.
Abnormal Starter Motor Noise
Refer to Pinpoint Test.
GO to Pinpoint Test B
Starter Motor Cranks but Engine Does Not Crank
Starter motor
CHECK the starter mounting and engagement. REPAIR as necessary.
Damaged Flexplate
CHECK the flexplate for damaged, missing or worn teeth. REPAIR as necessary.
Starter Motor Does Not Disengage from Flexplate
Starter Relay
Wiring, Terminals or Connectors
REMOVE the starter relay. If the engine stops cranking, INSTALL a new relay. If the engine continues to crank, REPAIR the CDC26 (GY/OG) circuit for a short to battery voltage.
Pinpoint Tests
Engine Does Not Crank
For circuit and connector information, refer to Wiring Diagrams Cell 20.
For circuit and connector information, refer to Wiring Diagrams Cell 90.
Normal Operation and Fault Symptoms
Refer to: Starting System - System Operation and Component Description (Starting System 303-06B - 1.6 L EcoBoost (132 kW/180 L PS) - Sigma, Description and Operation).
DTC Fault Trigger Conditions
Trouble Code
Description
Fault Trigger Conditions
P06E9
Engine Starter Motor Performance
Sets when engine rotation is not detected during cranking.
P0830
Clutch Pedal Circuit "A"
Sets when the PCM receives a vehicle speed input indicating vehicle movement and does not detect a clutch pedal position switch signal.
Possible Sources
Battery
Battery Cables
Starter motor
BJB Starter Relay
Visual Inspection and Preliminary Diagnosis
Inspect the high-current connections at the BJB.
Check BJB fuse 10 (30 A).
Check the BJB MEGA 1 high-current fuse (450A).
Inspect the CPP switch.
Inspect the passive key.
DIAGNOSTIC TEST A: ENGINE DOES NOT CRANK
A1 INSPECT AND VERIFY CONCERN
Perform the Inspection and Verification procedure in this section.
Was an obvious cause for the observed or reported concern found?
Yes
If necessary, repair the cause.
No
GO to A2
A2 CHECK THE MESSAGE CENTER FOR KEY NOT DETECTED MESSAGE
Check the message center by pressing the engine start/stop button.
Key Not Detected Message?
Yes
Diagnosis of the "Key Not Found" message. Refer to: Passive Anti-Theft System (PATS) (419-01C Passive Anti-Theft System (PATS) - Vehicles With: Keyless Entry and Push Button Start, Diagnosis and Testing).
No
GO to A3
A3 CHECK IPC (INSTRUMENT PANEL CLUSTER) OPERATION
Observe the IPC operation by pressing the engine start/stop button.
Do Any IPC Indicators Illuminate?
Yes
GO to A5
No
GO to A4
A4 CHECK SCAN TOOL COMMUNICATION
The ignition is on.
Using a scan tool, perform the network test.
Do the BCM, IPC and RFA modules pass the network test?
Yes
Diagnosis of "No Power Supply". Refer to: Steering Wheel and Column Electrical Components (211-05 Steering Wheel and Column Electrical Components, Diagnosis and Testing).
No
REFER TO: Communication Network (418-00 Communication Network, Diagnosis and Testing).
A5 RETRIEVE DTCS
The ignition is on.
Using the diagnostic scan tool, perform the self-test:
RFA
BCM
PCM
Were any Diagnostic Trouble Codes (DTCs) retrieved on-demand during the self-test?
Yes
For all RFA module DTCs: Refer to: Remote Function Actuator (RFA) Module (419-10 Multifunction Electronic Modules, Diagnosis and Testing). For PCM DTC P0830, GO to A19. For PCM DTC P06E9, GO to A6.
No
GO to A6
A6 CHECK PCM (POWERTRAIN CONTROL MODULE) CLUTCH PEDAL AT OR NEAR BOTTOM (CPP_BOT) PID (PARAMETER IDENTIFICATION)
Using a diagnostic scan tool, view the PCM Parameter Identifications (PIDs).
Monitor the PCM CPP_BOT PID while fully depressing and releasing the clutch pedal.
Does the PID change from NO to YES when the clutch pedal is fully depressed?
Using a diagnostic scan tool, view the PCM Parameter Identifications (PIDs).
Monitor the PCM ENG_CRANK PID while pressing the engine start/stop button and depressing the clutch pedal.
Does the PID change from inactive to active?
Yes
GO to A8
No
GO to A18
A8 CHECK STARTER RELAY OPERATION
NOTICE: The following step uses a test light to simulate normal circuit loads. Use only the test light recommended in the Special Service Tools table at the beginning of this section. To avoid damaging connector terminals, use the Flex Probe Kit to connect the test light probe to the vehicle. Do not use the test light probe directly on any connector.
Remove the BJB starter relay.
Action:
Positive lead
Measurement/Action
Negative lead
BJB starter relay Pin 1
BJB starter relay Pin 2
Make sure the transmission is in NEUTRAL.
While pressing the engine start/stop button and depressing the clutch pedal, observe the indicator light.
Does the indicator light illuminate when the ignition button and brake pedal are pressed?
Yes
GO to A9
No
GO to A16
A9 CHECK STARTER RELAY VOLTAGE
Ignition OFF.
Action:
Positive lead
Measurement/Action
Negative lead
BJB starter relay Pin 3
Ground
Is the voltage greater than 11 volts?
Yes
GO to A10
No
CHECK the BJB fuse 10 (30A) for correct operation. If OK, REPAIR the circuit for an open. If not OK, REFER to the Wiring Diagrams manual to determine possible causes of the circuit short.
A10 CHECK STARTER RELAY STARTER OPERATION
Ignition OFF.
Make sure the transmission is in NEUTRAL.
Action: Click to display the connectors
Positive lead
Measurement/Action
Negative lead
BJB starter relay Pin 3
BJB starter relay Pin 5
Did the starter engage and the engine start?
Yes
INSTALL a new starter relay.
No
GO to A11
A11 CHECK BATTERY GROUND CABLE
Action:
Positive lead
Measurement/Action
Negative lead
Ground G100
Is the voltage greater than 11 volts?
Yes
GO to A12
No
CLEAN or INSTALL a new battery negative cable, as necessary. Refer to: Battery Monitor Sensor (414-01 Battery, Mounting and Cables, Removal and Installation).
A12 CHECK STARTER GROUND
Action:
Positive lead
Measurement/Action
Negative lead
Starter motor housing
Is the voltage greater than 11 volts?
Yes
GO to A13
No
CLEAN the starter mounting flange and ENSURE the starter is installed correctly. Refer to: Starter Motor (Starting System 303-06B - 1.6 L EcoBoost (132 kW/180 L PS) - Sigma, Removal and Installation).
A13 CHECK STARTER VOLTAGE
Action: Click to display the connectors
Positive lead
Measurement/Action
Negative lead
C197A-1
Ground
Is the voltage greater than 11 volts?
Yes
GO to A14
No
CLEAN or INSTALL a new battery positive cable, as necessary.
A14 CHECK STARTER OPERATION
Ignition OFF.
In this section, check the starter positive circuit.
Was an obvious cause found?
Yes
If necessary, repair the cause.
No
GO to A15
A15 CHECK FOR STARTER CRANK INPUT
Install the BJB starter relay.
Disconnect starter motor C197B-1 ("S" terminal).
Press the engine start/stop button and depress the clutch pedal.
Action: Click to display the connectors
Positive lead
Measurement/Action
Negative lead
C197B-1
Ground
Is the voltage greater than 11 volts?
Yes
CLEAN the starter solenoid "S" terminal and starter solenoid connector. CHECK the wiring and starter for loose or intermittent connection.
No
REPAIR the circuit for an open.
A16 CHECK PCM (POWERTRAIN CONTROL MODULE) STARTER RELAY CIRCUITS FOR A SHORT TO GROUND
Ignition OFF.
Disconnect ACM C240A.
Disconnect the PCM C1915B.
Action: Click to display the connectors
Positive lead
Measurement/Action
Negative lead
C1915B-43
Ground
C1915B-62
Ground
Is the resistance greater than 10000 ohms?
Yes
GO to A17
No
REPAIR the faulty circuit.
A17 CHECK PCM (POWERTRAIN CONTROL MODULE) STARTER RELAY CIRCUITS FOR AN OPEN
Action: Click to display the connectors
Positive lead
Measurement/Action
Negative lead
C1915B-43
Starter relay BJB Pin 2
C1915B-62
Starter relay BJB Pin 1
Is the resistance less than 3 ohms?
Yes
GO to A23
No
REPAIR the faulty circuit.
A18 CHECK THE VOLTAGE IN THE PCM (POWERTRAIN CONTROL MODULE) KEY FOB DETECTION CIRCUIT
Ignition OFF.
Disconnect the PCM C1915B.
While holding the engine start/stop button, measure: Click to display connectors
Positive lead
Measurement/Action
Negative lead
C1915B-47
Ground
Is the voltage greater than 11 volts?
Yes
GO to A23
No
REPAIR the circuit.
A19 CHECK THE TRANSMISSION (CLUTCH PEDAL POSITION) SWITCH
Ignition OFF.
Disconnect the PCM C1915B.
With the clutch pedal fully depressed, measure: Click to display connectors
Positive lead
Measurement/Action
Negative lead
C1915B-30
Ground
Is the resistance less than 3 ohms?
Yes
GO to A23
No
GO to A20
A20 CHECK THE TRANSMISSION (CLUTCH PEDAL POSITION) GROUND CIRCUIT FOR AN OPEN
Disconnect the CPP Switch C2353.
Action: Click to display the connectors
Positive lead
Measurement/Action
Negative lead
C2353-2
Ground
Is the resistance less than 3 ohms?
Yes
GO to A21
No
REPAIR the circuit.
A21 CHECK THE TRANSMISSION (CLUTCH PEDAL POSITION) SWITCH CIRCUIT FOR AN OPEN
Action: Click to display the connectors
Positive lead
Measurement/Action
Negative lead
C1915B-30
C2353-1
Is the resistance less than 3 ohms?
Yes
GO to A22
No
REPAIR the circuit.
A22 CHECK THE CLUTCH START CIRCUIT FOR A SHORT TO GROUND
Ignition OFF.
Disconnect the RFA C3503B.
Disconnect the PCM C1915B.
Action: Click to display the connectors
Positive lead
Measurement/Action
Negative lead
C1915B-30
Ground
Is the resistance greater than 10000 Ohms?
Yes
GO to A23
No
REPAIR the circuit.
A23 CHECK THE PCM (POWERTRAIN CONTROL MODULE) OPERATION
Ignition OFF.
Disconnect and inspect all PCM connectors.
Repair:
corrosion (install new connectors or terminals - clean the module contacts)
damaged or bent terminals/pins - install new terminals/pins
pushed-out pins - install new pins as necessary
Connect the PCM connectors. Make sure they are fully seated and locked.
Operate the system and determine if the concern is still present.
Is the concern still present?
Yes
CHECK OASIS for any applicable Technical Service Bulletins (TSBs). If a TSB exists for this concern, STOP this test and FOLLOW the TSB instructions. If no TSBs apply to this concern, Click here to access the guided routine (PCM).
No
The system is currently operating correctly. The concern may have been caused by module connections. ADDRESS the root cause of any connector or terminal issues.
Abnormal Starter Motor Noise
Normal Operation and Fault Symptoms
Proper starter operation depends on correct starter installation to the engine, correct engagement of the starter ring gear with the flexplate, and correct operation of the starter assembly (internal gears, bearings).
Possible Sources
Engine
Starter motor
Starter Mounting
Visual Inspection and Preliminary Diagnosis
Inspect the starter.
Inspect the starter mounting.
DIAGNOSTIC TEST B: ABNORMAL STARTER NOISE
B1 CHECK THE STARTER MOUNTING
Inspect the starter mounting bolts for looseness.
Is the starter installed correctly?
Yes
GO to B2
No
INSTALL the starter correctly. REFER TO: Starter (303-06B Starting System - 1.6 L EcoBoost (132 kW/180 L PS) - Sigma, Removal and Installation).
B2 CHECK THE ENGINE NOISE
Ignition OFF.
Connect the remote starter switch between the starter solenoid C197A-1 (terminal "B") and C197B-1 (terminal "B").
Activate the starter and make sure the noise is caused by starter operation.
Is the noise caused by starter engagement?
Yes
REFER TO: Starter Drive Pinion and Flywheel Ring Gear Inspection (303-06B Starting System - 1.6 L EcoBoost (132 kW/180 L PS) - Sigma, General Procedures).
No
REFER TO: Engine (303-00 Engine System - General Information, Diagnosis and Testing). Continue diagnosis.
B10E5:11
For wiring diagrams and connector information, refer to Wiring Diagrams Cell 23.
Normal Operation and Fault Symptoms
The wake-up control circuit wakes the PCM before engine start. The PCM must wake up before the start request so it has time to complete its initialization. The wake-up control circuit is controlled by the BCM. The BCM activates the wake-up control circuit when: the driver door is open, the key is inserted into the ignition lock, or the ignition is ON or in the START position.
DTC Fault Trigger Conditions
Trouble Code
Description
Fault Trigger Conditions
B10E5:11
PCM Wake-Up Signal: Short to Ground
Set by the BCM when a short to ground is detected in the wake-up control circuit.
Possible Sources
BCM
PCM
Wiring, Terminals or Connectors
DIAGNOSTIC TEST C: B10E5:11
C1 CHECK THE PCM (POWERTRAIN CONTROL MODULE) FOR A SHORT TO GROUND
Ignition OFF.
Disconnect the PCM C1915B.
The ignition is on.
Using the diagnostic scan tool, clear the continuous diagnostic trouble codes (DTCs) from the BCM.
Using a scan tool, perform the BCM self-test.
Is BCM Diagnostic Trouble Code B10E5:11 present?
Yes
GO to C2
No
GO to C6
C2 CHECK THE PCM (POWERTRAIN CONTROL MODULE) WAKE-UP SIGNAL CIRCUIT FOR A SHORT TO VOLTAGE
Ignition OFF.
Disconnect C2280D.
The ignition is on.
Action: Click to display the connectors
Positive lead
Measurement/Action
Negative lead
C1915B-28
Ground
Is there voltage present?
Yes
REPAIR the circuit.
No
GO to C3
C3 CHECK THE PCM (POWERTRAIN CONTROL MODULE) WAKE-UP SIGNAL CIRCUIT FOR A SHORT TO GROUND
Ignition OFF.
Action: Click to display the connectors
Positive lead
Measurement/Action
Negative lead
C1915B-28
Ground
Is the resistance greater than 10000 Ohms?
Yes
GO TO C4
No
REPAIR the circuit.
C4 CHECK THE PCM (POWERTRAIN CONTROL MODULE) WAKE-UP SIGNAL CIRCUIT FOR AN OPEN
Ignition OFF.
Action: Click to display the connectors
Positive lead
Measurement/Action
Negative lead
C1915B-28
C2280D-9
Is the resistance less than 3 ohms?
Yes
GO to C5
No
REPAIR the circuit.
C5 CHECK THE BCM (BODY CONTROL MODULE) OPERATION
Ignition OFF.
Disconnect and inspect all BCM connectors.
Repair:
corrosion (install new connectors or terminals - clean the module contacts)
damaged or bent terminals/pins - install new terminals/pins
pushed-out pins - install new pins as necessary
Reconnect the BCM connectors. Make sure they are fully seated and locked.
Operate the system and determine if the concern is still present.
Is the concern still present?
Yes
CHECK OASIS for any applicable Technical Service Bulletins (TSBs). If a TSB exists for this condition, STOP this test and FOLLOW the TSB instructions. If no TSB resolves the condition, INSTALL a new BCM. REFER TO: Body Control Module (BCM) (419-10 Multifunction Electronic Modules, Removal and Installation).
No
The system is currently operating correctly. The concern may have been caused by module connections. ADDRESS the root cause of any connector or terminal issues.
C6 CHECK THE PCM (POWERTRAIN CONTROL MODULE) OPERATION
Ignition OFF.
Disconnect and inspect all PCM connectors.
Repair:
corrosion (install new connectors or terminals - clean the module contacts)
damaged or bent terminals/pins - install new terminals/pins
pushed-out pins - install new pins as necessary
Connect the PCM connectors. Make sure they are fully seated and locked.
Operate the system and determine if the concern is still present.
Is the concern still present?
Yes
CHECK OASIS for any applicable Technical Service Bulletins (TSBs). If a TSB exists for this concern, STOP this test and FOLLOW the TSB instructions. If no TSBs apply to this concern, Click here to access the guided routine (PCM).
No
The system is currently operating correctly. The concern may have been caused by module connections. ADDRESS the root cause of any connector or terminal issues.
Component Test(s)
Starter - Positive Circuit Test
Make sure the battery is fully charged. REFER TO: Battery Charging (414-01 Battery, Mounting and Cables, General Procedures).
Perform the battery drain test. REFER TO: Battery Drain Test (414-01 Battery, Mounting and Cables, General Procedures).
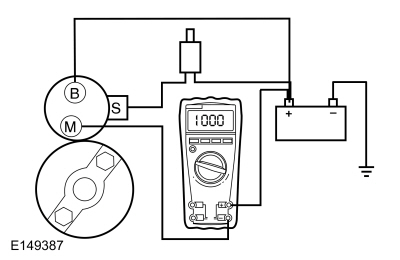
Connect a remote starter switch between the starter solenoid "S" terminal and the battery positive terminal.
Connect the positive lead of the digital multimeter to the positive battery terminal. Connect the negative lead to the starter solenoid terminal "M".
Place the transmission selector lever in the Park or Neutral position.
Activate the remote starter switch. Read and record the voltage. The voltage reading must be 0.5 volts or less.
If the voltage reading is 0.5 V or less, perform the Starter - Ground Circuit Test in this section.
If the voltage reading is above 0.5 volts, this indicates excessive resistance in the connections, the positive battery cable, or the starter solenoid. Disconnect the cables from the starter solenoid terminals "B", "S" and "M". Clean the cables and connections and reconnect the cables to the correct terminals. Repeat steps 3 through 6.
If the voltage reading is still greater than 0.5 volts when checking at terminal "M", move the negative lead of the digital multimeter to starter solenoid terminal "B" and repeat step 5.
If the voltage reading at terminal "B" is less than 0.5 volts, the problem is in the starter solenoid connections or the solenoid contacts. Install a new starter. REFER TO: Starter (303-06B Starting System - 1.6 L EcoBoost (132 kW/180 L PS) - Sigma, Removal and Installation).
If the voltage reading at solenoid terminal "B" is greater than 0.5 volts after cleaning the cables and connections at the solenoid, the problem is in the positive battery cable connection or in the positive battery cable itself. Clean the positive battery cable connection. If this does not resolve the concern, install a new positive battery cable.
Starter - Ground Circuit Test
Slow cranking can be caused by high resistance in the ground or the starter circuit. This procedure tests the voltage drop in the ground circuit.
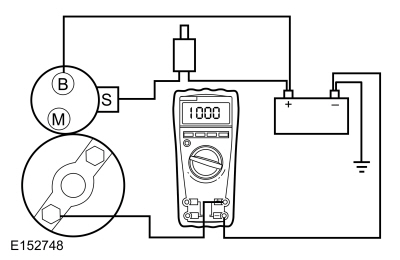
Connect a remote starter switch between the starter solenoid "S" terminal and the battery positive terminal.
Connect the positive lead of the digital multimeter to the starter housing (the connection must be clean, free of rust or grease). Connect the negative lead to the negative battery terminal.
Place the transmission selector lever in the Park or Neutral position.
Activate the remote starter switch and crank the engine. Read and record the voltage reading. The reading must be 0.5 volts or less.
If the voltage reading is greater than 0.5 volts, clean the negative battery cable connections at the battery, the body ground connections, and the starter ground. Retest.
If the voltage reading is greater than 0.5 volts, install a new negative battery cable. REFER TO: Battery Monitor Sensor (414-01 Battery, Mounting and Cables, Removal and Installation).
If the voltage reading is less than 0.5 volts and the engine still cranks slowly, install a new starter. REFER TO: Starter (303-06B Starting System - 1.6 L EcoBoost (132 kW/180 L PS) - Sigma, Removal and Installation).
?
Test yourself
A quick Ford Fiesta quiz: every answer comes with an explanation and a link to the manual page.
 BJB starter relay Pin 1


 Starter motor housing

 Click here to access the guided routine (PCM).