Powertrain
Halfshaft - LH - Removal and Installation
In this manual: Powertrain
11steps
~91min
5/5difficulty
5special tools
Done 0 of 11
Special Tool(s)
Material
Removal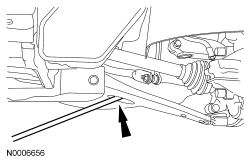
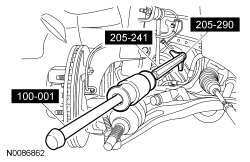
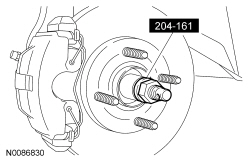
 |
Installer, Halfshaft 204-161 (T97P-1175-A) |
 |
Remover, Front Wheel Hub 205-D070 (D93P-1175-B) or equivalent |
 |
Remover, Halfshaft 205-241 (T86P-3514-A) |
 |
Remover, Halfshaft (Plate) 205-290 (T89P-3415-B) |
 |
Slide Hammer 100-001 (T50T-100-A) |
Material
| Item | Specification |
|---|---|
| Motorcraft® Full Synthetic Manual Transmission Fluid XT-M5-QS | WSD-M2C200-C |
| Motorcraft® MERCON® LV Automatic Transmission Fluid XT-10-QLV | MERCON® LV |
| Item | Part Number | Description |
|---|---|---|
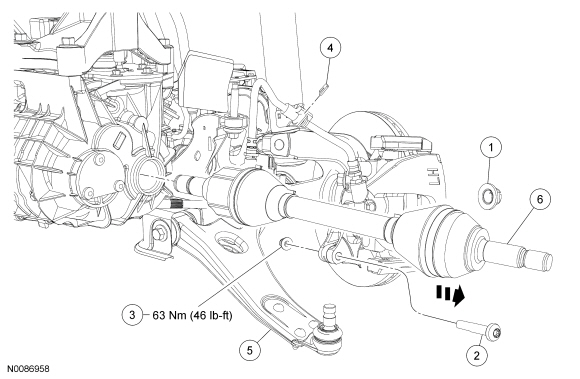
| 1 | 3B477 | Wheel hub nut |
| 2 | W712393 | Ball joint bolt |
| 3 | W520213 | Ball joint nut |
| 4 | — | Brake hose retainer |
| 5 | 3042 | Lower arm |
| 6 | 3A427 | LH halfshaft |
Removal
- With the vehicle in NEUTRAL, position it on a hoist. For additional information, refer to Section 100-02.
- Remove the LH wheel and tire. For additional information, refer to Section 204-04.
- Remove and discard the wheel hub nut.
- NOTICE: Do not use a prying device or separator fork between the ball joint and the wheel knuckle. Damage to the ball joint or ball joint seal may result. Only use the pry bar by inserting it into the lower arm body opening. NOTICE: Use care when releasing the lower arm and wheel knuckle into the resting position or damage to the ball joint seal may occur. Remove and discard the ball joint nut and bolt.
- Insert a pry bar in the lower arm body opening and separate the ball joint from the wheel knuckle.
- NOTICE: The inner joint must not be bent more than 18 degrees. The outer joint must not be bent more than 45 degrees. Damage to the halfshaft will occur.
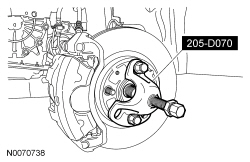
Using the Front Wheel Hub Remover, press out the halfshaft from the wheel hub and detach the LH halfshaft from the wheel hub.
- Support the halfshaft.
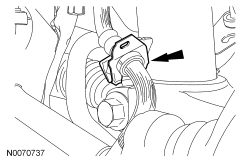
- Remove the brake hose retainer.
- Using the Slide Hammer, the extension from the Halfshaft Remover and the Halfshaft (Plate) Remover, remove the LH halfshaft from the transaxle.
- Remove and discard the halfshaft circlip.
- Install a new halfshaft circlip.
- NOTE: Make sure the snap ring is fully engaged by pulling on the joint housing.
Install the LH halfshaft into the transaxle.
- Using the Halfshaft Installer, install the LH halfshaft into the wheel hub.
- Install the brake hose retainer.
- NOTICE: Make sure the ball joint heat shield is installed on the ball joint stud or damage to the ball joint may occur.
Insert the ball joint stud into the wheel knuckle and install a new bolt and nut.
- Tighten to 63 N·m.
- NOTICE: Do not tighten the wheel hub nut with the vehicle on the ground. The nut must be tightened to specification before the vehicle is lowered onto the wheels. Wheel bearing damage will occur if the wheel bearing is loaded with the weight of the vehicle applied. NOTICE: Install and tighten the new wheel hub nut to specification in a continuous rotation. Always install a new wheel hub nut after loosening or when not tightened to specification in a continuous rotation or damage to the components may occur. NOTE:
Apply the brake to keep the halfshaft from rotating.
Install a new wheel hub nut.- Tighten to 270 N·m in a continuous rotation.
- Install the LH wheel and tire. For additional information, refer to Section 204-04.
- Top off the transmission fluid level.
Test yourself
A quick Ford Focus quiz: every answer comes with an explanation and a link to the manual page.
Was this page helpful?