Turbocharger. Removal and Installation
Special Service Tools / General Equipment
Hose Clamp Removal/Installation Tool
Materials
| Name | Specification |
|---|---|
| Motorcraft® Brake Parts Cleaner PM-4-A, PM-4-B |
- |
Removal
NOTICE: Turbocharger compressor blades can be damaged by even the smallest particles. When removing any turbocharger or engine air intake system component, make sure that no debris enters the system. Failure to do so may result in damage to the turbocharger.
- Remove the air cleaner outlet pipe.
Refer to: Air Cleaner Outlet Pipe (303-12A Air Distribution and Filtering - 1.5 L EcoBoost (118 kW/160 L PS) - I4, Removal and Installation). - Remove the air cleaner.
REFER TO: Air Cleaner Element (303-12A Intake Air Distribution and Filtering - 1.5 L EcoBoost (118 kW/160 L PS) - I4, Removal and Installation). - Remove the CAC inlet tube attaching bolt.
Torque: 71 lb-in (8 N·m)
- Loosen the CAC inlet tube clamp, then disconnect the CAC inlet tube.
- Loosen the TC bypass hose clamp, then disconnect the TC bypass hose.
- Disconnect the TC bypass solenoid valve and the IAT sensor electrical connectors.
- Disconnect the wiring harness clips.
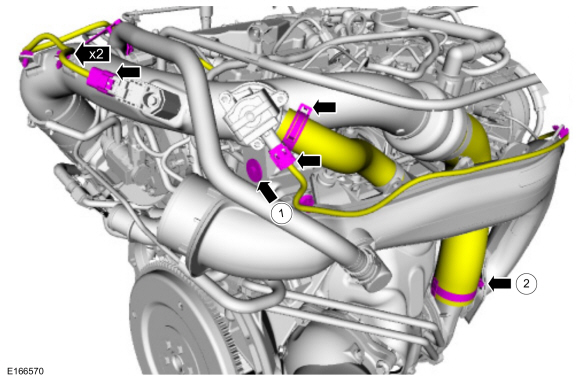
- Remove the CAC inlet tube attaching bolt.
- Loosen the TC outlet duct clamp.
Torque: 44 lb-in (5 N·m)
- 2. Squeeze the sides of the coupling and disconnect the vacuum tube.
- Disconnect the PCV tube quick-connect coupling.
Refer to: Quick-Connect Couplings (310-00A Fuel System - General Information - 1.5 L EcoBoost (118 kW/160 L PS) - I4, General Procedures).
- Disconnect the IAT2 sensor electrical connector and remove the TC air outlet tube.
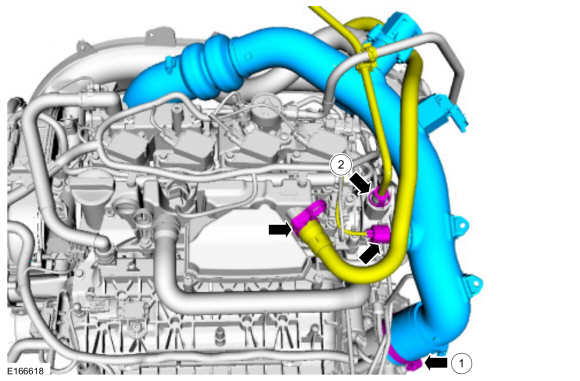
- Loosen the TC outlet duct clamp.
- Loosen the TC air inlet tube clamp.
Torque: 44 lb-in (5 N·m)
- 2. Remove the TC air inlet tube bolts.
- Disconnect the wiring harness clips and remove the TC air inlet tube.
Torque: 71 lb-in (8 N·m)
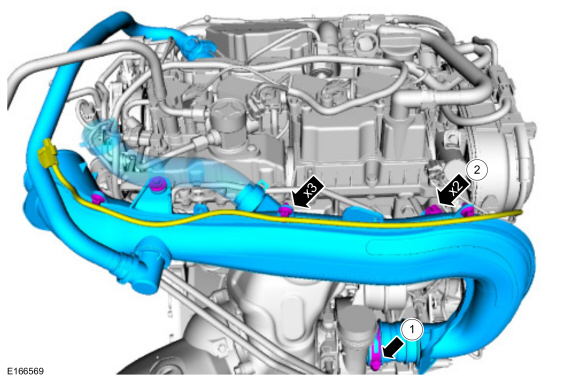
- Loosen the TC air inlet tube clamp.
- Remove the catalytic converter.
Refer to: Catalytic Converter (309-00A Exhaust System - 1.5 L EcoBoost (118 kW/160 L PS) - I4, Removal and Installation). - Drain the cooling system.
Refer to: Engine Cooling System Draining, Vacuum Filling and Air Bleeding (303-03A Engine Cooling — 1.5 L EcoBoost (118 kW/160 L hp) — I4, General Procedures). - Disconnect the TC coolant hose clamps and move the TC coolant hoses aside.
- Remove the TC coolant tube bracket bolt.
Torque: 97 lb-in (11 N·m)
- Remove the TC coolant tube bracket bolt.
Torque: 17 lb-ft (23 N·m)
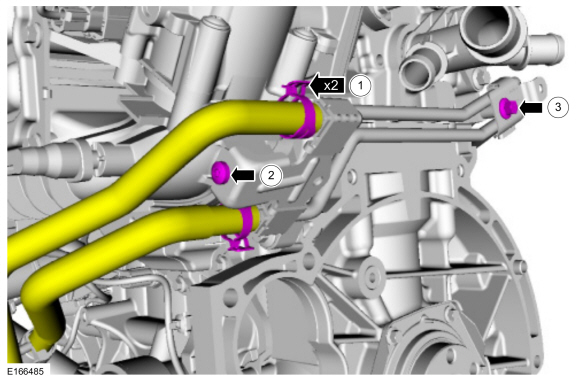
NOTICE: Do not use a wire brush; damage to the sealing area will cause leaks.
Carefully use a nylon brush to remove the old O-ring residue, and use brake cleaner to flush the O-ring residue from the turbocharger pipe to the engine O-ring bore. Inspect the area for deep scratches and gouges.
- Disconnect the TC coolant tube bolt from the TC.
Torque: 89 lb-in (10 N·m)
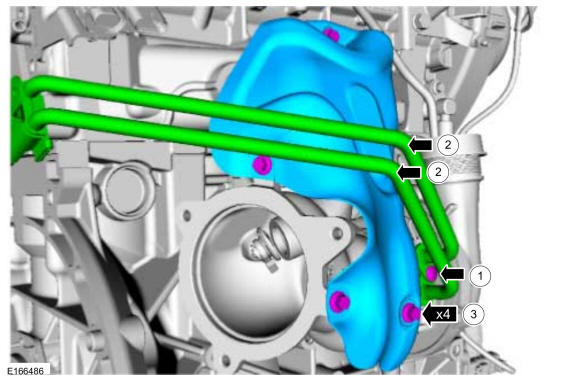
- Remove the TC coolant tubes.
Material: Motorcraft® Metal Surface Brake Parts Cleaner / PM-4-A, PM-4-B
- Remove the TC heat shield bolts, then remove the TC heat shield.
Torque: 89 lb-in (10 N·m)
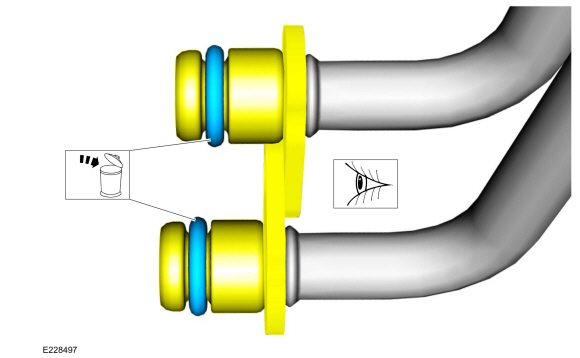
NOTICE: Do not use a wire brush; damage to the sealing area will cause leaks.
Inspect the turbocharger tube and seal surfaces. Make sure the retaining clip is not bent, and check the retaining clip is perpendicular to the O-ring seal area. Use brake parts cleaner and a nylon brush to clean.
- Remove and discard the TC coolant tube O-rings.
Material: Motorcraft® Metal Brake Parts Cleaner / ESR-M14P4-A, ESR-M14P4-B
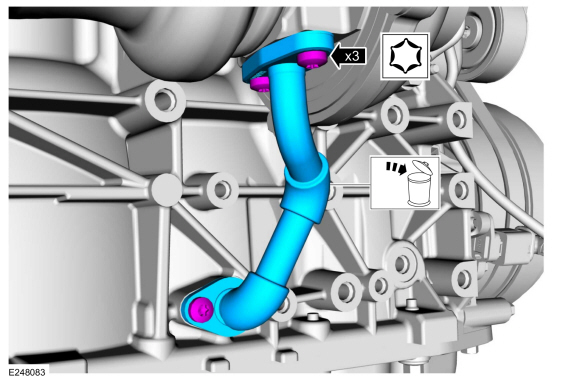
- Remove the TC oil return tube with the TC bolts.
- Remove the TC oil drain tube from the cylinder block bolt, then remove and discard the TC oil drain tube.
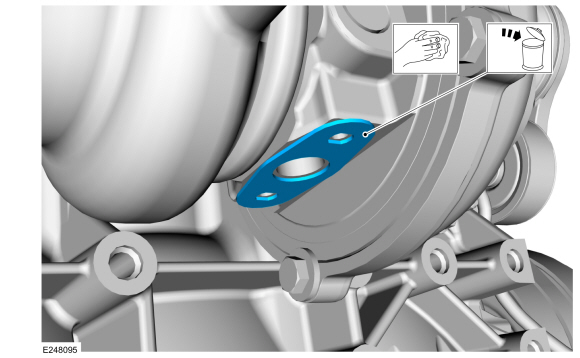
- Remove and discard the TC oil return tube gasket. Clean the sealing surface.
- Disconnect the TC wastegate control hose.
Use common equipment: hose clamp removal and installation tool.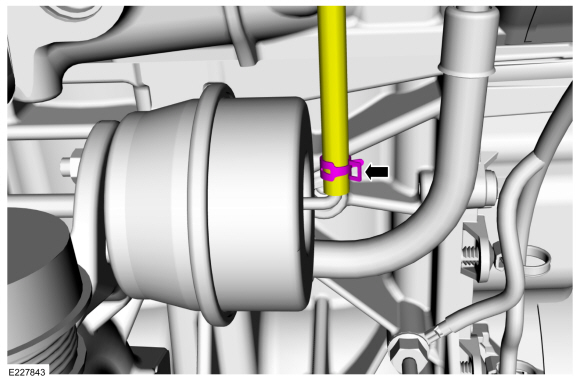
- Remove the TC oil feed tube bolt, then disconnect the TC oil feed tube.
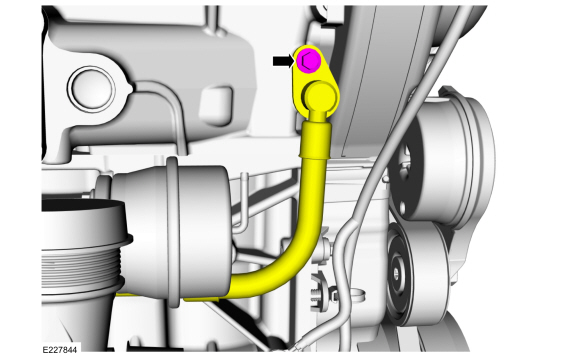
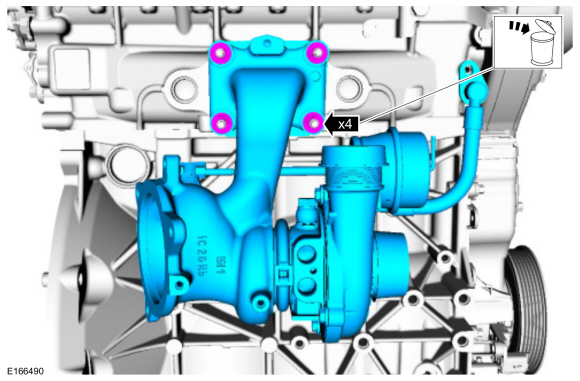
- Remove and discard the TC nuts. Remove the TC.
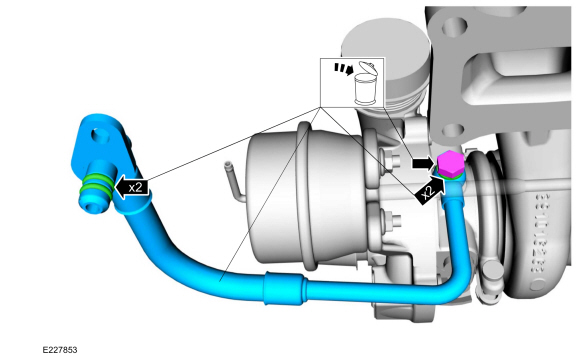
- Remove and discard the TC oil supply tube assembly, including the bolt, sealing washers and O-rings.
Installation
NOTICE: Make sure that the mating surfaces are clean and free of foreign material.
NOTICE: Do not use a wire brush; damage to the sealing area will cause leaks.
- Carefully use a nylon brush to remove the old O-ring residue, and use brake cleaner to flush the O-ring residue from the turbocharger O-ring bore. Inspect the area for deep scratches and pitting.
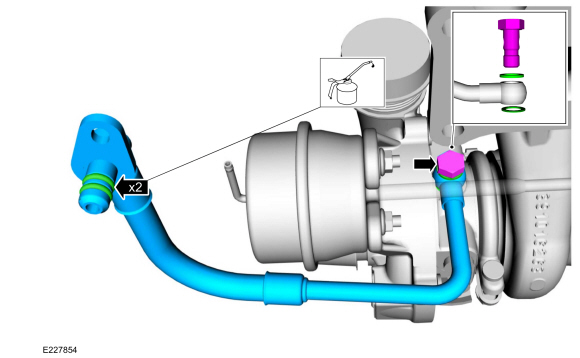
- Install a new TC oil feed tube assembly, including a new bolt, new washer seal and new O-rings. Lubricate the new O-rings with clean engine oil.
Material: Motorcraft® Metal Surface Brake Parts Cleaner / PM-4-A, PM-4-B
Torque: 19 lb-ft (26 N·m)
- Replace the TC mounting studs and gasket.
Torque: 89 lb-in (10 N·m)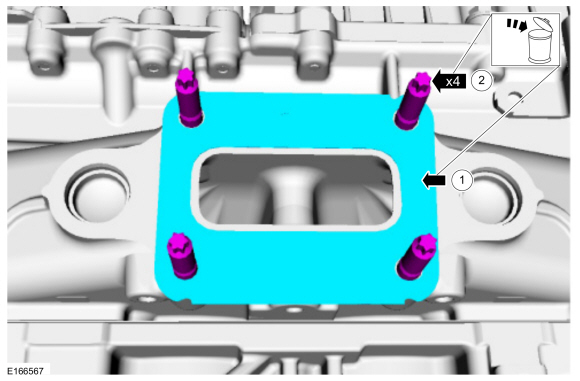
- Install the TC and tighten the TC mounting nuts in the sequence shown.
Torque:
Stage 1: Tighten in sequence to: 62 lb-in (7 N·m)
Stage 2: Tighten in sequence to: 124 lb-in (14 N·m)
Stage 3: Tighten in sequence to: 17 lb-ft (23 N·m)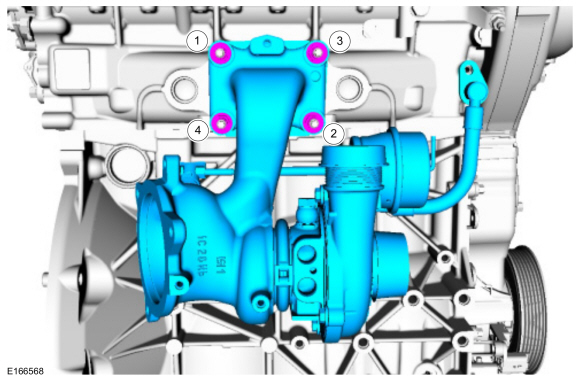
NOTICE: When installing the oil feed pipe, the sleeve on the oil feed pipe must be fully seated into the cylinder head with both O-rings inserted before the fasteners are tightened.
Install the TC oil feed tube, then install and tighten the TC oil feed tube bolt.
Torque: 89 lb-in (10 N·m)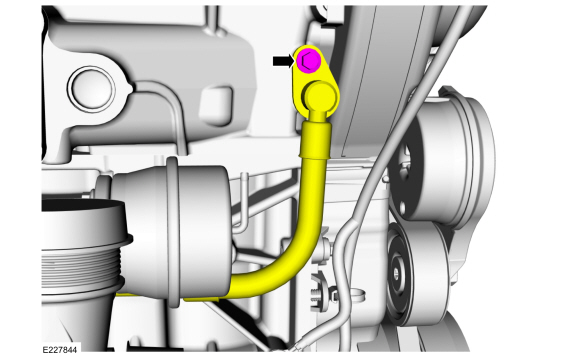
- Connect the TC wastegate control hose.
Use common equipment: hose clamp removal and installation tool.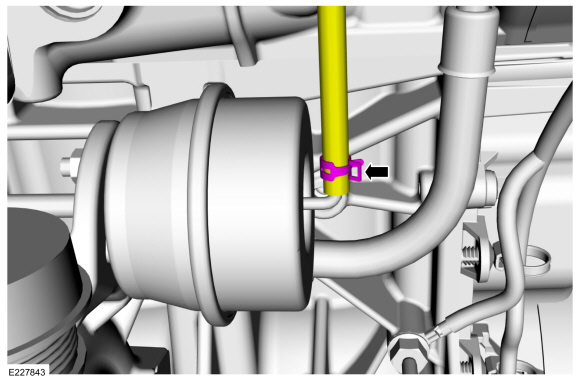
- Install a new TC oil drain tube gasket. Lubricate the O-ring with clean engine oil.
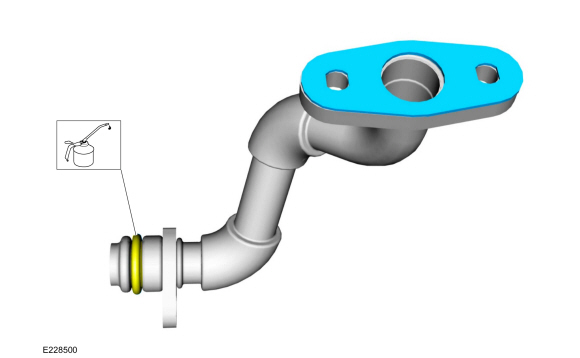
NOTICE: Do not use a wire brush; damage to the sealing area will cause leaks.
- Carefully use a nylon brush to remove the old O-ring residue, and use brake cleaner to flush the O-ring residue from the turbocharger pipe to the engine O-ring bore. Inspect the area for deep scratches and gouges.
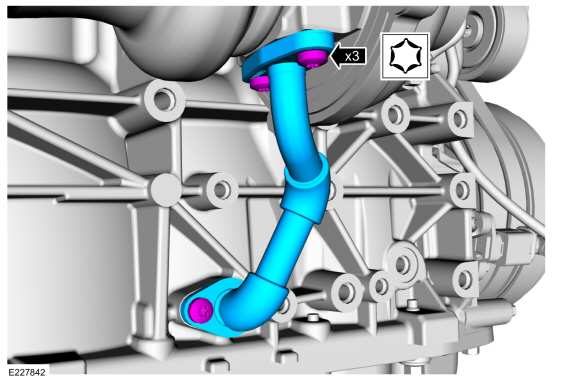
- Install a new turbocharger oil drain tube, then install and tighten the turbocharger oil drain tube bolts.
Material: Motorcraft® Metal Surface Brake Parts Cleaner / PM-4-A, PM-4-B
Torque: 89 lb-in (10 N·m)
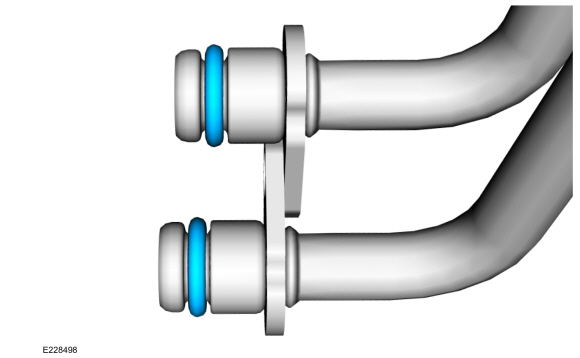
- Install new turbocharger coolant tube O-rings, then lubricate them with clean engine coolant.
- To install, reverse the removal procedure.
Test yourself
A quick Ford Fusion quiz: every answer comes with an explanation and a link to the manual page.