Disassembly and Assembly of Subassemblies
Cylinder Head
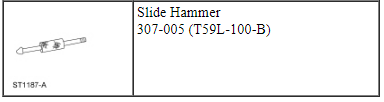
Special Tool(s)

Material

Disassembly
NOTICE: During engine repair procedures, cleanliness is extremely important. Any foreign material, including any material created while cleaning gasket surfaces, that enters the oil passages, coolant passages or the oil pan can cause engine failure.
NOTICE: Aluminum surfaces are soft and can be scratched easily. Never place the cylinder head gasket surface, unprotected, on a bench surface.
NOTE: If the components are to be reinstalled, mark the location of the components removed, they must be installed in the same location.
- NOTE: RH shown, LH similar.
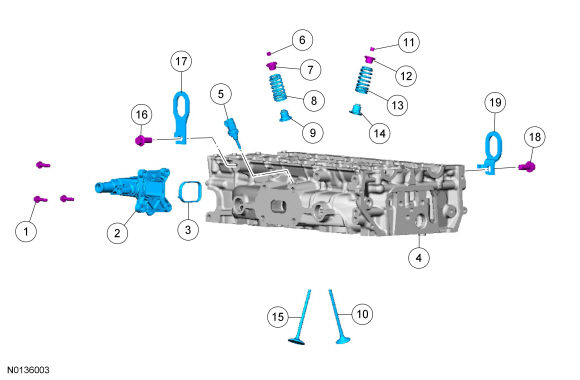
Remove the 2 bolts and the LH and RH engine lift eyes.
- Remove the 3 bolts and the coolant outlet and gasket.
- Remove and discard the CHT sensor.
- NOTE: Place all parts in order to one side.
Remove the valve spring.
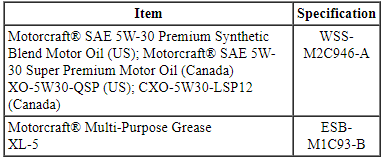
- Using the Valve Spring Compressors, compress the valve spring and remove the valve collet, using some multi-purpose grease and a small screwdriver.
- Remove the valve spring retainer and the valve spring.
- Inspect the valve springs. For additional information, refer to Section 303-00.
- Remove and discard the valve seal.
- Position the Valve Stem Oil Seal Remover and Slide Hammer over the seal.
- Pull up on the Slide Hammer and Valve Stem Oil Seal Remover and remove the seal.
- NOTE: Mark each valve location if the original valves are to be used.
Remove the valves.
- Inspect the valves. For additional information, refer to Section 303-00.
Assembly
- NOTE: If installing the original valves, make sure the valves are installed in the same position from which they were removed.
Coat the valve stems with clean engine oil and install the valves.
- NOTE: Lubricate the valve seal with clean engine oil prior to installing.
Using the Valve Stem Oil Seal Installer, install the valve seal.
- NOTE: Check the seating of the valve collet.
Install the valve spring and the valve spring retainer.
- Compress the valve spring and install the valve collet using some grease and a small screwdriver.
- Install a new CHT sensor.
- Tighten to 11 N·m.
- Inspect the gasket and replace if necessary.
- Install the gasket, coolant outlet and the 3 bolts.
- Tighten to 10 N·m.
- NOTE: RH shown, LH similar.
Install the LH and RH engine lift eyes and the 2 bolts.
- Tighten to 47 N·m.
Piston
Material


Disassembly
NOTE: If the piston and connecting rod are to be reinstalled, they must be assembled in the same orientation. Mark the piston orientation to the connecting rod reassembly.
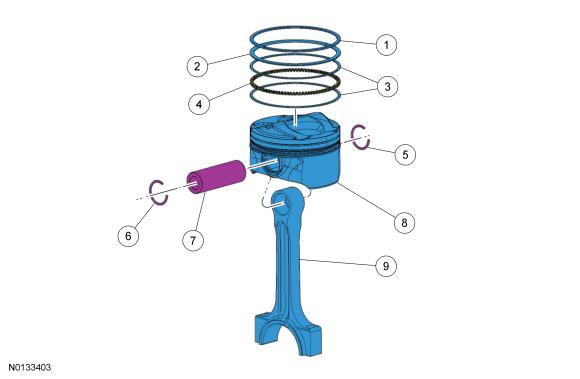
- Remove and discard the piston rings.
- Remove and discard the 2 piston pin retainers.
- Remove the piston pin.
- Separate the piston from the connecting rod.
- Clean and inspect the piston and connecting rod. For additional information, refer to Section 303-00.
Assembly
- Align the piston-to-connecting rod orientation marks and position the piston on the connecting rod.
- NOTE: Lubricate the piston pin and pin bore with clean engine oil.
Install the piston pin in the piston and connecting rod assembly.
- Install the 2 new piston pin retainers in the piston.
- NOTE: Lubricate the piston and the new piston rings with clean engine oil.
Install the piston rings on the piston.
- Align the piston rings on the piston.
- Upper oil control segment ring gap location
- Oil control spacer gap location
- Lower oil control segment ring gap location
Test yourself
A quick Ford Taurus quiz: every answer comes with an explanation and a link to the manual page.