Driveshaft
SPECIFICATIONS
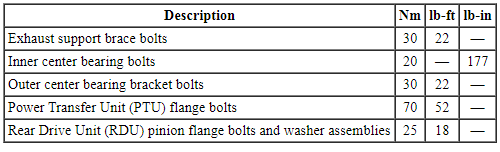
Torque Specifications
DESCRIPTION AND OPERATION
Driveshaft
NOTE: All driveshaft assemblies are balanced. If undercoating the vehicle, protect the driveshaft to prevent overspray of any undercoating material.
The driveshaft assembly consists of the following:
- Rubber-isolated center support bearing
- CV joints at each end of the shaft
- U-joint at the center support
- Assembly balanced with traditional balance weights
- Lubed-for-life joints requiring no periodic lubrication
- Unique bolt and washer assembly for the rear CV joint
The driveshaft transfers torque from the Power Transfer Unit (PTU) to the rear axle. It is attached to the PTU flange with a CV joint. The 2-piece shaft is connected by a staked U-joint located rearward of the driveshaft center bearing and attached to the Rear Drive Unit (RDU) at the active torque coupling. The driveshaft joints allow the smooth continuous rotation of the driveshaft through the allowable angle planes and length variations required in normal vehicle operation. The driveshaft is always turning at front wheel speed. The driveshaft is not serviceable. A new driveshaft must be installed if worn or damaged.
REMOVAL AND INSTALLATION
Driveshaft
Driveshaft
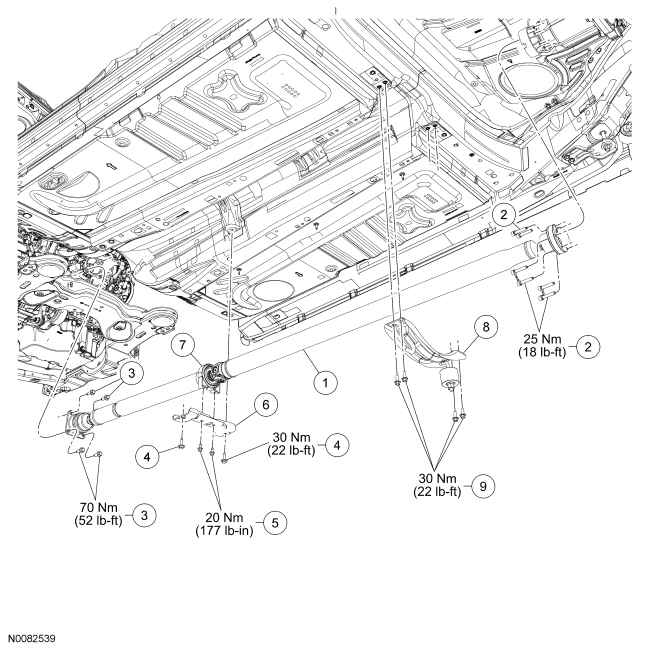
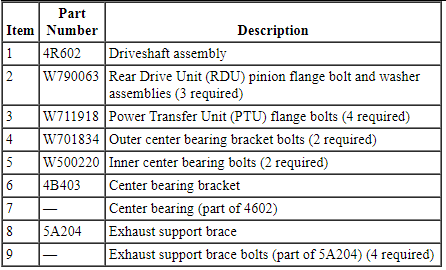
Removal and Installation
NOTE: Index-mark both driveshaft flanges.
- With the vehicle in NEUTRAL, position it on a hoist. For additional information, refer to Section 100-02.
- Remove the muffler and tailpipe. For additional information, refer to Section 309-00.
- Remove the 4 exhaust support brace bolts and the exhaust brace.
- To install, tighten to 30 N·m.
- NOTICE: Do not reuse the bolt and washer assemblies for the rear Constant Velocity (CV) joint flange. Install new assemblies or damage to the vehicle may occur.
Remove and discard the 3 Rear Drive Unit (RDU) pinion flange bolt and washer assemblies.
- To install, tighten to 25 N·m.
- Separate the driveshaft CV flange from the RDU flange using a flat-blade screwdriver in the area shown.
- NOTICE: Do not reuse the Constant Velocity (CV) joint bolts. Install new bolts or damage to the vehicle may occur.
Remove and discard the 4 Power Transfer Unit (PTU) flange bolts.
- To install, tighten to 70 N·m.
- Using a suitable prybar as shown, separate the driveshaft flange from the PTU flange.
- With the help of an assistant, remove the 2 outer center bearing bracket bolts and the driveshaft.
- To install, tighten to 30 N·m.
- If necessary, remove the 2 inner center bearing bolts and remove the bracket.
- To install, tighten to 20 N·m.
- NOTE: If a driveshaft is installed and driveshaft vibration is encountered after installation, index the driveshaft. For additional information, refer to Section 205-00.
To install, reverse the removal procedure.
Test yourself
A quick Ford Taurus quiz: every answer comes with an explanation and a link to the manual page.