Electrical
Removal and Installation
In this manual: Electrical
21steps
~126min
4/5difficulty
Done 0 of 21
Generator - 2.0L GTDI
Removal
- Disconnect the battery. For additional information, refer to Section 414-01.
- Remove the upper Charge Air Cooler (CAC) pipe. For additional information, refer to Intake Air System Components - Exploded View in Section 303-12.
Installation
- Position the generator and hand-tighten the 3 bolts. Tighten in the sequence shown.
- Tighten to 25 N·m.
- Tighten to 15 N·m.
- Tighten to 17 N·m.
- Install the upper Charge Air Cooler (CAC) pipe. For additional information, refer to Intake Air System Components - Exploded View in Section 303-12.
- Connect the battery. For additional information, refer to Section 414-01.
Generator - 3.5L GTDI, 3.5L Ti-VCT, 3.7L Ti-VCT
Removal
All vehicles
- Disconnect the battery. For additional information, refer to Section 414-01.
Radial arm removal only
NOTE: If equipped, the radial arm adapter is a serviceable item. Do not remove the generator if the radial arm adapter is the only concern.
Vehicles equipped with a 3.5L Ti-VCT or 3.7L Ti-VCT engine
- Remove the cooling fan assembly. For additional information, refer to Section 303-03.
Vehicles equipped with a 3.5L GTDI engine
- Remove the A/C compressor. For additional information, refer to Section 412-01.
All vehicles
Installation
Radial arm installation only
- Tighten to 9 N·m.
- Tighten to 17 N·m.
All vehicles
- Tighten to 8 N·m.
- Tighten to 47 N·m.
- Tighten to 47 N·m.
- Tighten to 17 N·m.
Vehicles equipped with a 3.5L GTDI engine
- Install the A/C compressor. For additional information, refer to Section 412-01.
Vehicles equipped with a 3.5L Ti-VCT or 3.7L Ti-VCT engine
- Install the cooling fan assembly. For additional information, refer to Section 303-03.
All vehicles
- Connect the battery cable. For additional information, refer to Section 414-01.
Generator Clutch
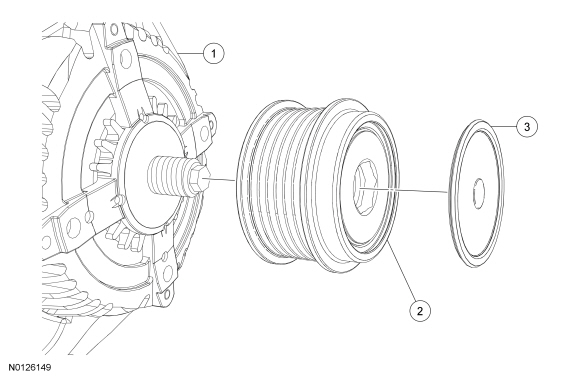

Removal
NOTE: This procedure only applies to the 2.0L GTDI.
- Remove the generator. Refer to Generator - 2.0L GTDI.
- Using a small screwdriver or similar tool, insert the tool through the soft rubber area on the center of the pulley cap and pry off the cap. Discard the cap.
- NOTICE: Do not insert anything into the fins of the generator to prevent the rotor inside the generator from turning. Inserting items into the generator could result in damage to the generator.
NOTE: The shaft and rotor will turn during removal.
Insert a 17 mm hex tool into the clutch pulley. Install an impact gun onto the hex tool and use the impact gun to remove the clutch pulley. A couple of short bursts with the impact gun will remove the clutch pulley.
Installation
- Hand start the clutch pulley onto the generator shaft.
- Insert a 17 mm hex tool into the clutch pulley and install a 17 mm, 55 lb-ft torque stick on the hex tool.
- NOTICE: Do not insert anything into the fins of the generator to prevent the rotor inside the generator from turning. Inserting items into the generator could result in damage to the generator.
NOTE: The shaft and rotor will turn during installation.
While holding the outer diameter of the clutch pulley, torque the clutch pulley using the impact gun and the 17 mm, 55 lb-ft torque stick for 3-4 seconds. This makes sure the proper torque has been applied.- Tighten to 75 N·m.
- Install a new cap onto the pulley with the rubber button facing inwards.
- Install the generator. Refer to Generator - 2.0L GTDI.
Test yourself
A quick Ford Taurus quiz: every answer comes with an explanation and a link to the manual page.
Was this page helpful?