Remove the engine cover. (Refer to Engine Mechanical System - "Engine Cover")
Remove the air cleaner assembly and air duct. (Refer to Engine Mechanical System - "Air Cleaner")
Remove the battery and battery tray. (Refer to Engine Electrical System - "Battery")
Disconnect the solenoid valve connector (B) and the lock switch connector (A).
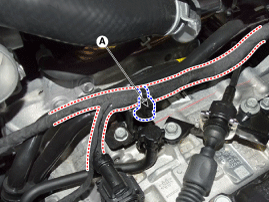
Remove the wiring clips (A).
Remove the wiring clips (A).
Remove the control cable (C) by removing the nuts (A) and bolts (B). Tightening torque: (B) 14.7 ~ 22 N·m (A) 9.8 ~ 13.7 N·m
Remove the ground line after removing the bolts (A).
Disconnect the ATF hose (A) from the heater pipe.
Remove the bolts (B) and (C).
Disconnect the heater pipe (D).
Carefully install the clamp so as not to damage the hose.
Install the clamp in the correct direction so that it does not interfere with other parts.
After installation, start the engine and check the hose for leaks.
Remove the upper case cover. (Refer to Case - "Upper Case Cover")
Assemble the engine support fixture (beam No.: 09200-38001 or 09200-3N000, support No.: 09200-2S000, adapter No.: 09200-2W000). (Refer to Special Service Tools - "Engine Support Fixture Assembly Drawing")
Using the engine support fixture (A), securely support the engine and transaxle assembly.
Remove the upper transaxle mounting bolts (A - 2 pcs) and the starter mounting bolts (B - 2 pcs). Tightening torque: (A) 42.2 ~ 54 N·m (B) 49.0 ~ 64 N·m
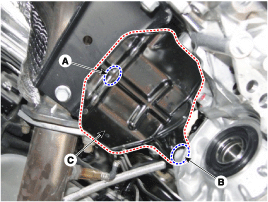
Remove the automatic transmission mounting bracket cover (A).
Loosen the mounting bolts (A) of the automatic transmission support bracket.
Tightening torque: 88.3 ~ 108 N·m
Remove the automatic transmission support bracket (A).
Tightening torque: 58.8 ~ 78 N·m
Raise the vehicle using a jack.
Remove the under cover. (Refer to Engine Mechanical System - "Engine Room Under Cover")
Remove the drive shaft assembly. (Refer to Drive Shaft and Axle - "Front Drive Shaft")
Remove the heat protector (C) by removing the bolts (A) and (B). Tightening torque: (A) 11.8 ~ 13.7 N·m (B) 21.6 ~ 26 N·m
Remove the dust cover (A).
Tightening torque: 42.2 ~ 48 N·m
Remove the torque converter mounting bolts (A) while turning the crankshaft.
Tightening torque: 45.1 ~ 52 N·m
Remove the roller rod bracket (C) after removing the bolts (A) and (B). Tightening torque: Bolt (B): 107.9 ~ 128 N·m Bolt (A): 49.0 ~ 69 N·m
Remove the roller guide support bracket (D).
Tightening torque: 49.0 ~ 64 N·m
Remove the automatic transmission using a jack after loosening the mounting bolts (A, B). Tightening torque: (A) 42.2 ~ 54 N·m (B) 42.2 ~ 48 N·m
Be careful not to damage other systems or nearby parts when removing the transmission assembly.
Installation
To install, reverse the removal procedure.
Perform the separate procedures below when reinstalling or replacing the automatic transmission.
When reinstalling the transmission.
Replace the seal with a new one if ATF leaked due to damage to the differential seal.
When installing the new seal, use the special service tools (SST No.: 09452-26100, 09231-H1100).
Check the ATF level after adding fluid to the automatic transmission. (Refer to Hydraulic System - "Fluid")
Erase the diagnostic trouble codes (DTC) using GDS.
Even if the negative battery cable is disconnected, DTCs will not be erased. Therefore, be sure to erase the DTCs using GDS.
When replacing with a new automatic transmission.
The new automatic transmission is already filled with the specified amount of ATF. For this reason, it is not necessary to fill and check the ATF, but any remaining ATF inside the ATF cooler must be removed.
Connect the air blow gun to the ATF cooler hose (A).
Place a container under the ATF cooler hose (B).
Remove the remaining ATF by blowing air through the ATF cooler hose (A).
Connect the ATF cooler hoses (A) and (B).
Erase the diagnostic trouble codes (DTC) using GDS.
Even if the negative battery cable is disconnected, DTCs will not be erased. Therefore, be sure to erase the DTCs using GDS.
Reset the automatic transmission adaptive values using GDS.
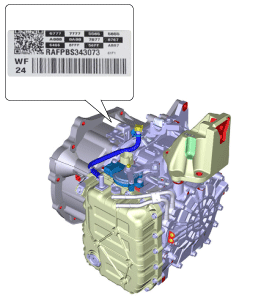
Perform the oil pressure characteristic input procedure. • Location of the oil pressure characteristic (barcode)• Oil pressure characteristic input (transmission replacement)
Perform the procedure to store the TCM adaptive values. (Refer to "Automatic Transmission Control System - Repair Procedures")
?
Test yourself
A quick Hyundai Elantra AD quiz: every answer comes with an explanation and a link to the manual page.